Images add visual appeal to reports. You can add a company logo or pictures of merchandise, or use icons instead of text labels. These images can originate from a file system, a web server, or a data source. Images are often used as decoration, but you can also use them as data. A product database, for example, might contain images of each item. If you create a report with product information, you can add product images to the report.
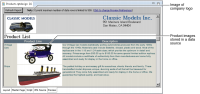
Figure 6‑18 shows a report that displays two types of images: a static image of a company logo, and dynamic images stored in a database.
Figure 6‑18 Report displaying two types of images
BIRT supports the following types of image files: BMP, GIF, ICO, JFIF, JPE, JPEG, JPG, PNG, TIF, and TIFF. To display an image, insert the image element in your report. You have four choices when inserting an image. You can:
Link the image from any location to the report.
Link the image from the BIRT resource folder to the report. The resource folder is a central location for external files used by reports. Rather than link images from various locations, you may find it more convenient to store all image files in the resource folder because packaging resource files for deployment is much easier.
Embed the image in the report.
Refer to the data set field that contains the images.
Use one of the first three methods to display a specific, or static, image. Typically, you display a static image once, so you insert the image directly on the report page, in a grid cell, or in the header row of a table. Use the fourth method to display a set of images returned by a data set. In this case, you probably want to display all the images in the data set field, so insert the image element in the detail row of a table.
When displaying a static image, decide whether to link or embed the image. Visually, there is no difference between a linked image and an embedded image. The difference is how changes to the image file affect what the report displays. If you link the image, any change to the original image file is reflected in the report. If you embed the image, changes to the original image file have no effect on the image that appears in the report. Use the guidelines in Table 6‑5 to determine whether to link or embed an image in a report.
Table 6‑5 Guidelines for linking and embedding images
When to link
When to embed
You expect to modify the original image, and you want the report to reflect future changes.
You expect to modify the original image, but you do not want the report to reflect future changes.
You do not expect to move or delete the original image file. Moving or deleting the image file breaks the link.
The original image file might be moved or deleted without your knowledge.
How to insert a linked image
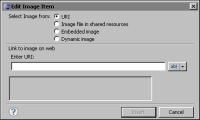
1 Drag the image element from the palette, and drop it in the desired location on the page. Edit Image Item appears, as shown in Figure 6‑19.
Figure 6‑19 Edit Image Item dialog
2 To link to an image stored in the resource folder:
1 In Select Image from, select Image file in shared resources.
2 Choose Browse to find the image file in the designated resource folder.
3 Select the image file, and choose OK.
4 Choose Insert to insert the image in the report.
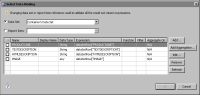
3 To link to images for which URIs are stored in a database, use the following procedure. The procedure assumes you have already created a data set that includes the field, which stores the URIs to the images.
1 In Edit Image Item, in Select Image from, select URI.
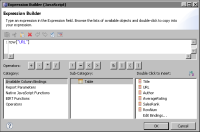
2 Under Enter URI, choose the expression builder button.
3 In the expression builder, select the data set field that stores the locations of the images, then choose OK. Figure 6‑20 shows an example of selecting a data set field named URL, which stores the URLs to images.
In Edit Image Item, Enter URI displays the expression that refers to the data set field.
Figure 6‑20 The expression builder showing a selected data set field that stores the URLs to images
4 Choose Insert to insert the image in the report.
4 To link to an image stored in any other location:
1 In Edit Image Item, in Select Image from, select URI.
2 Under Enter URI, specify the location of the image file, using one of the following methods:
To type a specific URL, choose the arrow button next to the expression builder button, and choose Constant. Type the URL.
The following is an example of a URL for a file in a remote location:
http://mysite.com/images/companylogo.jpg
The following is an example of a URI for a file that is on the local file system:
file:///c:/myprojects/images/companylogo.jpg
Specify a local file system location only for testing in the early stages of report development. A deployed report cannot access resources on a local machine.
To specify an expression that evaluates to a URL at report run time, choose the expression builder button to construct the expression.
3 Choose Insert to insert the image in the report.
How to insert an embedded image
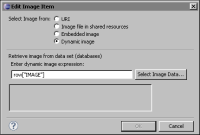
1 Drag the image element from the palette, and drop it in the desired location on the page.
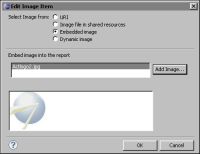
2 In Edit Image Item, in Select Image from, select Embedded image. If you previously inserted an image, Edit Image Item displays the name and a preview of that image, as shown in Figure 6‑21.
Figure 6‑21 Edit Image Item showing embedded image name
3 To embed a new image, choose Add Image.
4 In Open Image File, find and select the image to embed, then choose Open. Edit Image Item displays the image.
5 Choose OK. The image appears on the page.
How to insert images that are stored in a data source
1 In Data Explorer, create a data set that includes the image field.
2 In the layout editor, insert a table element on the page.
3 Bind the table to the data set in the following manner:
1 Select the table and, in Property Editor, choose Binding.
2 In the Binding page, in Data Set, choose the data set that contains the image field. BIRT creates a column binding for each field in the data set.
4 Drag the image element from the palette, and drop it in the detail row of the table.
5 In Edit Image Item, select Dynamic image.
6 Choose Select Image Data. Select Data Binding displays the column bindings available to the image element, as shown in Figure 6‑22. The image element has access to all the column bindings defined for the table, its container.
Figure 6‑22 Select Data Binding showing column bindings
7 Select the column binding that references the image field by clicking the check box next to the column binding. Choose OK.
In Edit Image Item, under Enter dynamic image expression, an expression that refers to the selected column binding appears, as shown in Figure 6‑23.
Figure 6‑23 Edit Image Item showing the dynamic image expression
8 Choose OK. The image element appears on the page in the layout editor. It shows an X. The actual images appear only when the report is generated.
Resizing an image
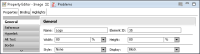
The image element displays an image at its actual size. If you cannot change the size of the original image, you can resize the image element in the report. Note, however, that images are designed to appear optimally at a specific size. Resizing an image in the report typically results in the degradation of its appearance.
To resize an image, select the image element, then in Property Editor, select General. Specify a width and height for the image element. Typically, you want to resize an image so that its aspect ratio is maintained to avoid stretching the graphic out of proportion. To maintain an image’s aspect ratio, specify the width and height as a percentage of the original size. For example, setting both the width and height to 80%, as shown in Figure 6‑24, reduces the image size to 80% of the original size.
Figure 6‑24 Setting the width and height of an image element