A template can contain any report element, such as data sources, data sets, master pages, and any type of report item. BIRT Report Designer provides two ways to create a template. The creation options are:
Creating an empty template
From the main menu, choose File➛New➛Template. Then, design the template in the same way as a report design. Use this technique if you have no existing report designs that have the required structure.
Creating a template from an existing report design
Open the report design. From the main menu, choose File➛Register Template with New Report Wizard. Use this technique if you have an existing report design that has the structure that you need.
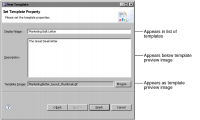
When you create a template, BIRT prompts for template-specific properties. Figure 29‑27 shows the properties and describes where they appear in the New Report wizard when a report developer creates a new report. The only required property is Display Name.
Figure 29‑27 Template-specific properties
When you create a template from a report design, the default image is the image from the template that you use to create the design. You can change the default image to a thumbnail by setting the template’s Preview Image property in Property Editor.
Designing template report items
After you develop the structure of a template, you can choose to identify some or all of the items in the layout as template report items. When a report developer uses the template to create a report design, a template report item in the layout has a standard appearance and contains an informational message. Double‑clicking the template report item activates the item as a standard report item and its appearance changes to match the properties that you set when you designed the template.
A template can contain both template report items and normal report items. Use template report items for items that you want the report developer to modify for the new report design. Use normal report items for items that the report developer does not need to change.
Typically, you first set simple report items, such as data elements inside a table element, to be template report items. Next, make the container into a template element, with overall instructions for the items inside it. To provide complex instructions for using a template, create a set of instructions for the template called a cheat sheet. Property Editor displays the Cheat Sheet property in a template root’s Advanced properties. To create a cheat sheet, use the Eclipse Plug‑in Development Environment. For instructions, see the New Cheat Sheet Wizard topic in the Plug-in Development Environment Guide in the Eclipse online help.
How to create a template report item
1 Open or create a template.
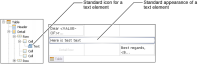
2 Add a report item to the layout, or select an existing item in the layout. For example, Figure 29‑28 shows a text item inside a table item and its appearance in the Outline view.
Figure 29‑28 Standard appearance of a text element and its icon
3 In the layout editor, right-click the report item, for example, the text item. Choose Create Template Report Item.
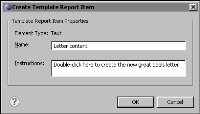
4 In Create Template Report Item, type instructions to the report developer. These instructions explain how to use the report item. Figure 29‑29 shows an example of some instructions.
Figure 29‑29 Providing instructions for a template report item
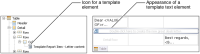
Choose OK. The report item now appears in the layout as a template report item. The template report item displays an icon appropriate to the type of report item and the instructions you provided, and in the Outline view, the report item’s icon changes to be a template item icon. Figure 29‑30 shows how the text element shown in Figure 29‑28 appears after conversion to a template report item.
Figure 29‑30 Text element as a template report item
Registering a template with the New Report wizard
BIRT Report Designer uses the template folder to contain custom templates. The default location of the template folder is the folder in the BIRT Report Designer user interface plug-in that contains the standard built-in templates. Typically, this folder is not in a shared location, so each report developer in a team must define the same shared location as the template folder. Typically, the template folder is a directory on a shared network drive. When a developer chooses File➛New➛Report, BIRT Report Designer lists all templates in that folder as well as the standard BIRT templates.
To share a template across a team of report developers, publish the template to the template folder. To provide visual assistance to the report developer, associate an image, known as a thumbnail, with the template. This image appears in the preview area of the New Report wizard when the developer selects the template. The wizard displays both the templates in the shared template folder and the built-in templates.
How to set up a template folder
1 From the Eclipse main menu, choose Window➛Preferences.
2 In Preferences, expand Report Design, and choose Template.
3 To navigate to the template folder, choose Select, and select a folder. Then, choose OK.
4 In Preferences, choose OK.
How to publish a template
1 Open the report template.
2 Click in a blank area of the layout editor. The template’s properties appear in Property Editor.
3 To set the image that appears in the New Report wizard to a thumbnail or an image file on the file system, perform the following steps:
1 In Property Editor, next to Thumbnail, choose the ellipsis button.
2 In Manage Thumbnail, specify the thumbnail for the template by performing one of the following steps:
Select Generate from the report. Then, choose Generate.
Select Browse from file system. Then, choose Browse. In Select an image file, navigate to and select the thumbnail image for the template. Then, choose Open.
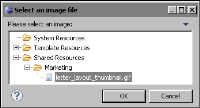
Select Import from shared resources. Then, choose Import. In Select an image file, navigate to and select the thumbnail image for the template, as shown in Figure 29‑31. Then, choose OK.
Figure 29‑31 Choosing a thumbnail image from shared resources
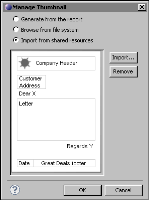
The thumbnail image appears in Manage Thumbnail, as shown in Figure 29‑32.
Figure 29‑32 A thumbnail image selected for the template
3 In Manage Thumbnail, choose OK. The name of the thumbnail appears in the Thumbnail property in Property Editor.
4 Save the report template.
4 Choose File➛Register Template with New Report Wizard.
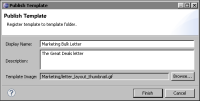
5 In Publish to Template Folder, check the properties. Make any corrections to the display name and description, as shown in Figure 29‑33.
Figure 29‑33 Publishing a template
6 To change the template image, choose Browse. Then, select an image from the available resources and choose OK.