BIRT dashboards and reports frequently use files with additional information to present report data to the users. A BIRT resource is any of the following items:
Static image that a BIRT report design uses
Report library
Properties file
Report template
Data object
CSS file
External JavaScript file
SWF file of a Flash object
Java event handler class packaged as a Java archive (JAR) file
The location of resource files in the iHub’s volume depends on how the resources are used. Table 42‑1 shows these locations.
Table 42‑1 Resource file locations
Resource usage
Publish method
Location in iHub volume
Used in a BIRT application
Publish Project
Same application folder
Not used in a BIRT application
Publish Resources
Volume resource folder
A BIRT application can only use resources in its own application folder. For example, a dashboard in a BIRT application cannot use data objects stored in the central resource folder of an iHub’s volume because that folder is outside the application folder. Files that are not in a BIRT application, such as reports and dashboards in a user’s home folder, use a single, shared resource folder in the volume.
You can publish BIRT resources from the BIRT Designer Professional’s local resource folder to an iHub server. By default, the local resource folder is the current report project folder. If you use shared resources with other developers and the resource files for your reports are stored in a different folder, you can change the default Resource folder used in your project. Use the Window—Preferences—Actuate BIRT—Resource menu to set the resource folder.
In the volume, the Resource folder is set to /Resources by default.
How to publish a local resource to an iHub resource folder
To publish a resource, such as a data object or report library, to an iHub server, complete the following steps:
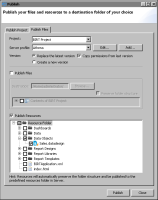
1 Choose File➛Publish.
2 In Publish, select Publish Files if it is not already selected.
3 In Project, select the BIRT project where the local resources are located.
4 Select a server profile. If there is no appropriate profile in the iHub profile list, create a new profile by choosing Add.
5 Select Publish Resources.
6 In Publish Resources, select the resources that you want to publish, as shown in Figure 42‑21.
Figure 42‑21 Selecting a resource
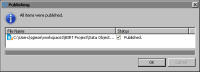
7 Choose Publish. A window showing the file upload status appears.
In Publishing, wait until the upload finishes, then choose OK, as shown in Figure 42‑22.