Tutorial 1: Creating a data element using the Design Engine API
This tutorial provides step-by-step instructions for creating a Java class that generates a BIRT report design with a BIRT data source generated from a BIRT data design file. You perform the following tasks:
*Set up a project.
*Create a GenerateDataObject Java class.
*Create the main( ) method to test the code.
*Run the code.
Task 1: Set up a project
To compile a Design Engine API application, the design engine Java archive (JAR) files from Actuate iHub must be in your classpath. You can find the design engine JAR files in the <Actuate home>/modules/BIRTiHub/iHub/Jar/BIRT/lib directory folder. The main JAR files that contain the design engine classes are coreapi.jar and modelapi.jar files. In addition, you need a data design file from which to generate the data objects. For this tutorial, the data design file is include.datadesign.
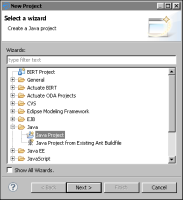
1 In Java perspective, select FileNewProject. New Project appears, as shown in Figure 8‑1.
Figure 8‑1 Creating a new project
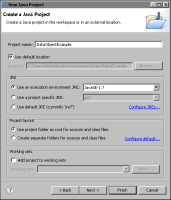
2 Expand Java, select Java Project, and choose Next. New Java Project appears, as shown in Figure 8‑2.
Figure 8‑2 Creating the DataObjectExample project
3 In Project Name type:
DataObjectExample
4 In Project layout, select:
Use project folder as root for sources and class files
5 Choose Next. Java Settings appears.
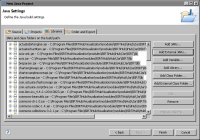
6 Set the project build path.
1 Select the Libraries tab.
2 Choose Add External JARs.
3 In JAR Selection, navigate to the iHub\Jar\BIRT\lib directory. For the default installation of BIRT on Windows, this directory is:
C:\Actuate3\BIRTiHubVisualization\modules\BIRTiHub\iHub\Jar\BIRT\lib
4 In JAR Selection, select all of the JAR files in the directory.
5 Choose Open. The libraries are added to the classpath as shown in Figure 8‑3.
Figure 8‑3 DataObjectsAPI project build path
6 Choose Finish.
7 Import the data design file.
1 In the Package Explorer, right-click the DataObjectExample project.
2 Choose Import from the context menu.
3 In Import, choose GeneralFile System and then choose Next.
4 In File System, next to the From Directory field, choose Browse.
5 Navigate to and select a data design file. Then choose Finish. The data design file appears in the project as shown in Figure 8‑4.
Figure 8‑4 DataObjectExample project showing the data design file
Task 2: Create a GenerateDataObject Java class
This Java class creates a simple report design, with table, list, and image elements.
1 Choose FileNewClass. New Java Class appears.
2 In Name type:
GenerateDataObject
3 In Package, as shown in Figure 8‑5, type:
myPackage
Figure 8‑5 Creating a GenerateDataObject class
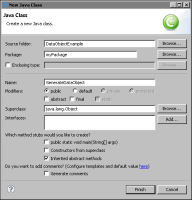
4 Choose Finish. GenerateDataObject.java opens in the Java editor.
5 Add a BIRT_HOME static variable to the class. For the default installation of iHub on a Windows system, use the following line in the body of the GenerateDataObject class body:
private static final String BIRT_HOME = "C:\Actuate3\BIRTiHubVisualization\modules\BIRTiHub\iHub\Jar\BIRT\platform";
Task 3: Create the main( ) method to test the code
Add a main( ) method to run the class.
1 Type the following main method:
public static void main( String[] args ) throws Exception{}
An error indicating that the BirtException class is not defined appears.
2 Use Quick Fix (Ctrl+1) to import the BirtException class definition.
3 Add the main method body shown in Listing 8‑1 to your main( ) method.
Listing 8‑1 main( ) method code
DesignConfig config = new DesignConfig( );
config.setBIRTHome( BIRT_HOME );
 
DesignEngine engine = new DesignEngine( config );
SessionHandle sessionHandle = engine.newSessionHandle( ULocale.ENGLISH );
ReportDesignHandle designHandle = sessionHandle.createDesign();
ElementFactory factory = designHandle.getElementFactory( );
 
DataMartDataSourceHandle dataSource = factory.newDataMartDataSource( "Data Source" );
dataSource.setDataMartURL( "include" );
dataSource.setAccessType( DesignChoiceConstants.ACCESS_TYPE_TRANSIENT );
designHandle.getDataSources( ).add( dataSource );
 
FileOutputStream fos = new FileOutputStream("test.rptdesign");
designHandle.serialize( fos );
fos.close( );
 
designHandle.close( );
System.out.println("Done");
Read the code explanations:
*To access a data source and its contents, the application must first generate and configure a design engine object.
*After creating the engine object, the code instantiates a new session. The SessionHandle object manages the state of all open data and report designs. Use SessionHandle to open, close, and create data designs, and to set global properties, such as the locale and the units of measure for data elements. Create the session handle only once. BIRT supports only a single SessionHandle.
*Generate a new design handle using the SessionHandle object. Create a design engine element factory using the DesignHandle object.
*Create a new instance of DataMartDataSourceHandle and set the datamart URL to the name of a datamart file, include, which corresponds to the include.datadesign file added to the project. Then, configure the access type and add the data source handle to the design handle object.
*Finally, open a file output stream to a report design, test.rptdesign, that uses the data object. Export the data design element to the report design.
4 Add the import statements shown in Listing 8‑2 to the beginning of the file.
Listing 8‑2 import statement code
import java.io.FileOutputStream;
import org.eclipse.birt.report.model.api.DesignConfig;
import org.eclipse.birt.report.model.api.DesignEngine;
import org.eclipse.birt.report.model.api.ElementFactory;
import org.eclipse.birt.report.model.api.ReportDesignHandle;
import org.eclipse.birt.report.model.api.SessionHandle;
import org.eclipse.birt.report.model.api.elements
.DesignChoiceConstants;
import com.actuate.birt.report.model.api
.DataMartDataSourceHandle;
import com.ibm.icu.util.ULocale;
Task 4: Run the code
5 Create a Run configuration for GenerateDataObject.java class.
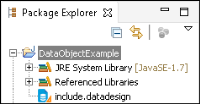
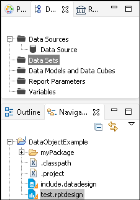
1 In Package Explorer, select:
GenerateDataObject.java
2 From the main menu, choose RunRun Configurations.
3 Double-click the Java Application link in the left frame of Run Configurations. The GenerateDataObjects configuration gets created.
4 Choose Run. Save and Launch appears. Choose OK.
6 After the execution completes, refresh the contents of the DataObjectExample project. test.rptdesign appears.
7 Open the report design and view the XML source. The XML contains a datamart element that points to include.datadesign and a data source called include, as shown in the following code:
<datamart-node
location="file:/DataObjectExample/include.datadesign">
...
<data-sources>
<data-mart-data-source name="Data Source" id="4">
<property name="datamartURL">include</property>
<property name="accessType">transient</property>
</data-mart-data-source>
</data-sources>
8 In Data Explorer, expand Data Sources to view the new data source, as shown in Figure 8‑6.
Figure 8‑6 Data Source in test.rptdesign
The final code for GenerateDataObject is shown in Listing 8‑3.
Listing 8‑3 GenerateDataObject.java
package myPackage;
import java.io.FileOutputStream;
import org.eclipse.birt.report.model.api.DesignConfig;
import org.eclipse.birt.report.model.api.DesignEngine;
import org.eclipse.birt.report.model.api.ElementFactory;
import org.eclipse.birt.report.model.api.ReportDesignHandle;
import org.eclipse.birt.report.model.api.SessionHandle;
import org.eclipse.birt.report.model.api.elements
.DesignChoiceConstants;
import com.actuate.birt.report.model.api.DataMartDataSourceHandle;
import com.ibm.icu.util.ULocale;
 
public class GenerateDataObject {
 
private static final String BIRT_HOME =
"C:/Program Files/BIRTiHubVisualization/modules/BIRTiHub/iHub
/Jar/BIRT/platform";
 
public static void main( String[] args ) throws Exception {
DesignConfig config = new DesignConfig( );
config.setBIRTHome( BIRT_HOME );
DesignEngine engine = new DesignEngine( config );
SessionHandle sessionHandle = engine.newSessionHandle( ULocale.ENGLISH );
ReportDesignHandle designHandle = sessionHandle.createDesign();
ElementFactory factory = designHandle.getElementFactory( );
 
DataMartDataSourceHandle dataSource =
factory.newDataMartDataSource( "Data Source" );
dataSource.setDataMartURL( "include" );
dataSource.setAccessType( DesignChoiceConstants
.ACCESS_TYPE_TRANSIENT );
designHandle.getDataSources( ).add( dataSource );
 
FileOutputStream fos = new FileOutputStream("test.rptdesign");
designHandle.serialize( fos );
fos.close( );
 
designHandle.close( );
System.out.println("Done");
}
}