You can run the new XML data extraction plug-in directly in BIRT Report Designer or programmatically when you run and render a report using the Web Viewer. This section describes how to test the XML data extraction plug‑in in BIRT Report Designer.
How to launch the XML data extraction plug-in
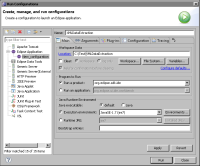
1 From the Eclipse SDK menu, choose Run➛Run Configurations. In Run Configurations, right-click Eclipse Application. Choose New.
2 Create a configuration to launch an Eclipse application:
1 In Name, type:
XMLDataExtraction
2 In Main, in Location, type:
C:\Test\XMLDataExtraction
Run Configurations appears as shown in Figure 26‑9.
Figure 26‑9 Creating the XMLDataExtraction run configuration
3 Choose the Arguments tab. Ensure the following arguments are entered:
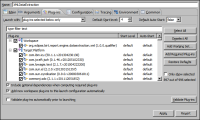
4 Choose the Plug-ins tab to select the list of plug-ins to launch with the run configuration.
5 In Launch with, from the drop-down list, select:
plug-ins selected below only
In Plug-ins, select the following plug-in, as shown in Figure 26‑10:
plug-ins selected below only
Figure 26‑10 Selecting the XMLDataExtraction plug-in
6 Choose Run to launch the run-time Eclipse Workbench. A new instance of Eclipse opens up.
How to extract data from a BIRT report to XML format
BIRT Report Designer discovers the new XML data extraction plug-in and displays the new XML format in the Export Data menu.
1 In the new Eclipse Workbench, open the BIRT Report Design perspective.
2 In BIRT Report Designer perspective, open a BIRT report.
3 Choose Run➛View Report➛In Web Viewer from the main menu.
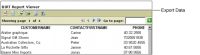
4 In the Web Viewer, select Export Data from the viewer toolbar, as shown in Figure 26‑11.
Figure 26‑11 Selecting the Export Data feature
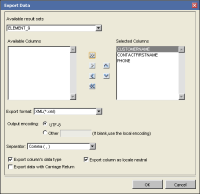
5 In Export Data, choose the following options:
1 In Available Columns, press <CTRL> and select the columns to export.
2 Choose the arrow to move columns to the Selected Columns list. Use the double arrow to select and move all the columns in the data set. Use the up and down arrows to change the order in which the columns appear in the output file.
3 In Export format, select XML(*.xml) from the list.
4 Select Export column’s data type and Export column as locale neutral, as shown in Figure 26‑12.
Figure 26‑12 Setting the export data properties
5 Choose OK to start the export.
Your browser may prompt you about how to handle the download. For example, Chrome shows a prompt at the bottom of the browser window, as shown in Figure 26‑13.
Figure 26‑13 Handling the exported XML data
6 Choose Keep or Save.
7 Open the saved XML file using any modern browser or XML editor. The structure of the file is similar to Listing 26‑1.