Use the host instance of the PDE Workbench to create the basic structure of a plug-in extension by performing the following tasks:
Specify the plug-in dependencies.
Verify the plug-in run-time archive.
Specify the plug-in extension.
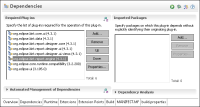
How to specify the plug-in dependencies
1 On PDE Manifest Editor, choose Overview.
2 In Plug-in Content, choose Dependencies.
3 In Required Plug-ins, choose Add.
4 In Plug-in Selection, select a plug-in, such as the example shown in Figure 22‑10.
Figure 22‑10 Specifying a plug-in dependency
Choose OK.
5 Repeat the steps to add more plug-ins to the list of required plug-ins in the Dependencies page.
In Required Plug-ins, the order of the list determines the sequence in which a plug-in loads at run time. Use Up and Down to change the loading order.
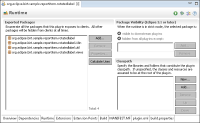
Figure 22‑11 shows an example of a list of dependencies for a plug-in extension.
Figure 22‑11 Viewing plug-in dependencies
How to verify the plug-in run-time archive
1 On PDE Manifest Editor, choose Runtime. Runtime appears, as shown in Figure 22‑12.
Figure 22‑12 Specifying run-time visibility
2 In Runtime, perform the following tasks:
In Exported Packages, list all the packages that the plug-in exposes to clients.
In Package Visibility, when the plug-in is in strict run-time mode, indicate whether a selected package is visible to downstream plug-ins or hidden except for the specified plug-ins.
In Classpath, choose Add to add the name of an archive file or folder to the classpath.
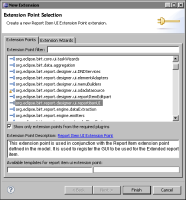
How to specify the plug-in extension
1 On PDE Manifest Editor, choose Extensions.
2 In All Extensions, choose Add. New Extension appears.
3 On Extension Point Selection, in Extension Points, select a plug-in, such as the one in the following example: