Deploying and testing the rotated label report item plug-in
After building the plug-in, the Eclipse PDE provides support for deploying and testing the plug-in in a run-time environment. The following sections describe the steps to deploy and test the rotated label report item plug-in example.
Deploying a report item extension
To deploy the rotated label report item plug-in and integrate the extension with BIRT Report Designer, use the Export wizard or manually copy the org.eclipse.birt.sample.reportitem.rotatedtext plug-in from your workspace to the eclipse\plugins directory. For testing, you can create a run configuration and include the rotated label plug-in from the workspace in the launch plug-in configuration.
Launching the rotated label report item plug-in
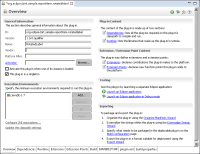
On PDE Manifest Editor, in Overview, the Testing section contains links to launch a plug-in as a separate Eclipse application in either Run or Debug mode. Figure 23‑10 shows Overview for the rotated label report item extension example in the host instance of the PDE Workbench.
Figure 23‑10 Viewing Overview for the rotated label report item extension
How to launch a run-time workbench
1 From the Eclipse SDK menu, choose Run➛Run Configurations. In Run Configurations, right-click Eclipse Application. Choose New.
2 Create a configuration to launch an Eclipse application by performing the following tasks:
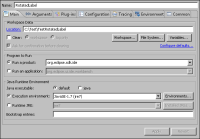
1 In Name, type:
RotatedLabel
2 On Main, in Location, type:
C:\Test\TestRotatedLabel
Run Configurations appears as shown in Figure 23‑11.
Figure 23‑11 Creating the RotatedLabel run configuration
3 Choose the Arguments tab. Ensure the following arguments are entered:
4 Choose the Plug-ins tab to select the list of plug-ins that you want to launch with the run configuration.
5 In Launch with, from the drop-down list, select:
plug-ins selected below only
6 In Plug-ins, select Workspace and Target Platform. Deselect other plug-ins you are currently working on in the same workspace.
7 Choose Run to launch the run-time Eclipse Workbench. A new instance of Eclipse opens up.
8 In the run-time workbench, choose the Report Design perspective.
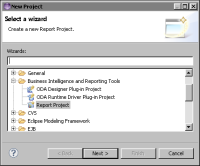
9 In Report Design, choose File➛New➛Project. New Project appears. In Wizards, choose Report Project, as shown in Figure 23‑12.
Figure 23‑12 Selecting Report Project in New Project
Choose Next. New Report Project appears.
10 In Project name, type:
RotatedLabelTest
Choose Finish.
11 In Report Design—Eclipse Platform, choose File➛New➛Report.
12 In File name, type a file name to change the default file name. Choose Finish. The layout editor displays the report design. Palette contains the RotatedLabel report item.
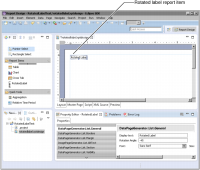
13 From Palette, drag RotatedLabel to Layout, as shown in Figure 23‑13.
Figure 23‑13 Rotated label report item in the report design
14 In the report design editor view, choose Preview. The preview appears, displaying the rotated label report item, as shown in Figure 23‑14.
Figure 23‑14 The rotated label in the report preview