This tutorial shows how to generate a temporary document from a report design and interact with the document by passing its details to the viewer using Actuate JavaScript API (JSAPI).
Task 1: Get a list of the available report designs
3 After the definition of uriLogin, create a new variable for the path to the folders resource:
var uriFolders = 'http://mymachine:5000/ihub/v1/folders';
4 After the code that processes the login button click, add code to process the getfolders button click. Add the following functions to run the GET folders resource request recursively and display the output:
$.getJSON( request, function( data ) { buildDesignList( depth + 1, data )});
}
}elseif( item.FileType === 'RPTDESIGN' ){
$( '#output' ).append( item.Name + '<br/>' );
}
});
}
5 Save and run the HTML file:
1 Choose File➛Save.
2 Copy this file into a web application deployed to a web server. Then, type the URL of the page into a web browser. Alternatively, double-click the file in Windows Explorer. In username, type:
Administrator
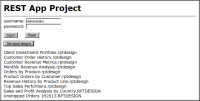
3 Choose Login. Choose Get report designs. The list of files appears as shown in Figure 15‑14.
Figure 15‑14 Listing report designs in the iHub volume using the REST API
6 Create and manage a drop-down list of the report designs discovered in the previous step:
1 After the definition of the getdesigns button in the HTML body, define a label and a drop-down list:
5 In resetAll, clear the drop-down list as well as the input fields and output div:
$( 'input:text' ).empty( );
$( '#designDropdownList' ).val( -1 );
$( '#output' ).empty( );
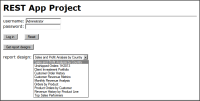
7 Save and run the HTML file as in Step 5. The list of files appears as shown in Figure 15‑15.
Figure 15‑15 Listing report designs as a drop-down list
Task 2: Generate a temporary document from a report design
Run a report design that has no parameters to generate a temporary document.
1 Add a viewreport button after the drop-down list for report designs. Set the text to "Run report", as shown in the following code:
<buttonid="viewreport">Run report</button>
2 After the definition of uriFolders, create a new variable for the path to the visuals resource:
var uriVisuals = 'http://mymachine:5000/ihub/v1/visuals';
3 After the code that processes the get designs button and before the getDesignList function, add code to process any change to the value of the new drop-down list and process the viewreport button:
var designIndex = 0;
// Handle design field change
$( '#designDropdownList' ).change( function() {
designIndex = $( this ).val();
});
// Process view report button
$( '#viewreport' ).click( function(){
checkParameters( designIdArray[designIndex] );
});
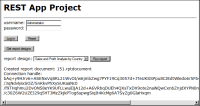
4 After the buildDesignList function, add code to run the report after checking that the report design has no parameters. The checkParameters( ) function runs a visuals parameters query and passes the result to the runReport( ) function. In runReport( ), for a report design that has no parameters, jQuery script makes an AJAX POST request to iHub and parses the response. The success function displays a message showing the report document name and the connection handle. The failure function displays a message that the report execution failed, as shown in the following code:
Figure 15‑16 Executing a report successfully using the REST API
Task 3: View the document using JSAPI
Connect to a JSAPI server on an Information Console application that can access the iHub volume that contains the report designs. Set up the JSAPI viewer module and open the temporary document in the report viewer.
1 In the HTML header element, define the path to JSAPI, which is jsapi in the Information Console application, as shown in the following line:
2 Change the text of the viewreport button to "View report", as shown in the following code:
<buttonid="viewreport">View report</button>
3 After the definition of uriVisuals, create a new variable for the path to Information Console:
var iportalUrl = 'http://mymachine:8700/iportal';
4 Set up the JSAPI environment and load the JSAPI viewer module when the login request succeeds:
1 Call the acLoad( ) function when the login succeeds. Navigate to the success function of the $.ajax call that executes uriLogin. After the assignment of the authId variable, replace the line that displays the "Login success" message with the following lines:
// Load JSAPI viewer module
acLoad( );
2 Before the checkParameters( ) function, create the acLoad( ) function, which performs the following tasks:
Loads the JSAPI viewer module
Sets the repository type for the iHub volume
Specifies the URI to the iHub server
Specifies the volume to use
Uses the authId returned by the login request as the authentication credentials for the JSAPI session
Submits the session specification to JSAPI
The following lines show a sample implementation of these items:
3 Create success and failure functions for the JSAPI submit request. These functions display appropriate messages in the output div, as shown in the following code:
$( '#output').html( "<b>JSAPI viewer module not loaded</b>" );
alert( "Your application encountered an exception: \n" +exception.getMessage( ));
}
5 In the runReport( ) function, replace the code that displays the report name and connection handle with code to open the JSAPI viewer, which performs the following tasks:
Configures a browser panel that provides scrolling functionality to the report viewer
Sets the size of the viewer in pixels
Specifies the document in the transient report folder to view and the connection handle
Submits the request to the JSAPI viewer
The code looks similar to the following lines:
var panel = new actuate.viewer.BrowserPanel( );
var uiConfig = new actuate.viewer .UIConfig( );
uiConfig.setContentPanel( panel );
myviewer = new actuate.Viewer( "viewerpane", uiConfig );
6 Set up the viewerpane div element that contains the report viewer:
1 After the definition of the output div element, create the viewerpane div element, as shown in the following code:
<divid="viewerpane"></div>
2 In the resetAll( ) function, add the following line to clear the viewerpane element:
$( '#viewerpane' ).empty( );
7 Save the HTML file and deploy it to an application server. For example, copy the file to the folder that contains the default Information Console application:
8 Type a URI that runs the file deployed in the previous step. Use the server name, not localhost for an application server on the local machine. For example, the URI for a file in the default Information Console application looks like:
http://mymachine:8700/iportal/ViewReport.html
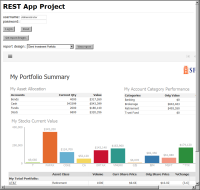
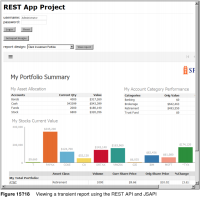
The result of viewing a report that has no parameters looks similar to the page shown in Figure 15‑17.
Figure 15‑17 Viewing a transient report using the REST API and JSAPI
A complete set of code for this example is provided in Listing 15‑3. Copy and paste this code into a text editor to create the complete example. To run the example, change mymachine to the fully qualified domain name of your REST API server.
Listing 15‑3 An Actuate REST API sample JSAPI report viewer page using JQuery