Accessing Actuate BIRT iHub content using the Actuate REST API
The Actuate REST API accesses and manages dynamic data built using Actuate BIRT technology and generates new documents for deployment. Use the REST API to deliver BIRT content and data from BIRT iHub to any mobile or web application. Using the REST API, you can:
Retrieve data from a BIRT document or BIRT data object for integration into other applications.
Build rich visualizations by integrating REST API with Actuate JavaScript API (JSAPI).
Build new visualization documents based on user interaction.
Convert a visualization into Adobe PDF or Microsoft Excel formats for download and deployment.
Schedule generation of new visualizations.
Upload files to and download files from an iHub volume.
Retrieve iHub volume folder and file information.
Additionally, an administrator user can use the REST API to:
Create and modify users and user groups.
Control access to files and data by assigning user and group privileges.
This section provides tutorials on using the REST API on a jQuery JavaScript platform. Java-based examples are available on github at the following location:
The Actuate REST API is a resource extension that responds to RESTful requests. This REST API adheres to a set of principles, which constitute a strategy for developing web and mobile components that are platform- and language-independent. These REST API applications require very little time to implement and use minimal client and server resources.
The REST API employs uniform resource identifiers (URIs) to convey user requests to the iHub System. URIs access iHub functionality including generating and storing reports, browsing volume contents, extracting data from files and data sources, and managing users and credentials.
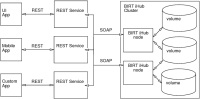
Applications use the REST API to send requests to the REST service, which runs on a Node.js platform. The REST server module interprets REST requests and forwards them as SOAP requests to a BIRT iHub node for action on a specified volume, as shown in Figure 15‑1.
Figure 15‑1 REST API tiered architecture
The REST API integrates content into any web or mobile application that can connect to an Actuate BIRT iHub volume. User accounts and user groups control access to BIRT iHub resources in the volume. The volume organizes content into files and folders and controls access privileges for different users and user groups. BIRT iHub also generates new visualizations using application and report designs created by BIRT designers. You can use the Actuate REST API to access all of these features using any programming languages or tools that support REST. To view interactive visualizations, such as filtering, drill-down, and dashboards, pass information from the REST API to Actuate JSAPI, as described in Using Actuate JavaScript API in an application.
Using the interactive documentation
Interactive documentation for REST API operations is installed with iHub and is accessible at the following URL:
http://<web server>:5000/ihub/v1/ihubrestdocs/
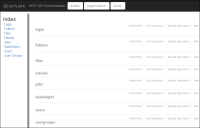
The documentation provides links to the REST API commands, as shown in Figure 15‑2. Navigate among groups of resources using the index on the page.
Figure 15‑2 REST API interactive documentation start page
Select any resource to display its documentation and interactive fields for data entry. Use the login resource first to generate an authentication identifier and token for use in all the other resources. Use authId, targetVolume, and locale on the top navigation bar to set the corresponding HTTP headers and use them for all API requests in the session.
If your REST service uses a proxy, ports, or a context other than the defaults, you must change the url value in the following file:
The interactive documentation provides an interface to run and test REST API resources without writing an application. Use the following steps to try out these resources.
1 Open the interactive documentation in a browser by navigating to the following URL, replacing <web server> with the name of the system that runs the REST service:
http://<web server>:5000/ihub/v1/ihubrestdocs/
The interactive documentation appears, as shown in Figure 15‑2.
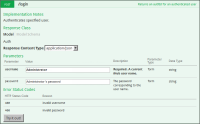
2 In the main area of the page, click login. A POST /login bar appears. Click any of the text in the POST /login bar. Information and data entry fields for the POST /login resource appear.
3 In username, type a valid iHub user name. In password, type the password for the user, as shown in Figure 15‑3.
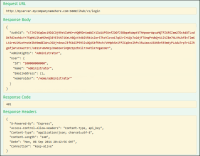
4 Choose Try it out! The request and response information appear, as shown in Figure 15‑4.
Figure 15‑4 POST login output
5 Copy the AuthId value to the authId field in the top navigation bar, as shown in Figure 15‑5.
Figure 15‑5 Preparing the AuthId field for update
The authId value is set in the HTTP headers and will be in the request messages for all resources. The authId does not appear in the authId parameter in the resources, but it is set in the HTTP headers. Trying out other resources uses this identifier.
6 To change the default volume and locale, type in the top navigation bar’s targetVolume and locale boxes. These fields set the associated HTTP headers, targetVolume and locale for all API requests in the session.
7 For any resource, type values in the required fields, which have descriptions in bold text. If desired, type values in optional fields, which have descriptions in plain text. Then choose Try it out! The request and response information for the resource appear.
For example, expand folders and GET /folders. In search, type:
app*
Choose Try it out! The response shows information about the Applications folder as shown in the following lines:
{
"ItemList": {
"File": [
{
"Id": "800000000000",
"Name": "Applications",
"FileType": "Directory",
"PageCount": "0",
"Size": "0"
}
]
},
"TotalCount": "1"
}
How to customize the location of interactive documentation
To change the location, context root, and port numbers of the interactive documentation to match your environment, perform the following steps.
iHub uses UTF-8 encoding. When creating HTTP requests for a REST API application, specify UTF-8 encoding support. For example, to set UTF-8 encoding support in the HTTP header for a POST request, include charset=utf-8 in the content-type field, as shown in the following code: