About Java Report Server Security Extension (RSSE) and iPortal Security Extension (IPSE)
By default, BIRT iHub stores information about users, user groups, and access control lists (ACLs) in the metadata database that installs with BIRT iHub. Commonly, an enterprise stores user information in an external security system, such as a Lightweight Directory Access Protocol (LDAP) or Microsoft Active Directory, with which all applications needing user information communicate. BIRT iHub provides a SOAP-based API known as Java Report Server Security Extension (RSSE), that supports creating a web service application to communicate with an external security system. Using the Java RSSE framework, a developer can create an application that provides the following security features:
External authentication
Authenticates a user using an interface to an external security system. Users, user groups, access control lists (ACLs), and other information remain on the volume.
External registration
Manages users, user groups, access control lists (ACLs), and other information using an interface to an external security system. The volume no longer manages this information.
Page-level security
Controls user access to sensitive information in a BIRT report by implementing page-level security. A page-level security application requires a BIRT Page Level Security option license.
By default, a user logs in to Information Console to run a design to generate visual representations of data, such as charts, graphs, and reports. When the user logs in, BIRT iHub authenticates the user. If an enterprise wants to support a user generating a report by clicking on a link in the enterprise website for example, the user should not need to authenticate again, after having already logged in to the enterprise website. BIRT iHub provides an API that supports a single sign-on (SSO) solution, known as iPortal Security Extension (IPSE). A developer can implement IPSE to accept any manner of data and convert it into a user name and password that BIRT iHub recognizes. For example, a user logs into a banking website and the banking application authenticates the user and assigns a token to the user. The token serves as proof of authentication while the user is on the banking website. The user clicks a link to generate a report showing account activity for the current month. To prevent the user having to provide a user name and password to authenticate with BIRT iHub, the bank has written an IPSE implementation to convert the user token to a user name and password that BIRT iHub recognizes. IPSE passes the user name and password to BIRT iHub, iHub authenticates the user and generates the report. Authentication with BIRT iHub is transparent to the user.
IPSE and RSSE commonly work together.For example, an IPSE implementation might encrypt a user name and password, and pass them to an RSSE implementation. The RSSE implementation decrypts the user name and password and passes them to BIRT iHub, allowing the user to log in to Information Console.
Open Text provides the following example implementations that demonstrate using RSSE and IPSE:
ServerIntegrationRSSEExample
Shows how to integrate BIRT iHub with external security systems using RSSE. You download the folder containing the RSSE example files to the machine where your application container resides. . This document refers to the location to which you download the folder as RSSE_EXAMPLE_HOME.
ServerIntegrationIPSEExample
Shows how to achieve single sign-on when BIRT iHub is integrated into an application using iPortal Security Extension (IPSE). You download the folder containing the IPSE example files to a machine on which a user logs in to Information Console. This document refers to the location to which you download the folder as IPSE_EXAMPLE_HOME.
You can view the example RSSE and IPSE implementations at the following location:
Installing the software required to run the RSSE and IPSE examples
Running the RSSE and IPSE examples requires the following software:
Java Development Kit (JDK) version 1.7 or later
Apache Tomcat
Apache Axis2
Apache Ant
When deploying an RSSE application, you must use an external application server. Do not use the embedded Tomcat application server that installs with BIRT iHub.
This section describes how to install these software packages.
How to install the software required to run the RSSE and IPSE examples
1 Install a Java Development Kit (JDK) by performing the following tasks:
1 Download a Java Development Kit (JDK), version 1.7 or later. The Java Development Kit is available at the following location:
2 Install the Java Development Kit that is appropriate to your operating system.
3 Create an environment variable named JAVA_HOME. Assign the pathname of the folder into which you installed the JDK to this variable, for example:
C:\Program Files (x86)\Java\jdk1.7.0_60
2 Install Apache Tomcat by performing the following tasks:
1 Open a new browser window and go to the following location:
http://tomcat.apache.org
Open the binary distribution of Apache Tomcat that is compatible with the Java release version and operating system in your environment.
2 Extract the files the Apache Tomcat archive contains. All the files download to a new folder on your machine. For example, if you extract the Tomcat files to the C:\ drive on Windows, the download creates a folder such as the following:
C:\apache-tomcat-7.0.59
This section will refer to this path as TOMCAT_HOME.
3 Install Apache Axis2 by performing the following tasks:
1 Download the latest version of the Apache Axis2 WAR (Web Archive) Distribution. Apache Axis2 is available at the following location:
Open the WAR Distribution archive appropriate to your operating system.
2 Extract the files the Axis2 archive contains to a new folder, for example:
C:\apache-axis2-WAR-distribution
3 Copy C:\apache-axis2-WAR-distribution\axis2.war to TOMCAT_HOME\webapps.
4 Restart Tomcat by performing the following tasks:
1 From a command prompt, navigate to TOMCAT_HOME\bin.
2 Execute shutdown.bat
3 Execute startup.bat.
4 Install Apache Ant by performing the following tasks:
1 Open a new browser window and go to the following location:
http://ant.apache.org/bindownload.cgi
Open the archive appropriate to your operating system.
2 Extract the files the Apache Ant archive contains. All the files download to a new folder on your machine. For example, if you extract the Ant files to the C:\ drive on Windows, the download creates a folder such as the following:
C:\apache-ant-1.9.4
This section will refer to this path as ANT_HOME.
3 Add the path of the ANT_HOME\bin folder to your Path system environment variable, for example:
C:\apache-ant-1.9.4\bin
Understanding the RSSE example
The RSSE example demonstrates using external registration, where authentication takes place outside of BIRT iHub, and user and user group information is stored on an external security system. RSSE_EXAMPLE_HOME \src\com\actuate\rsse\example\SampleRSSE.java is the RSSE driver that BIRT iHub uses to implement RSSE.
This section discusses the following topics:
Understanding initialization
What the RSSE driver does when BIRT iHub starts
Understanding user log in
What the RSSE driver does when a user logs in to Information Console
Understanding SampleRSSE.json
What the data file for the RSSE example contains
Running the RSSE example
How to run the RSSE example
Understanding initialization
When BIRT iHub starts, the RSSE driver performs an initialization procedure consisting of the following method calls:
start(...)
The start(...) method creates a response object, and calls the following methods on it:
setConnectionPropertyExternal(boolean parameter)
start(...) always passes false to setConnectionPropertyExternal(...).
setExternalProperties(...)
Obtains the list of user properties from static method SampleRSSE.getExternalProperties(). A user must possess all the properties SampleRSSE.getExternalProperties() returns.
setIntegrationLevel(...)
Specifies whether iHub uses external authentication or external registration. In SampleRSSE.java, the value of SampleRSSEConst.RSSE_INTEGRATION_LEVEL is external registration.
setRSSEVersion(...)
Specifies the RSSE version that iHub3.1 uses. Set the RSSE version to 11.
setSelectGroupsOfUser(boolean parameter)
Indicates whether SelectGroups implements the UserName element in the RSSE driver. False indicates the element is not implemented, true indicates the element must be implemented.
setSelectUsersOfRole(boolean parameter)
Indicates whether SelectUsers implements the RoleName element in the RSSE driver. False indicates the element is not implemented, true indicates the element must be implemented.
Specifies whether the RSSE driver supports the GetTranslatedUserNames API. False indicates the element is not supported, true indicates the element must be supported. Must be true when integration level is set to external registration.
setUserACLExternal(boolean parameter)
Specifies whether the user’s access control list is stored externally. Applies only if using page-level security.
getTranslatedUserNames(...)
BIRT iHub has a default user named Administrator, who has all privileges in a volume. In an external security system, this user might be known by a different name than Administrator, for example, Pam Castillo. GetTranslatedUserNames(...) maps Administrator to Pam Castillo and returns Pam Castillo. You can think of Pam Castillo as an alias of the default BIRT iHub Administrator user. When Pam Castillo logs in to Information Console, BIRT iHub assumes Pam Castillo is Administrator.
getTranslatedRoleNames(...)
GetTranslatedRoleNames(...) is similar to GetTranslatedUserNames(...). BIRT iHub has three default user groups; Administrators, All, and Operator. Operator is obsolete starting in iHub 3, but still exists for backward compatibility. In an external security system, these three user groups might be known by different names, such as Admin, Everyone, and Operations. GetTranslatedRoleNames(...) maps Administrators, All, and Operator to Admin, Everyone, and Operations, and returns Admin, Everyone, and Operations.
Understanding user log in
When a user logs in to Information Console, Information Console sends a SOAP message to BIRT iHub containing the user name, user password, and the name of the volume the user wants to access. BIRT iHub calls doesUserExist(...), passing the user and volume names as parameters. iHub first checks its own list of users of the specified volume for the user name. If the name is not found, RSSE checks the RSSE cache. If the name is still not found, RSSE checks the external security system for the name. If the name is found, doesUserExist(...) returns a response object containing a value of true. Otherwise, doesUserExist(...) returns false in the response object.
If doesUserExist(...) returns true, BIRT iHub calls authenticate(...), which uses the user name, password, and volume name with which the user logged in to Information Console to authenticate the user.
If the user is authenticated, authenticate(...) creates an AuthenticateResponse object. If the UserSetting parameter passed to authenticate(...) has a value of true, authenticate(...) obtains the user information for the authenticated user and returns it in the AuthenticateResponse object.
The last operation that the RSSE driver performs when a user logs in to Information Console is a call to getRolesOfUser(...) . This method returns any user groups to which the user belongs.
Understanding SampleRSSE.json
The RSSE example implementation uses a .json file, SampleRSSE.json, containing JSON-formatted data, to represent the BIRT iHub volume information residing in an external security system. For example, SampleRSSE.json contains the following types of information, as shown in Listing 13‑1:
Volume
The volume or volumes the cluster contains, the users of each volume, and the user groups (referred to as roles in SampleRSSE.json file) existing for each volume. The volumes SampleRSSE.json contains are DEFAULT VOLUME and Volume1.
Note that you must create Volume1 in System Console before running the RSSE example to log in to Information Console using Volume1. Default Volume already exists because the Information Console install program creates Default Volume.
User
The user information for each volume, for example:
The users of each volume, such as Administrator, user1, and user2. The RSSE example driver uses the capitalized user names in SampleRSSE.json as keys.
The properties for each volume user, such as e-mail address and home folder.
The user group or groups to which each user belongs, and the privileges that user group or those user groups possess.
The RSSE implementation reads the .json file, and for each volume, creates any users or roles that do not already exist. After running the example RSSE implementation, you can log in to Information Console as user1 using a blank password. You see the contents of Default Volume, and user1 possessing all the properties appearing under the "USER1" key, such as:
An e-mail address of user1@xyz.com
A home folder named /Home/user1, and membership in the following user groups:
role1, having Read and Write privileges in Default Volume
role2, having Visible and Read privileges in Default Volume
Listing 13‑1 Viewing SampleRSSE.json
{
"DEFAULT VOLUME": {
"name": "DEFAULT VOLUME",
"users": {
"ADMINISTRATOR": {
"volume": "DEFAULT VOLUME",
"name": "Administrator",
"password": "",
"emailAddress": "Administrator@xyz.com",
"homeFolder": "/Home/Administrator",
...
},
"USER1": {
"volume": "DEFAULT VOLUME",
"name": "user1",
"password": "",
"emailAddress": "user1@xyz.com",
"homeFolder": "/Home/user1",
"viewPreference": "HTML",
"maxJobPriority": 500,
"sendNoticeForSuccess": true,
"sendNoticeForFailure": true,
"successNoticeExpiration": 7,
"failureNoticeExpiration": 5,
"sendEmailForSuccess": true,
"sendEmailForFailure": true,
"attachReportInEmail": true,
"privilegeTemplate": [
{
"volume": "DEFAULT VOLUME",
"accessRight": "RW",
"roleName": "role1"
},
{
"volume": "DEFAULT VOLUME",
"accessRight": "VR",
"roleName": "role2"
}
],
"roles": [
"role1",
"role2"
]
},
"USER2": {
...
},
...
}
"roles": {
"ADMINISTRATORS": "Administrators",
"ROLE1": "role1",
"ROLE2": "role2",
"ROLE3": "role3"
},
}
"VOLUME1": {
"name": "Volume1",
"users": {
...
}
}
}
Running the RSSE example
When the RSSE example driver program runs, it first reads the RSSE_EXAMPLE_HOME\src\SampleRSSE.properties file. This file contains the following configuration properties, which override default values in the example driver code. These properties are necessary only for the example RSSE implementation. A production RSSE implementation does not require them.
DATA_FOLDER
Folder that contains the JSON-formatted data file containing the user information.
LOG_FILE_NAME
Name of the log file the RSSE driver creates in DATA_FOLDER. Use the log file to follow the sequence of tasks the driver program performs.
JSON_STORAGE_FILE_NAME
Name of the JSON-formatted data file containing the user information.
USER_ADMINISTRATOR
Translated administrator user name. This name can be different from the default user Administrator if you require a different admin user. Note that starting with iHub3, the default user Administrator always has administrative privileges
ADMIN_ROLE
Translated administrative user group (role) name. Supports specifying a user group name which must be assigned to all administrative users.
ROLE_ALL
Translated user group (role) name All. BIRT iHub assigns all users to the All role implicitly.
LICENSE_OPTIONS_EXTERNALIZED
Reserved for future use. The current sample implementation does not support externalized license options, but the implementation can be changed to support them.
How to run the RSSE example
1 Download the ServerIntegrationRSSEExample-ihub-3.1 folder. This procedure refers to the location of this folder as RSSE_EXAMPLE_HOME.
2 Navigate to the RSSE_EXAMPLE_HOME\src folder and open SampleRSSE.properties.
3 Create the folder that the DATA_FOLDER path specifies.
4 Copy the file that JSON_STORAGE_FILE_NAME specifies to the folder you created in the previous step.
5 Open a command prompt, and navigate to RSSE_EXAMPLE_HOME. Execute ant. Apache Ant creates RSSE_EXAMPLE_HOME\bin\SampleRSSE.aar.
6 Copy SampleRSSE.aar to TOMCAT_HOME\webapps\axis2\WEB-INF \services.
7 Copy RSSE_EXAMPLE_HOME\lib\gson-2.3.jar to TOMCAT_HOME \webapps\axis2\WEB-INF\lib.
8 Restart Tomcat. by performing the following tasks:
1 From a command prompt, navigate to TOMCAT_HOME\bin.
2 Execute shutdown.bat
3 Execute startup.bat.
9 Configure RSSE by performing the following tasks:
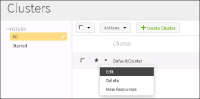
1 Log in to System Console. Choose Clusters. Left-click the arrrowhead icon next to the cluster containing the node on which you are running the RSSE example, and choose Edit, as shown in Figure 13‑1.
Figure 13‑1 Editing a cluster node
2 From the side menu, choose User Management.
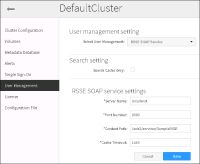
3 In User Management, perform the following tasks, as shown in Figure 13‑2:
1 In Select User Management, choose RSSE SOAP Service.
2 In Port Number, specify the port on which Tomcat listens, for example, 8080. In Context Path, specify the following path:
/axis2/services/SampleRSSE
3 Choose Save.
Figure 13‑2 Configuring User Management for RSSE
10 Restart the cluster by performing the following tasks:
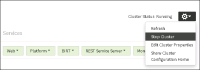
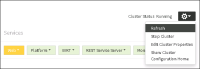
1 From the side menu, choose Cluster Configuration. Left-click the gear icon to display the Manage Cluster menu, and choose Stop Cluster, as shown in Figure 13‑3.
Figure 13‑3 Stopping the cluster
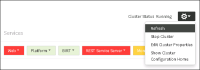
2 Choose Refresh to update the status of the services, as shown in Figure 13‑4. When all services are showing red, go to the next step.
Figure 13‑4 Refresh the status of the services
3 Choose Start Cluster from the Manage Cluster menu.
4 Choose Refresh from the Manage Cluster menu to update the status of the services. When all services are showing green, the cluster is running.
The example RSSE implementation program runs. The source for this program is in the following location:
RSSE_EXAMPLE_HOME\src\com\actuate\rsse\example
11 Log in to Visualization Platform as user1 for example, with no password. You land in the user1 home folder, /Home/user1.
For information about the RSSE API methods and data types, see Actuate API Reference.
Understanding the IPSE example
When you deploy an IPSE driver, you edit the Information Console web.xml file, and specify the IPSE driver name as the value for the SECURITY_ADAPTER_CLASS parameter. Then, you restart the Web service. BIRT iHub detects that its authentication mechanism has been replaced by the IPSE driver. When a user logs in to Information Console, BIRT iHub authenticates the user using the authenticate(...) method in the IPSE driver.
IPSE supports processing the information a user provides when logging in to Information Console before Information Console sends the login information to BIRT iHub in a SOAP request.
When a user logs in to Information Console, the IPSE authenticate(...) method receives an HttpServletRequest, and uses it to obtain the information that IPSE provides to BIRT iHub.
An IPSE driver processes the information with which a user logs in to Information Console, and sets values for the following items:
user name
user password
volume
credentials
The IPSE driver can assign any value to each of these items, including null. When the IPSE driver has set values for these items, the work of the IPSE driver is finished. Next, Information Console calls the following IPSE methods to retrieve the values:
getUserName()
getPassword()
getVolume()
getExtendedCredentials()
Information Console creates a SOAP message containing the values these methods return and sends the message to BIRT iHub.
To log a user in to Information Console, BIRT iHub must recognize the user name, the volume name, and recognize that the user belongs to the volume.
Information Console creates a SOAP message containing the user name, password, and volume name the user provided when logging in and sends the message to BIRT iHub.
If you are using an IPSE driver, the driver must perform the following tasks:
Authenticate the user
Map the information the user provides to a user name and volume name that BIRT iHub recognizes as a valid pair
Return the user name in the getUserName() method
Return the volume name in the getVolume() method
In the scenario using the IPSE example driver, a user logs in to Information Console using a user name and password that the IPSE example driver recognizes. This user name and password pair is different than the user name and password pair that BIRT iHub recognizes for this user.
The IPSE example implementation uses a .json file, SampleIPSE.json, to define the mapping between the user name and password a user uses to log in to Information Console, and the user name and password that BIRT iHub recognizes for this user.
SampleIPSE.json contains the same volumes and users as SampleRSSE.json. The user logs in to Information Console using a user name and password that SampleIPSE.json contains. This user name and password is an alias of the user name and password BIRT iHub requires to log the user into Information Console. SampleIPSE.json contains the mapping between the user name and password that the user logs into Information Console with, and the user name and password that BIRT iHub recognizes as valid for this user.
In SampleRSSE.json, the Default Volume users are Administrator, user1, and user2. In SampleIPSE.json, the same Default Volume users are Admin, a1, and a2. The IPSE example driver uses the capitalized user names in SampleIPSE.json as keys. Each user has the following properties in SampleIPSE.json, as shown in Listing 13‑2:
name
The user name that BIRT iHub recognizes. SampleRSSE.json contains all the information about the user having the name this property specifies. The RSSE example driver passes this user name to BIRT iHub.
authName
The user name that IPSE recognizes. This is the user name with which the user logs in to Information Console.
authPassword
The password for the user that authName specifies. This is the password with which the user logs in to Information Console.
For example, Default Volume user a1 in SampleIPSE.json maps to Default Volume user user1 in SampleRSSE.json.
Listing 13‑2 Viewing SampleIPSE.json
{
"DEFAULT VOLUME": {
"name": "Default Volume",
"users": {
"ADMIN": {
"name": "Administrator",
"authName": "Admin",
"authPassword": "pass"
},
"A1": {
"name": "user1",
"authName": "a1",
"authPassword": "1"
},
"A2": {
"name": "user2",
"authName": "a2",
"authPassword": "2"
}
}
},
"VOLUME1": {
"name": "Volume1",
"users": {
"ADMIN": {
"name": "Administrator",
"authName": "Admin",
"authPassword": "pass"
},
"B1": {
"name": "user1",
"authName": "b1",
"authPassword": "1"
},
"B2": {
"name": "user2",
"authName": "b2",
"authPassword": "2"
},
"B3": {
"name": "user3",
"authName": "b3",
"authPassword": "3"
}
}
}
}
These properties are relevant only to the example.
When the IPSE example driver program runs, it first reads the IPSE_EXAMPLE_HOME\src\SampleIPSE.properties file. This file contains the following configuration properties, which override default values in the example driver code. These properties are necessary only for the example IPSE implementation. A production IPSE implementation does not require them.
DATA_FOLDER
Folder that contains the JSON-formatted data file containing the user credential to user name and password mappings.
JSON_STORAGE_FILE_NAME
Name of the JSON-formatted data file containing the user credential to user name and password mappings.
LOG_FILE_NAME
Name of the log file the IPSE driver creates in DATA_FOLDER. Use the log file to follow the sequence of tasks the driver program performs.
USE_EXTENDED_CREDENTIALS
Specifies whether the IPSE driver uses extended credentials. The IPSE example driver uses extended credentials. The authenticate(...) method in the RSSE example driver consumes the extended credential that the IPSE example driver sends.
How to run the IPSE example
1 Download the ServerIntegrationIPSEExample-ihub-3.1 folder. This procedure refers to the location of this folder as IPSE_EXAMPLE_HOME.
2 Navigate to the IPSE_EXAMPLE_HOME\src folder and open SampleIPSE.properties.
3 Create the folder that the DATA_FOLDER path specifies.
4 Copy the file that JSON_STORAGE_FILE_NAME specifies to the folder you created in the previous step.
5 Using Windows Explorer, navigate to AC_SERVER_HOME\Jar. Copy the javaserver.jar file to IPSE_EXAMPLE_HOME\lib.
6 Open a command prompt and navigate to EXAMPLE_HOME. Execute ant. Apache Ant creates IPSE_EXAMPLE_HOME\bin\SampleIPSE.jar.
7 Copy the following files to AC_SERVER_HOME\web\iportal\WEB-INF\lib:
IPSE_EXAMPLE_HOME\bin\SampleIPSE.jar
All the files in IPSE_EXAMPLE_HOME\lib
8 Using Windows Explorer, navigate to AC_SERVER_HOME\web\iportal \WEB-INF. Open the web.xml file in a text editor. In web.xml, perform the following tasks:
1 Find the SECURITY_ADAPTER_CLASS <param-name> element.
2 Specify com.actuate.ipse.example.SampleIPSE for the <param-value> element, as shown in Listing 13‑3.
Listing 13‑3 Setting the value for SECURITY_ADAPTER_CLASS
9 Log in to System Console. Choose Clusters. Left-click the arrrowhead icon next to the cluster containing the node on which you are running the IPSE example, and choose Edit, as shown in Figure 13‑5.
Figure 13‑5 Editing a cluster node
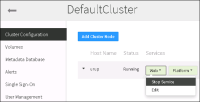
10 On Cluster Configuration, left-click Web, and choose Stop Service, as shown in Figure 13‑6.
Figure 13‑6 Stopping the Web service
11 Left-click the gear icon to display the Manage Cluster menu. Choose Refresh to update the status of the Web service, as shown in Figure 13‑7.
Figure 13‑7 Refreshing the status of the Web service
Wait until Web turns red to go to the next step. When Web is red, the Web service is stopped.
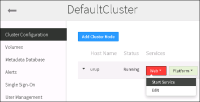
12 Left-click Web, and choose Start Service, as shown in Figure 13‑8.
Figure 13‑8 Starting the Web service
The example IPSE implementation program runs. The source for this program is in the following location:
IPSE_EXAMPLE_HOME\src\com\actuate\ipse\example
Use the following examples to explore the capability that the IPSE example implementation provides:
To log in as user 1 in Default Volume, open a browser, and enter the following URL in the address bar:
http://localhost:8700/iportal
Log in with the following credentials:
username: a1
password: 1
You land in the Default Volume user1 home folder, /Home/user1.
To view files and folders in Information Console as user1 in Volume1 by using a URL to access Information Console:
Enter the following URL in the browser address bar:
To reload the data file and view files and folders as the Administrator user in Default Volume: (relevant to the example only. but this functionality is here to tell them by the way, re-read your user list. New users may have been added)
Enter the following URL in the browser address bar:
Using the IPSE example implementation , the Administrator user in Default Volume can reload user name and password pairs from the SampleIPSE.json file without restarting the Web service or iHub node.
For information about the IPSE API methods and data types, see Actuate API Reference.