BIRT provides support for connection pooling. For a Tomcat application server with a connection pool configured, BIRT reports can be set up to use a connection from the connection pool when connecting to a JDBC database. A BIRT JDBC data source uses the JNDI URL property to access the connection pool service on the web application server to get a connection from the pool.
Setting up a report to use connection pooling
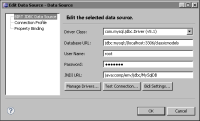
Use BIRT Report Designer to configure reports to use connection pooling. The BIRT JDBC data source wizard requires configuring a direct-access connection as well as the JNDI URL. The reason for this requirement is that some JNDI service providers do not support client-side access. During design time, such JDBC drivers use the direct-access JDBC connection. The JDBC data-set query builder uses the direct JDBC connection to obtain its metadata.
In BIRT Report Designer, only the design functions directly related to a data‑source design, such as Test Connection and Preview Results of a data set, attempt to use a JNDI name path. If the JNDI connection fails for any reason, the data source reverts to using the JDBC driver direct-access URL.
Similarly, at report run time, such as during report preview, the JDBC run‑time driver attempts to look up its JNDI data source name service to get a pooled JDBC connection. If such look-up is not successful for any reason, the JDBC driver uses the direct-access URL to create a JDBC connection.
Using a jndi.properties file
Each individual JNDI application on the web application server uses its own environment settings stored in the JVM system properties. The JNDI reads the following standard JNDI properties from the system properties:
java.naming.factory.initial
java.naming.factory.object
java.naming.factory.state
java.naming.factory.control
java.naming.factory.url.pkgs
java.naming.provider.url
java.naming.dns.url
To simplify the task of setting up the JNDI initial context environment for an individual JNDI application, the JNDI feature supports the use of a jndi.properties resource file. Install this file in the drivers subfolder of the oda.jdbc plug‑in located at the following path:
This file contains a list of key-value pairs in the properties file format, key=value. The key is the name of the property, and the value is a string, for example, java.naming.factory.object=jnp://localhost:1099.
Here is an example of a JNDI resource file used with JBoss application server:
The JDBC run-time driver looks for the jndi.properties file in the web application’s folder tree. If the driver does not find the file or has a problem reading from it, the initial context uses the default behavior, as defined by javax.naming.Context, to locate any JNDI resource files. Configuring the classpath for classes referenced by the environment properties is necessary.
Configuring a JNDI connection object
The JNDI URL property for the JDBC data source supports retrieving a JDBC connection from a pool when BIRT reports are deployed to a web application server. More information about configuring connection pooling on Tomcat is available at:
The following example assumes you already have deployed the BIRT report viewer to a Tomcat 7.0 application server in the folder, $TOMCAT_INSTALL /webapps/birt, as described earlier in this chapter.
1 Install the JDBC Driver. Make an appropriate JDBC driver available to both Tomcat internal classes and the web application, for example, by installing the driver’s JAR files into the following library directory in the Tomcat application server home folder:
$CATALINA_HOME/common/lib
2 Declare the resource requirements in the BIRT report viewer’s WEB‑INF/web.xml file. For example, add the following entry to set up a JNDI service for a MySQL format database with the name, MySqlDB:
<resource-ref>
<description>Resource reference to a factory for
java.sql.Connection</description>
<res-ref-name>jdbc/MySqlDB</res-ref-name>
<res-type>javax.sql.DataSource</res-type>
<res-auth>Container</res-auth>
</resource-ref>
3 Configure the Tomcat resource factory as a Resource element in the BIRT report viewer’s META-INF/context.xml file, similar to the following lines: