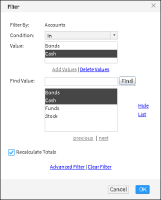
Sometimes you need to view a wider range of data, such as details for several asset types, not only for a single asset type, as shown in Figure 7‑25.
Figure 7‑25 Selecting multiple values for a filter condition
To select more than one comparison value, select the In operator, choose Select Values, then select each value. Use the Previous and Next buttons to navigate the list of values that appears. Figure 7‑25 shows the selection of Bonds and Cash from a list of asset value types. Choose OK.
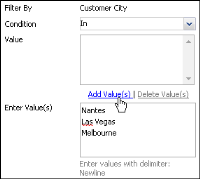
Alternatively, type the values in Enter Values, separated by a delimiter such as newline, or copy and paste the values. Then, choose Add Values, as shown in Figure 7‑26.
Figure 7‑26 Adding multiple values to a filter condition
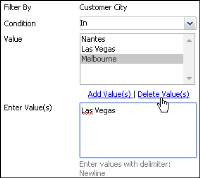
To remove values from a filter condition, type the values in Enter Values, separated by a delimiter such as newline, or copy and paste the values. Then, choose Delete Values, as shown in Figure 7‑27.
Figure 7‑27 Deleting a value from a filter condition
Make sure none of the values in Value is selected. Selected values are also deleted when you choose Delete Values. For example, in Figure 7‑28, when you choose Delete Values, Las Vegas and Melbourne are deleted, not just Las Vegas. If any of the values in Value is selected, Ctrl-click the value to deselect it.
Figure 7‑28 Deleting a selected value from a filter condition
The default delimiter is the newline character. To change the delimiter, you must change the value of the FilterValueDelimiter parameter in AC_SERVER_HOME \modules\BIRTiHub\iHub\web\iportal\WEB-INF\web.xml. Supported delimiters include comma (,), semicolon (;) and newline. For example, to change the delimiter to a comma (,) modify web.xml as follows:
<context-param>
<param-name>FilterValueDelimiter</param-name>
<param-value>,</param-value>
</context-param>
Defining multiple filter conditions
You can add as many filter conditions as you want, but each condition narrows the scope of data further, and adds complexity to the filter. Design and test filters with multiple conditions carefully. As you add filter conditions, Interactive Viewer inserts the logical operator And between each filter condition. You can change this operator to Or. You can also add the Not operator to either the And or Or operators to exclude a small set of data.
When you define more than two conditions, you can use parentheses to group conditions to get the results you expect. For example, A And B Or C is evaluated in that order, so A and B must be true or C must be true to include a data row. In A And (B Or C), B Or C is evaluated first, so A must be true and B Or C must be true to include a data row.
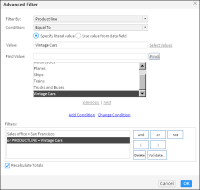
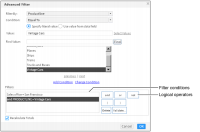
To define multiple filter conditions, use the Advanced Filter dialog box, shown in Figure 7‑29. Advanced Filter displays all the filter conditions defined for the report table or chart element. You can also use Advanced Filter to modify or delete existing filter conditions.
Figure 7‑29 Adding a filter condition
How to define multiple filter conditions
1 Select and right‑click the report column that contains the values to evaluate, then choose Filter.
2 In Filter, choose Advanced Filter. Advanced Filter appears. Filter By displays the selected column.
3 Define the first filter condition as follows:
1 In Condition, select a comparison operator.
2 In Value, select or type the comparison value. For conditions that test equality and for the Between condition, you can either set a literal value or you can base the value on another data column by selecting the Use value from data field option. For example, you can request actual shipping dates that are greater than the forecast shipping dates, or actual sales that are less than sales targets.
The conditions that support basing the filter value on another column are Equal to, Not Equal to, Less Than, Less Than or Equal to, Greater Than, Greater Than or Equal to, Between, and Not Between.
3 Choose Add Condition.
The filter condition appears in the Filters area, as shown in Figure 7‑30.
Figure 7‑30 Adding or modifying a filter condition
4 Define the second filter condition as follows:
1 In Filter By, select another column.
2 In Condition, select a comparison operator.
3 In Value, select or type the comparison value. You can select Specify literal value, or Use value from data field.
4 Choose Add Condition.
In the Filters area, the second filter condition appears below the first condition, as shown in Figure 7‑30. By default, the second condition is preceded by the logical operator, AND.
5 Choose a different logical operator, if necessary.
6 Add additional filter conditions using the previously outlined method.
7 If you create more than two filter conditions and you use different logical operators, you can use the Parentheses buttons to group conditions and define the order of evaluation of the filter conditions.
8 Choose Validate to verify the syntax of the filter conditions.
9 Select or deselect Recalculate Totals based on whether you want the aggregate data in the report to be modified. Choose OK.
10 Verify that the report displays the results you need.
How to modify a filter condition
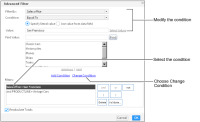
In Advanced Filter, in the Filters area, select the condition to modify, as shown in Figure 7‑31. Modify the condition by changing the values in the Filter By, Condition, or Value fields. Then, choose Change Condition. Select or deselect Recalculate Totals based on whether you want the aggregate data in the report to be modified. Choose OK to apply the modified condition.
Figure 7‑31 Changing a filter condition
When working with Interactive Viewer, you can only modify filters that you create in Interactive Viewer. Interactive Viewer operates on a report document file generated from a BIRT design, so you cannot modify any filters defined using report designers such as Report Studio or BIRT Designer Professional. When you specify a filter condition using Interactive Viewer and save the modified report as a BIRT design file, you must use the report designer tools to modify this filter condition. You cannot modify this filter condition using Interactive Viewer because Report Studio and BIRT Designer Professional reapply the filters when you generate the report. Interactive Viewer displays the filtered report document file.
How to delete a filter condition
To delete a condition, select the condition in Filter. Then, choose Clear Filter. Choose OK.
To delete an advanced filter condition, in the Filters area in Advanced Filter, select the condition. Then, choose Delete.
Verify that the remaining filter conditions are still valid.
If you perform the following steps, you cannot remove a filter condition:
1 In Interactive Viewer, open an .rptdesign file that contains a chart.
2 Apply a filter to the chart.
3 Save and close the .rptdesign file.
4 Open the saved .rptdesign file.
5 Remove the filter from the chart.
The chart data is still filtered because, when you saved the .rptdesign file, only the data that appeared in the report at that point (the filtered data) was saved, so removing the filter has no effect.