Interactive Viewer provides common formats to change how numbers appear. You can, for example, display numbers with or without decimal values, in scientific notation, as a percentage, or as currency with the appropriate symbol. Sometimes, even though a column displays numbers, the data can have a string data type. Postal codes, for example, are frequently stored as string data. Numeric formats do not apply to numbers of string type. When you work with merged columns, select each column from the drop‑down list of columns in the merged column, and define a new format each time, based on the column’s data type.
Applying a standard number format
Table 8‑1 shows the standard number formats that Interactive Viewer supports. The examples in the table reflect the English (United States) locale. If you work in a different locale, the data appears differently. For example, a number that appears as 1352.45 in the English (United States) locale appears as 1352,45 in the French (France) locale.
Table 8‑1 Standard number formats
Format
Example of data display
General Number
6066.45 or 6066.5 or 6067, depending on the original value. This format displays up to two decimal places. Whole numbers and numbers with one or two decimal places appear in their original format.
Currency
$6,067.45 or ¥6067 or 6067€, depending on the symbol, symbol position, decimal place, and thousands separator values that you set.
Fixed
6067 or 6067.5 or 6,067.45, depending on the decimal place and thousands separator values that you set.
Percent
45% or 45.8% or %45, depending on the symbol position and decimal place values that you set. This format multiplies the original value by 100 and adds the percent (%) symbol.
Scientific
2E04 or 2.67E04, depending on the decimal place value you set. The number after the E represents the exponent of 10. For example, 2.67E04 means 2.67 multiplied by 10 raised to the fourth power.
How to apply a standard number format
1 Select and right‑click a column that contains numeric data. Choose Format➛Format Data.
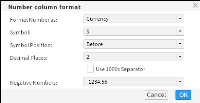
Number column format appears, as shown in Figure 8‑7.
Figure 8‑7 Setting number column format
2 On Number column format, in Format Number as, select a format. For example, you can format the credit limit column as currency in dollars ($). Select the appropriate options from the remaining drop‑down lists on Number column format. Choose OK.
You can select a standard format or define a custom format. Standard and custom formats are described in the next sections.
Applying a standard date‑and‑time format
Table 8‑2 shows the supported standard date‑and‑time formats. The examples in the table reflect the English (United States) locale. If you work in a different locale, the date appears differently. For example, a date that appears as March 5, 2008 in the English (United States) locale appears as 5 mars 2008 in the French (France) locale.
Table 8‑2 Standard date‑and‑time formats
Format
Example of data display
General Date
March 5, 2008 4:42:00 PM PDT
Long Date
March 5, 2008
Medium Date
Mar 5, 2008
Short Date
3/5/08
Long Time
4:42:00 PM PDT
Medium Time
4:42:00 PM
Short Time
16:42
How to apply a standard date‑and‑time format
1 Select and right‑click a column that contains date-and-time data. Choose Format➛Format Data.
2 In Date column format, select one of the formats from the list. Choose OK.
Applying a standard Boolean format
A Boolean expression evaluates to True or False. For example, consider a calculated column displaying values for the following expression:
ActualShipDate <= TargetShipDate
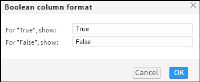
If the actual ship date is before or on the target ship date, the expression evaluates to True. If the actual ship date is after the target ship date, the expression evaluates to False. If you do not format a column of Boolean data type, the column displays the values True and False. To specify different labels, select the column, and from the context menu, choose Format➛Format Data. Type the new labels on Boolean column format, as shown in Figure 8‑8.
Figure 8‑8 Specifying display values for True and False
Applying a standard string format
Table 8‑3 describes the string formats that you can choose and illustrates how the formatted data appears.
Table 8‑3 Standard string formats
Format
Description
Lowercase
The string appears in all lowercase, for example:
john smith
Uppercase
The string appears in all uppercase, for example:
JOHN SMITH
How to apply a standard string format
1 Select and right‑click a column that contains string data. Choose Format➛Format Data.
2 In String column format, select one of the formats from the list.