If an information object is used in more than one locale, provide translated strings for the following column and parameter properties:
Description
Display Name
Heading
Help Text
The translated strings are used when the information object is used as a data source in a report design in Report Studio or a report using the information object data source is viewed in Viewer or Interactive Viewer.
For each locale, you create a properties file that contains a key and a translated string for each column or parameter and property. For example, the following entries contain keys and French strings for the customerNumber and customerName columns:
customerNumber_DescriptionKey="Numéro de client"
customerNumber_DisplayNameKey="Numéro de client"
customerNumber_HeadingKey="Numéro de client"
customerNumber_HelpTextKey="Numéro de client"
customerName_DescriptionKey="Nom du client"
customerName_DisplayNameKey="Nom du client"
customerName_HeadingKey="Nom du client"
customerName_HelpTextKey="Nom du client"
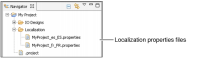
Localization properties files reside in the project’s Localization folder. The file name is constructed from the project name and the locale code. In Figure 3‑60, the Localization folder in the project MyLocalizedProject contains properties files for Spanish and French. Localization properties files are shared among all information objects in a project.
Figure 3‑60 Localization properties files
The locale code consists of a two-letter language code, an underscore, and a two‑letter country code. For example, the locale code for French (France) is fr_FR. Use the following URL to display a list of languages and the corresponding ISO 639 language codes:
http://www-01.sil.org/iso639-3/codes.asp
Use the following URL to display a list of countries and the corresponding ISO 3166 country codes:
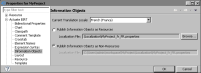
Localization properties files are published to the volume’s resource folder. When you publish localization properties files, the folder structure in the project is preserved. To determine whether localization properties files are published as resources or not, select the appropriate project in Navigator and choose File➛Properties➛Actuate BIRT, as shown in Figure 3‑61.
Figure 3‑61 Publishing localization properties files as non-resources
How to localize an information object
1 Choose the translation locale for the project.
1 Select the project in Navigator.
2 Choose File➛Properties➛Actuate BIRT.
3 In Current Translation Locale, choose the translation locale from the drop‑down list.
4 If the default location for the localization properties file is not correct, browse to the correct location. The path is relative to the resources root. Choose OK.
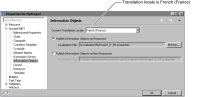
In Figure 3‑62, the translation locale is French (France).
Figure 3‑62 Specifying the translation locale
2 Open the information object in the graphical or textual information object editor.
3 Choose Columns or Parameters.
4 In Columns or Parameters, select the column or parameter whose properties you want to localize. In Figure 3‑63, the customerName column is selected in the graphical information object editor.
6 In Localization, choose Browse for the appropriate key.
For example, to localize the Display Name property, choose the Browse button to the right of the Display Name Text Key field.
7 In Select Key, in Quick Add:
1 In Key, type the translation key.
2 In Value, type the translation string.
3 Choose Add.
8 Select the Key-Value pair. Choose OK.
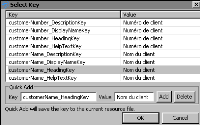
In Figure 3‑64, the Key-Value pair customerName_DisplayNameKey-"Nom du client" appears.
Figure 3‑64 Creating a Key-Value pair
9 Repeat steps 6 through 8 for the remaining translation keys. Choose OK.
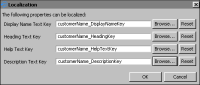
Figure 3‑65 shows the translation keys for the customerName column.
Figure 3‑65 Translation keys for customerName
10 Repeat steps 4 through 9 for the remaining columns or parameters.
11 Test the localized information object with the appropriate locale. For example:
1 Log in to Information Console as Administrator.
2 In the banner, on the top right‑corner, choose Administrator➛My Profile. In My Profile, in Language select French (France). Choose Save.
3 Use the localized information object as a data source in a report design in Report Studio.
4 Verify that the French display name, help text, and heading appear.
How to modify a translation string
1 In Localization, shown in Figure 3‑65, choose Browse for the appropriate key.
2 In Select Key, shown in Figure 3‑64, select the appropriate Key-Value pair.
3 In Value, modify the translation string. Choose Add.
4 Select the Key-Value pair. Choose OK.
How to modify a translation key
1 In Localization, shown in Figure 3‑65, choose Browse for the appropriate key.
2 In Select Key, shown in Figure 3‑64, select the appropriate Key-Value pair. Choose Delete.
3 In Key, modify the translation key. Choose Add.
4 Select the Key-Value pair. Choose OK.
How to disable localization for a column or parameter property
In Localization, shown in Figure 3‑65, choose Reset for the appropriate key. The information object displays the untranslated string for the column or parameter property, for example, Display Name, instead of the translated string.
How to restore localization for a column or parameter property
1 In Localization, shown in Figure 3‑65, choose Browse for the appropriate key.
2 In Select Key, shown in Figure 3‑64, select the appropriate Key-Value pair. Choose OK.