To extend the encryption extension point plug-in, you must perform the following tasks:
Make the encryption extension point plug-in available to Eclipse.
Create a plug-in project.
Include any required JAR files in the plug-in JAR file.
Select an extension point.
Create the plug-in class.
Implement both the encrypt and decrypt methods in the IEncryptionProvider interface.
Package the plug-in.
Deploy the plug-in.
Set the Type attribute for the appropriate connection parameters to masked.
This section provides detailed instructions for performing each task.
How to make the encryption extension point plug-in available to Eclipse
Copy com.actuate.ais.encryption_<version> from one of the locations where it resides to eclipse\plugins.
How to create a plug-in project
1 In Eclipse, choose File➛New➛Project.
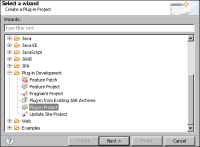
2 In New Project—Select a wizard, expand Plug-in Development. Then, select Plug-in Project, as shown in Figure 2‑12. Choose Next.
Figure 2‑12 Selecting a Plug‑in Project
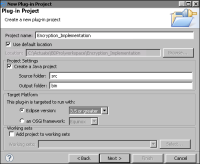
3 In New Plug-in Project—Plug-in Project, in Project name, type the name of the project, as shown in Figure 2‑13. Choose Next.
Figure 2‑13 Typing the name of the project
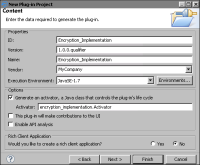
4 In New Plug-in Project—Content, complete the following steps:
In ID, type the name of the identifier for the plug-in and the package name for the encryption provider class, as shown in Figure 2‑14.
In Version, type the version number for the code.
In Name (optional), type a descriptive name for the plug-in.
In Vendor (optional), type the name of the extension’s provider.
Select Generate an activator, a Java class that controls the life cycle of the plug-in.
In Activator, type the full name of the Activator class. The package for the class should be the same as for ID.
Deselect This plug-in will make contributions to the UI.
In Rich Client Application, if necessary, select No.
Figure 2‑14 New Plug-in Project—Content
Choose Finish.
5 Open Perspective appears. Confirm that you want to display the plug-in perspective.
How to include required JAR files in the plug-in JAR file
1 In the plug-in perspective, choose Dependencies.
2 In Required Plug-ins, choose Add.
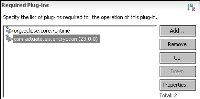
3 In Plug-in Selection, select com.actuate.ais.encryption (version), as shown in Figure 2‑15. Choose OK.
If com.actuate.ais.encryption is not visible, type encryption in Select a Plug-in to filter the list.
Figure 2‑15 Specifying the required plug-in
com.actuate.ais.encryption appears in Required Plug-ins, as shown in Figure 2‑16.
Figure 2‑16 Required Plug-ins
How to select an extension point
1 Choose Extensions.
2 In All Extensions, choose Add.
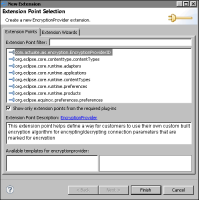
3 In New Extension—Extension Point Selection—Extension Points, select com.actuate.ais.encryption.EncryptionProviderID, as shown in Figure 2‑17. Choose Finish.
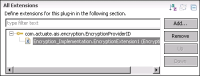
4 In All Extensions, expand com.actuate.ais.encryption.EncryptionProviderID. Select the child entry, as shown in Figure 2‑18.
Figure 2‑18 Selecting the child entry
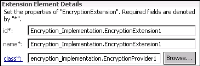
5 In Extension Element Details, modify the id, name, and class, as shown in Figure 2‑19.
Note the name of the Java class, EncryptionProvider.
Figure 2‑19 Setting the properties of the extension element
6 Choose File➛Save to save the plugin.xml file.
How to create the plug-in class
1 In Extension Element Details, choose the underlined class link.
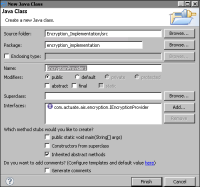
2 New Java Class appears, as shown in Figure 2‑20.
Figure 2‑20 Checking the class name
3 In New Java Class—Java Class, check that the class name matches the class name in Extension Element Details. Choose Finish.
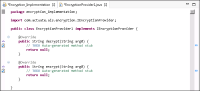
Eclipse creates a stub class, shown in Figure 2‑21, that contains the encrypt and decrypt methods.
Figure 2‑21 Stub class
How to implement the encrypt and decrypt methods
The code in Listing 2‑2 implements AES 128-bit encryption. Test the encryption and decryption code in Eclipse. The Activator class, created by Eclipse, must exist in the plug-in.
Listing 2‑2 Implementing the encrypt and decrypt methods
byte[] encryptedBytes = new BASE64Decoder().decodeBuffer(encryptedString);
Cipher cipher = getCipher(Cipher.DECRYPT_MODE);
byte[] raw = cipher.doFinal(encryptedBytes);
decryptedString = new String(raw);
} catch (Exception ex) {}
return decryptedString;
}
@Override
public String encrypt(String plainText) {
String encryptedString = null;
try {
if (plainText == null) return null;
if ("".equals(plainText)) return "";
Cipher cipher = getCipher(Cipher.ENCRYPT_MODE);
byte[] raw = cipher.doFinal(plainText.getBytes());
encryptedString = new BASE64Encoder().encode(raw);
} catch (Exception ex) {}
return encryptedString;
}
}
How to clear an access restriction error
If the sun.misc.BASE64Encoder or sun.misc.BASE64Decoder packages produce an 'Access restriction' error, change the error to a warning by performing the following tasks:
1 Choose Window➛Preferences.
2 On Preferences, expand Java, expand Compiler, and select Errors/Warnings.
3 On Errors/Warnings, expand Deprecated and restricted API, and change Forbidden reference from Error to Warning, as shown in Figure 2‑22.
Figure 2‑22 Changing Error status to Warning status
Alternatively, implement Base64 encoding and decoding using a package such as org.apache.commons.codec.
How to package the plug-in
1 Open plugin.xml.
2 Choose Overview.
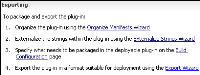
3 In Exporting, shown in Figure 2‑23, choose Export Wizard.
Figure 2‑23 Choosing Export Wizard
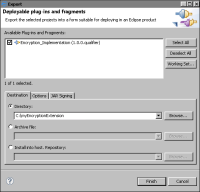
4 In Destination, browse to the directory location in which to save the plug-in library, as shown in Figure 2‑24. Choose Finish. The plug-in is packaged in a JAR file in /plugins in the directory you specify.
Figure 2‑24 Specifying the directory in which to save the plug-in library
How to deploy the plug-in
1 Place the plug-in JAR file in the following location:
AC_SERVER_HOME/Jar/BIRT/platform/plugins
If you are using an iHub cluster, repeat this step for each server in the cluster.
2 Place the plug-in JAR file in the following location:
<BDPro_HOME>\eclipse\plugins
3 Restart BIRT iHub and BIRT Designer Professional for the plug-in to take effect.
How to set the Type attribute to masked
You can set the Type attribute for an encrypted connection property to masked in the appropriate ConnectionParam element location using one of the following methods: