When you create a map of a stored procedure result set, the IO Design perspective creates a subfolder in the folder that contains the data connection definition (.dcd) file for the database. The subfolder contains a .epr file as well as the .sma file. The .epr file specifies:
The statement that calls the stored procedure
The stored procedure’s input and input/output parameter values and data types
The stored procedure’s output parameters
The stored procedure’s input and input/output parameters are associated with the result set map. In other words, when you build an information object from the result set map, these parameters are source parameters. The parameter values provided by a result set map user must yield the same result set metadata as the parameter values you provide when you create the map. In other words, the result set map must have the same columns and data types at run time as it does at design time.
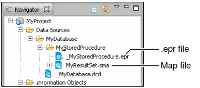
The names of the subfolder and the .epr file are derived from the name of the stored procedure. For example, you are working with a stored procedure called MyStoredProcedure in a database called MyDatabase. As shown in Figure 2‑35, if you create a map of a result set called MyResultSet, the IO Design perspective places the files MyResultSet.sma and _MyStoredProcedure.epr in a subfolder of MyDatabase called MyStoredProcedure.
Figure 2‑35 Location of the .epr file and map file for a stored procedure
For each result set map you create, BIRT Designer Professional creates a new subfolder and .epr file.
For example, if you create another result set map for MyStoredProcedure, the IO Design perspective creates a subfolder called MyStoredProcedure_1 and a .epr file called _MyStoredProcedure_1.epr. If you create a third result set map for MyStoredProcedure, the IO Design perspective creates a subfolder called MyStoredProcedure_2 and a .epr file called _MyStoredProcedure_2.epr, and so on.
The IO Design perspective does not distinguish between stored procedures that have the same name but different parameters (overloaded stored procedures). DB2 and Informix databases support overloaded stored procedures. To work with overloaded stored procedures, rename each stored procedure such that it has a unique name. If you cannot rename a stored procedure, create a new stored procedure with a unique name that calls the original stored procedure.
If you are working with a stored procedure in a Sybase database that has an output parameter, change the output parameter to an input/output parameter and provide a dummy value in the Parameters For Stored Procedure dialog box.
How to create a map of a stored procedure result set
1 In Navigator, select the appropriate project.
2 Choose File➛New➛Map.
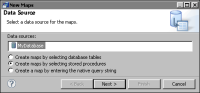
3 In New Maps—Data Source:
Select the appropriate data source.
Select Create maps by selecting stored procedures, as shown in Figure 2‑36.
Figure 2‑36 Creating a map by selecting a stored procedure
Choose Next.
4 In New Maps—Maps:
In Catalog, select the appropriate catalog.
In Filter:
To display stored procedures from a particular schema, type the first few characters of the schema name in Schema name prefix, for example, dbo. Do not append an asterisk, for example, dbo*. This filter is case‑sensitive.
To display only stored procedures whose names begin with a particular string, type the string in Stored procedure name prefix, for example, ac. Do not append an asterisk, for example, ac*. This filter is case‑sensitive.
Choose Apply filter.
Move the appropriate stored procedure name from Available to Selected.
Parameters For Stored Procedure appears.
In Parameters For Stored Procedure:
In Statement, shown in Figure 2‑37, correct the syntax if it is incorrect.
If you are using a configurable database type, check your JDBC driver documentation for the correct syntax.
Figure 2‑37 Correcting the syntax
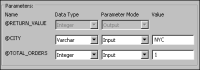
In Parameters, for the stored procedure’s input and input/output parameters:
If necessary, choose the correct data type for each parameter from the Data type drop-down list. The Actuate SQL data type must be compatible with the native SQL data type.
If necessary, choose the correct parameter mode for each parameter from the Parameter mode drop-down list.
Figure 2‑38 Specifying parameter values for a stored procedure
Choose OK. The name of the stored procedure appears in Selected, as shown in Figure 2‑39.
Figure 2‑39 Result of specifying input parameters for a stored procedure
Choose Next.
5 In New Maps—Maps:
Move the appropriate result set from Available to Selected.
Result Set Name appears.
In Name, type the name of the result set, as shown in Figure 2‑40.
Figure 2‑40 Naming the stored procedure’s result set
Choose OK. The result set name appears in Selected. The result set columns appear in Data column preview, as shown in Figure 2‑41.
Figure 2‑41 Viewing the list of result set columns
Choose Finish. A reminder appears. Choose OK.
The .epr and .sma file names appear in Navigator.
6 In Output Columns:
To rename a column, type the new name in Name.
Decide on column names before you build an information object from this map. Changing a column name after you build an information object results in a compiler error in the information object.
If necessary, choose the correct data type from the Data type drop-down list. The Actuate SQL data type must be compatible with the native SQL data type.
To create a filter on a column, set the column’s Filter property to Predefined and choose Prompt editor to specify the filter’s prompt properties. Figure 2‑42 shows Output Columns and the location of the Prompt editor button.
To define other column properties, select the column and define the properties in Properties.
Figure 2‑42 Columns created by the selected result set of a stored procedure
How to modify a .epr file for a stored procedure
1 In Navigator, double-click the appropriate .epr file.
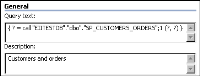
2 In General:
In Query text, correct the syntax if it is incorrect.
If you are using a configurable database type, check your JDBC driver documentation for the correct syntax.
In Description, type a description for the stored procedure, as shown in Figure 2‑43.
Figure 2‑43 Providing a description of a stored procedure
3 Choose Parameters.
The stored procedure’s parameters appear.
4 In Parameters:
To rename a parameter, type the new name in Parameter.
The IO Design perspective assigns a default name to a parameter based on its position in the statement, for example param_1.
If necessary, choose the correct Actuate SQL data type from the Data type drop-down list. The Actuate SQL data type must be compatible with the native SQL data type.
In Default value, type the parameter’s default value.
Do not create an expression. You cannot type a default value for an output parameter.
To specify the parameter’s prompt properties, choose Prompt editor. Figure 2‑44 shows the Parameters pane and the location of the Prompt editor button.
Figure 2‑44 Specifying parameter prompt properties for a stored procedure
To define other parameter properties, select the parameter and define the properties in Properties.