Another way to provide users access to data is to create a custom user interface to a data source and integrate the user interface with Report Studio. Report Studio supports the usage of BIRT and custom data sources. There are three supported scenarios you can implement:
You use a BIRT JDBC data source, and the out-of-box functionality to configure the user interface for selecting the data.
You use a BIRT driver to connect to your data source. You create your own user interface for selecting the data. This scenario is appropriate in all cases when your data source is not a BIRT JDBC data source, but it is still supported by BIRT, such as XML, Web Services, etc.
You use your own custom ODA driver to connect to your data source and you build your own user interface for selecting the data.
Actuate provides two examples that reference the supported scenarios:
Sample ODA data source. The example demonstrates how to configure a user interface for selecting data when using the BIRT JDBC driver.
Extended sample ODA data source. The example creates a custom user interface for selecting data and uses a BIRT driver to connect to the data source.
Sample ODA data source
Creating a custom user interface to connect to a BIRT JDBC data source does not require additional coding. You must configure the data source and data set and describe the data set columns in the erni_config.xml file, as shown in Listing 5‑1.
Listing 5‑1 Configuring the sample data source in erni_config.xml
<odaconfig>
<name>OdaSample</name>
<displayName>Sample ODA data source</displayName>
<description>A sample ODA data source</description>
To test the sample ODA data source with Report Studio, you must first enable the data source, named OdaSample, by setting the data source’s <enabledInEnterpriseMode> attribute in erni_config.xml to true. The erni_config.xml file is stored in the following location:
<context root>\WEB-INF
Typically, in standard installations the <context root> is as follows:
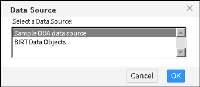
After you enable the sample data source, restart the appropriate Windows service for iHub or Information Console, and open Report Studio. When prompted, select one of the standard report templates. The Data Source dialog box, as shown in Figure 5‑18, prompts you to select a data source. Select Sample ODA data source.
Figure 5‑18 Selecting a data source
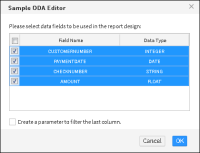
Based on the XML definition in erni_config.xml, the product displays a sample ODA editor with a table, containing the configured database columns, as shown in Figure 5‑19.
Figure 5‑19 Selecting data in the sample ODA editor
The check boxes appearing next to the column names allow the user to select the data for the report. The editor gives the user ability to create a parameter for filtering the data in the last column.
Table 5‑1 lists all the configuration attributes and their descriptions.
Table 5‑1 Attributes of a sample ODA data source
Attribute
Description
<name>
The unique name of the data source. This name follows certain naming conventions. There can be no spaces, for example.
<displayName>
The data source name that appears in the Data Source dialog box, as shown in Figure 5‑18.
<description>
The data source description that appears in the Available Data pane.
<datasetExtensionId>
Identifies the ID of the data set extension of the data driver.
<datasourceDisplayName>
The display name of the data source.
<datasourceExtensionId>
Identifies the ID of the data source extension of the data driver.
<datasetDisplayName>
The display name of the data set.
<odaURL>
The database URL to use to connect to the data source.
<odaUser>
The user name, used to connect to the database.
<odaPassword>
The database password.
<odaColumn><name>
The name of the database column to be included in the user interface.
<odaColumn><dataType>
The type of the database column. Can be one of the following:
The name of the database table if single table is used.
<queryText>
The text of the query if the columns are from different tables.
<enabledInWorkgroupMode>
Not used.
<enabledInEnterpriseMode>
Indicates whether this data source is available to users.
<entryPoint>
A URL or servlet that points to the first web page of your custom query builder.
Configuring the ODA data source requires knowledge about your JDBC data source and data set. If you do not know this information, you can obtain the database connection properties from your database administrator. It is a good practice to create first a sample report in BIRT Designer Professional and validate the connection and the database query. You use the XML source of the created report to identify the correct values for the sample ODA configuration. Look for the attribute values in the <data-sources> and <data-sets> tags at the beginning of the report XML.
Listing 5‑2 shows portions of the report XML that contain the configuration attributes and their values.