BIRT iHub 3.1.1 contains scripts that support exporting a volume from either a BIRT iHub 3.1 or 3.1.1 system, and importing the volume to either a BIRT iHub 3.1 or 3.1.1 system.
Exporting and importing a volume is a useful capability when you want to back up a volume to a second machine, for example.
Exporting and importing a volume consists of the following tasks:
Run the export_volume script on the machine from which you are exporting the volume. The script creates an archive file containing the volume data and volume metadata. The name of the archive file is <volume name>.zip on both a Windows machine and a Linux machine.
Copy the archive file to the machine to which you are importing the volume.
Run the import_volume script on the machine to which you are importing the volume. The script uses the archive file to create the volume.
This section makes reference to AC_SERVER_HOME, a variable that represents the BIRT iHub home folder. In a default BIRT iHub installation on Windows, where BIRT iHub was installed as an individual module, AC_SERVER_HOME represents the following path:
Exporting or importing a volume when one BIRT iHub system is Release 3.1
BIRT iHub contains the tools that support exporting and importing a volume beginning with Release 3.1.1. If one of the two BIRT iHub systems involved in a volume export or import operation is a Release 3.1 system, you must copy the iHub Release 3.1.1 tools to the BIRT iHub Release 3.1 system.
How to copy BIRT iHub 3.1.1 tools to a BIRT iHub 3.1 system
1 In the BIRT iHub 3.1.1 system, navigate to AC_SERVER_HOME\tools.
2 Copy the 3.1F1Tools.zip file (for Windows machines) or the 3.1F1Tools.tar.gz file (for Linux machines) to AC_SERVER_HOME in the BIRT iHub 3.1 system.
3 On a Windows system, extract the contents of 3.1F1Tools.zip to a new folder, AC_SERVER_HOME\3.1F1Tools. The name of the new folder must be 3.1F1Tools.
On a Linux system, you do not need to create the 3.1F1Tools folder manually. The tar command creates this folder automatically when you use the command from AC_SERVER_HOME to extract the contents of 3.1F1Tools.tar.gz.
Exporting a volume
In this section:
For a BIRT iHub 3.1 system involved in an export operation, AC_SERVER_HOME\<3.1tools> refers to the AC_SERVER_HOME\3.1F1Tools folder.
For a BIRT iHub 3.1.1 system involved in an export operation, AC_SERVER_HOME\<3.1tools> refers to the AC_SERVER_HOME\tools folder.
How to export a volume
This procedure assumes that you are working in a Windows environment. If the task a step describes is different for a Linux environment, the step includes the Linux version of the task.
1 Copy AC_SERVER_HOME\<3.1tools>\sample_properties\export_volume.properties to AC_SERVER_HOME\<3.1tools>\bin.
2 Open AC_SERVER_HOME\<3.1tools>\bin\export_volume.properties using a text editor. When specifying a path name in this file, always use a forward slash (“/”) as the delimiter character. Perform the following tasks:
1 For SOURCE_VOLUME_NAME, specify the name of the volume you are exporting.
2 For EXPORT_PATH, specify the full path of the folder to which the export_volume script writes the archive file the script creates from the volume you export. Alternatively, leave this property commented out to accept the default value, AC_SERVER_HOME/data/migrate/workspace. The export_volume script creates this folder if it does not exist.
3 If a volume in the BIRT iHub System to which you are importing a volume has the same name as the volume you are exporting, specify a new name for the export volume using TARGET_VOLUME_NAME to avoid a naming conflict. If a naming conflict between volumes occurs, the export_volume script aborts and displays an error message. Leave TARGET_VOLUME_NAME commented out to leave the volume name unchanged.
4 If a schema in the BIRT iHub System to which you are importing a volume has the same name as the schema for the volume you are exporting, specify a new name for the export volume schema using TARGET_SCHEMA_NAME to avoid a naming conflict. If a naming conflict between schemas occurs, the export_volume script aborts and displays an error message. Leave TARGET_SCHEMA_NAME commented out to leave the schema name unchanged.
5 For SOURCE_DATABASE_USER_PASSWORD, specify the password for the BIRT iHub metadata database used by the BIRT iHub system from which you are exporting the volume. For example, the default password for the PostgreSQL database that installs with BIRT iHub is postgres.
6 For TARGET_DATABASE_TYPE, specify whether the metadata database used by the BIRT iHub system to which you are importing the volume is PostgreSQL or Oracle. Permissible values are PostgreSQL and Oracle.
7 The folder that WORKSPACE specifies contains the log files that the export_volume script creates, and also the <export volume name>.zip file if you left EXPORT_PATH commented out. Leave the WORKSPACE property commented out to accept the default value, AC_SERVER_HOME/data/migrate/workspace. Alternatively, specify the full path of the folder to which you want the export_volume script to write log files. The export_volume script creates the WORKSPACE folder if it does not exist.
Listing 7‑13 shows an example of export_volume.properties.
Listing 7‑13 Setting the properties the export_volume script uses
#Always use a forward slash ("/") as the delimiter character in
#a pathname in this properties file, even when using the file
#in a Windows environment.
#Specify the name of the volume you are exporting
SOURCE_VOLUME_NAME=volume1
#Specify the full path of the folder to which the export volume
script writes the archive file the script creates from the
volume you export. Leave this property commented out to accept
the default path, <AC_SERVER_HOME>/data/migrate/workspace.
#EXPORT_PATH=
#If a volume on the target BIRT iHub system has the same name
as the volume you are exporting, specify a new volume name to
avoid a naming conflict. Leave TARGET_VOLUME_NAME commented
out to leave the volume name unchanged.
#TARGET_VOLUME_NAME=
#If a schema on the target BIRT iHub system has the same name
as the schema for the volume you are exporting, specify a new
schema name to avoid a naming conflict. Leave
TARGET_SCHEMA_NAME commented out to leave the schema name
unchanged.
#TARGET_SCHEMA_NAME=
#Specify the password for the BIRT iHub metadata database used
by the BIRT iHub system from which you are exporting the
volume.
SOURCE_DATABASE_USER_PASSWORD=postgres
#Specify the type of database the target BIRT iHub system uses
for volume metadata. Permissible values are PostgreSQL and
Oracle.
TARGET_DATABASE_TYPE=PostgreSQL
#Specify the full path of the folder to which the export_volume
script writes log files. Alternatively, leave this property
commented out to accept the default location, <AC_SERVER_HOME>
/data/migrate/workspace.
#WORKSPACE=
3 Stop iHub processes. For information on performing this task, see Stopping and starting iHub processes. Wait until all services have stopped before going to the next step.
4 Open a command prompt. Navigate to AC_SERVER_HOME\<3.1tools>\bin. Execute the export_volume script, passing it the export_volume.properties file. If export_volume.properties is in a different folder than the export_volume script, specify the full path of export_volume.properties in the command.
If export_volume.bat and export_volume.properties are in AC_SERVER_HOME\<3.1tools>\bin, execute the following command:
export_volume.bat export_volume.properties
If your environment is Linux, and export_volume.sh and export_volume.properties are in AC_SERVER_HOME/<3.1tools>/bin, execute the following command:
sh ./export_volume.sh export_volume.properties
The export_volume script creates the volume archive file.
5 Start iHub processes. For information on performing this task, see Stopping and starting iHub processes. Wait until all services have started before going to the next step.
6 Copy the archive file that the export_volume script created to the machine on which you are importing the volume. You can copy the archive file to any location on this machine. For example, copy the file to a new folder, C:\volume_archive_files.
Viewing the log file the export_volume script creates
The export_volume script creates a log file for each volume the script exports. For example, the default location of the log file for a volume named volume1 is:
The tnsnames.ora file supports the import_volume script connecting to the database on the machine to which you are importing the volume. The import_volume script connects to the database, then loads the volume metadata into the database.
The import_volume script must be able to access the Oracle client. Make sure the Path environment variable includes the Oracle client path.
Importing a volume
In this section:
For a BIRT iHub 3.1 system involved in an import operation, AC_SERVER_HOME\<3.1tools> refers to the AC_SERVER_HOME\3.1F1Tools folder.
For a BIRT iHub 3.1.1 system involved in an import operation, AC_SERVER_HOME\<3.1tools> refers to the AC_SERVER_HOME\tools folder.
How to import a volume
This procedure assumes that you are working in a Windows environment. If the task a step describes is different for a Linux environment, the step includes the Linux version of the task.
1 Copy AC_SERVER_HOME\<3.1tools>\sample_properties\import_volume.properties to AC_SERVER_HOME\<3.1tools>\bin.
2 Open AC_SERVER_HOME\<3.1tools>\bin\import_volume.properties using a text editor. When specifying a path name in this file, always use a forward slash (“/”) as the delimiter character. Perform the following tasks:
1 For IMPORT_FILE, specify the full path of the location where you copied the volume archive file on the machine to which you are importing the volume, for example, C:/volume_archive_files/volume1.zip.
2 For VOLUME_STORAGE_ROOT, specify the full path of the folder to contain the imported volume data after you run the import_volume script. The script creates this folder.
3 For CREATE_DATABASE_SCHEMA, specify one of the following values:
true
Specify true to create a new schema for the volume you are importing. If you specified a value for the TARGET_SCHEMA_NAME property in export_volume.properties, this value is the name of the new schema. If you did not specify a value for TARGET_SCHEMA_NAME, the new schema has the same name as the original volume schema. If a schema having the same name as the new schema already exists on the machine to which you are importing the volume, the import_volume script will abort and display an error message.
false
Specify false if the schema for the volume you are importing already exists on the machine to which you are importing the volume, and the imported volume is to use this schema. Ensure that the schema is empty before running the import_volume script. If this schema does not exist, the import_volume script will abort and display an error message.
4 For TABLESPACE_NAME, specify a tablespace for the schema of the volume you are importing if you are using an Oracle database for volume metadata. Alternatively, accept the default value of USERS. The import_volume script ignores this property if you are not using an Oracle database.
5 For DATABASE_ADMINISTRATOR and DATABASE_ADMINISTRATOR_PASSWORD, specify the name and password for the database administrator. For example, the default database administrator and database administrator password for the PostgreSQL database that installs with BIRT iHub is postgres.
6 For DATABASE_USER_PASSWORD, specify the database user password. For the PostgreSQL database that installs with BIRT iHub, the password is postgres.
7 The folder that WORKSPACE specifies contains the log files that the import_volume script creates. Leave the WORKSPACE property commented out to accept the default value, AC_SERVER_HOME/data/migrate/workspace. Alternatively, specify the full path of the folder to which you want the import_volume script to write log files. The import_volume script creates the WORKSPACE folder if it does not exist.
Listing 7‑15 shows an example of import_volume.properties:
Listing 7‑15 Setting the properties the import_volume script uses
#Always use a forward slash ("/") as the delimiter character in
#a pathname in this properties file, even when using the file
#in a Windows environment.
#Specify the full path of the location where you copied the
volume archive file on the machine to which you are importing
the volume.
IMPORT_FILE=C:/volume_archive_files/volume1.zip
#Specify the full path of the folder that will contain the
imported volume data after you run the import_volume script,
for example: <AC_SERVER_HOME>/shared/volume1. The script
#Specify true to create a new schema for the volume you are
importing. Specify false if you want this volume to use the
schema that already exists in the target database for the
volume.
CREATE_DATABASE_SCHEMA=true
#Specify a tablespace for the schema of the volume you are
importing if you are using an Oracle database for volume
metadata. The import_volume script ignores this property if
you are not using an Oracle database.
TABLESPACE_NAME=USERS
#Specify the login credentials of the database administrator of
#the target database
DATABASE_ADMINISTRATOR=postgres
DATABASE_ADMINISTRATOR_PASSWORD=postgres
#Specify the target database user password.
DATABASE_USER_PASSWORD=postgres
#Specify the full path of the folder to which the import_volume
script writes log files. Alternatively, leave this property
commented out to accept the default value, <AC_SERVER_HOME>
/data/migrate/workspace. The script creates this folder if it
does not exist.
#WORKSPACE=
3 Stop iHub processes. For information on performing this task, see Stopping and starting iHub processes. Wait until all services have stopped before going to the next step.
4 Open a command prompt. Navigate to AC_SERVER_HOME\<3.1tools>\bin. Execute the import_volume script, passing it the import_volume.properties file. If import_volume.properties is in a different folder than the import_volume script, specify the full path of import_volume.properties in the command.
If import_volume.bat and import_volume.properties are in AC_SERVER_HOME\<3.1tools>\bin, execute the following command:
import_volume.bat import_volume.properties
If your environment is Linux, and import_volume.sh and import_volume.properties are in AC_SERVER_HOME/<3.1tools>/bin, execute the following command:
sh ./import_volume.sh import_volume.properties
The import_volume script imports the volume.
5 Start the BIRT iHub cluster. For information on performing this task, see Stopping and starting iHub processes. Wait until all services have started before going to the next step.
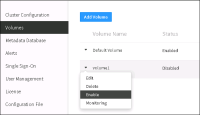
6 Enable the volume by performing the following tasks:
1 In System Console—Clusters, edit the cluster. Then, choose Volumes from the side menu.
2 Left-click the arrowhead icon next to the volume name and choose Enable, as shown in Figure 7‑67. Confirm that you want to enable the volume.
Figure 7‑67 Enabling the imported volume
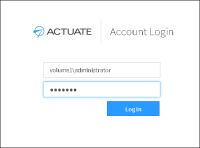
7 Access the imported volume by logging in to Information Console, specifying the volume name, user name, and user password, as shown in Figure 7‑68.
Figure 7‑68 Accessing the imported volume in Information Console
Viewing the log file the import_volume script creates
The import_volume script creates a log file for each volume the script imports. For example, the default location of the log file for a volume named volume1 is:
Rolling back if an error occurs during volume import
If the import_volume script experiences an error while executing, look for the cause in the messages the script writes to the command prompt, and in the log file the script creates. After correcting the error, perform the following tasks:
Delete the volume schema if it was already created.
Delete the storage folder that the import script creates for the imported volume. If you specified a value for the VOLUME_STORAGE_ROOT property in import_volume.properties specifies, this value is the path of the volume storage folder. If you did not specify a value for this property, the default volume storage folder path is AC_SERVER_HOME\shared\<volume name>.