Using an SSL certificate with BIRT iHub enables verification of the identity of the BIRT iHub server and encryption of data sent between the web browser and BIRT Visualization Platform. The certificate installed with BIRT iHub is self‑signed and is for demonstration purposes only. A self‑signed certificate is not signed by a Certification Authority (CA). A CA verifies that a certificate is valid and that no tampering has occurred. Using this demonstration SSL certificate shows a warning in the web browser. Use the self-signed certificate to test the creation of an SSL‑based connection between the web browser and the BIRT iHub server.
Using self-signed certificates during server testing is common practice for web developers. To test a secure SSL connection, generate a root certificate that signs and validates the self-signed certificate. This root certificate can then be installed and trusted in web browsers that connect to BIRT iHub. Root certificates from many certificate authorities are preinstalled in operating systems. These root certificates offer temporary SSL certificates that can also be used for testing SSL data security.
An SSL certificate has the following general characteristics:
Domain name, such as actuate.com. The name confirms the server is associated with the domain name of the web site.
Expiration date. After this expiration date, the certificate will not be trusted.
Certificate authority signature. The certificate authority distributes a public root certificate that, when trusted, can validate an SSL certificate. Most commercial certificate authorities distribute a public root certificate to computer operating systems. Check that this is the case with your certificate authority.
The server’s public key, used to send encrypted information to the server.
Using SSL with IDAPI
The Actuate Information Delivery application programming interface (IDAPI) supports integrating and administering BIRT iHub using Extensible Markup Language (XML) and the Simple Object Access Protocol (SOAP). Using the IDAPI, developers create applications that perform such tasks as uploading and downloading files, generating a document and scheduling document generation, sending an e-mail notification when a job completes, and using external libraries.
By default, BIRT iHub supports SSL-secured SOAP services on port 8001. This port number is set in the acserverconfig.xml file in the SOAPDispatchService element. In a default Windows installation, the location of this file is:
The default values for the port numbers defined in the SOAPDispatchService are:
<SOAPDispatchService
EnableRequestService="true"
ProvisioningSOAPPort="8010"
SOAPDispatchSOAPPort="8000"
ProvisioningSOAPSSLPort="8011"
SOAPDispatchSOAPSSLPort="8001"/>
After enabling SSL for the Visualization Platform, test the SSL-secured SOAP port using a URL of the following format:
https://<servername>:8001/wsdl
For example, for a server named urup, use the following URL:
https://urup:8001/wsdl
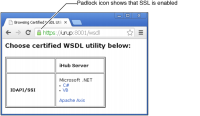
This request asks which Web Service Description Language (WSDL) utilities are available. The response is a list of available SOAP APIs and their implementations, as shown in Figure 5‑1. The green padlock symbol in the browser address field confirms that SSL security is enabled.
Figure 5‑1 WSDL utility secured with SSL
For more information about using IDAPI, see Integrating Applications into BIRT iHub.
Using SSL with JSAPI
The Actuate JavaScript API (JSAPI) is a set of JavaScript classes that support authenticating users, connecting to data sources, interacting with the user, generating reports, and viewing reports. These classes support using the HTTPS protocol and SSL security.
The JSAPI library is available from any iHub Information Console client installation or Actuate BIRT Deployment Kit. The URL for the library is:
http://127.0.0.1:8700/iportal/jsapi
127.0.0.1:8700 is the host name and TCP port for an available Actuate web application host.
/iportal is the context root for the web application.
/jsapi is the default location of the JSAPI libraries.
A script tag in an HTML page loads the JSAPI library, as shown in the following code:
A BIRT iHub system using external tools to manage Visualization Platform users supports connecting to a Lightweight Directory Access Protocol (LDAP) or Active Directory server using SSL. By default, BIRT iHub only connects to an LDAP or Active Directory server that has a signed certificate. To connect to a server that does not have a signed certificate, use the Java keytool utility to add that certificate as a trusted certificate. For information on using the Java keytool utility, see the following URL:
You can use SSL to secure the communication between a client web browser and System Console. System Console runs as a web application under the Tomcat servlet container. Tomcat installs with System Console.
This section refers to a variable named TOMCAT_HOME, which represents the path of the folder into which Tomcat installs when you install System Console. In a default System Console installation on Windows, the location of TOMCAT_HOME is:
How to secure the communication between a web browser and System Console
1 Stop Tomcat by performing the following tasks:
1 Open a command prompt. Navigate to TOMCAT_HOME\bin.
2 Execute the shutdown script. For example, on a Windows machine, execute shutdown.bat.
2 Generate a certificate keystore, and configure TOMCAT_HOME\conf \server.xml as described in the Apache Tomcat SSL/TLS Configuration HOW-TO document, at the following location:
3 Start Tomcat by executing the startup script in TOMCAT_HOME\bin. For example, on a Windows machine, execute startup.bat.
Using SSL with Visualization Platform
Use SSL to validate the identity of the BIRT iHub Visualization Platform server and to encrypt the data between the client web browser and the BIRT iHub server. To use SSL with the BIRT Visualization Platform, disable SAML and Message Distribution service (MDS) in the web.xml file located at \iHub\web\iportal\WEB-INF\. In a default Windows installation, this location is:
Change the following values and restart the Actuate iHub 3.1 Service:
Set the SAMLEntityID parameter to an empty value. For example:
<context-param>
<description>The SP ID for SAML SSO</description>
<param-name>SAMLEntityID</param-name>
<param-value></param-value>
</context-param>
Set the Message Distribution service MDS_ENABLED parameter to false. For example:
<context-param>
<!-- true or false: Enable or disable MDS -->
<param-name>MDS_ENABLED</param-name>
<param-value>false</param-value>
</context-param>
After restarting the Actuate iHub 3.1 Service, access the Visualization Platform using a URL of the following format:
https://<servername>:8701/iportal/
For example, for a server named urup, use the following URL:
https://urup:8701/iportal/
Figure 5‑2 shows the secured SSL connection to the Visualization Platform using HTTPS. The default certificate included with the installation of Visualization Platform is not signed by a certification authority and the browser identifies it as not trusted. When you use your own signed and trusted SSL certificate, the web browser trusts your certificate.
Figure 5‑2 Using HTTPS to access Information Console
For testing purposes, install and trust the self-signed demonstration certificate included in the default installation of Visualization Platform. This certificate is birtihub.crt located in the following folder:
Each operating system has a different method to install a trusted certificate. For example, in Windows, install this certificate into the Trusted Root Certification Authorities certificate store. Figure 5‑3 shows the same web URL as Figure 5‑2 after setting the demonstration certificate to be trusted.
Figure 5‑3 Using HTTPS with a trusted certificate
How to install and trust the demonstration SSL certificate on Windows
This example shows how to install your own root certificate for testing purposes. This procedure applies to browsers other than Mozilla Firefox. Firefox uses a different mechanism to trust certificates. Refer to the Firefox documentation to set up a trusted certificate on Firefox.
1 Using Windows Explorer, navigate to the following folder:
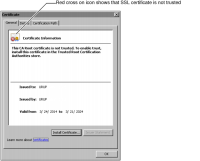
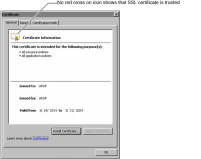
2 Open the birtihub.crt file. Certificate—General appears, as shown in Figure 5‑4.
Figure 5‑4 Opening an untrusted root certificate
3 Choose Install Certificate. Certificate Import Wizard appears, as shown in Figure 5‑5.
Figure 5‑5 Installing a root certificate
4 Choose Next. Certificate Store appears.
5 Enable Place all certificates in the following store. Choose Browse. Select Certificate Store appears.
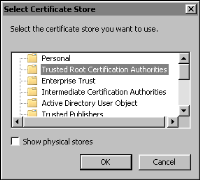
6 Select Trusted Root Certification Authorities, as shown in Figure 5‑6. Choose OK.
Figure 5‑6 Selecting a store to install the root certificate
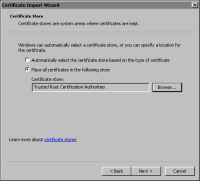
7 In Certificate Store, choose Next, as shown in Figure 5‑7.
Figure 5‑7 Selecting where to install the root certificate
In Completing the Certificate Import Wizard, choose Finish, as shown in Figure 5‑8.
Figure 5‑8 Finishing the installation of the root certificate
If you receive a security warning asking if you want to install this certificate, choose Yes.
When you receive an alert that the import was successful, choose OK.
Choose OK to close Certificate—General.
How to verify that the HTTPS connection is trusted
This example shows how to verify that the HTTPS connection to Information Console is trusted. This procedure applies to browsers other than Mozilla Firefox. Firefox uses a different mechanism to check trusted certificates. Refer to the Firefox documentation to check the HTTPS connection on Firefox.
1 Using Windows Explorer, navigate to the following folder:
2 Open the birtihub.crt file. The certificate should look similar to Figure 5‑9.
Figure 5‑9 Verifying the installation of the root certificate
3 Choose Certification Path. Verify that the certificate status is OK, as shown in Figure 5‑10.
Figure 5‑10 Verifying the certificate status
Choose OK.
4 Open a web browser such as Google Chrome. Type a URL of the following format, replacing servername with the name of your server. Do not use localhost as the name of the server.
https://servername:8701/iportal/
Information Console appears, using HTTPS.
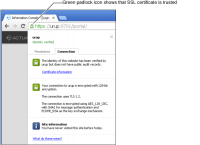
5 Choose view site information. Choose Connection as shown in Figure 5‑11.
Figure 5‑11 Verifying a secured SSL connection to Information Console
Using SSL for communication with the volume metadata database
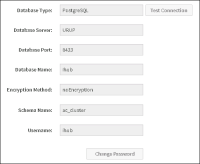
You can encrypt the connection from BIRT iHub to the volume metadata database. By default, BIRT iHub uses a PostgreSQL database to contain volume metadata. In System Console, Metadata Database displays the properties for this PostgreSQL database. The database type for this database is PostgreSQL. Figure 5‑12 shows the following properties for this database, installed on a machine named urup. An asterisk (*) next to the property name means the property is required.
Database server
The host name of the machine containing the database.
Database port
The default port number for the default PostgreSQL database is 8432.
Database name
The name of the database. The default database name is ihub.
Encryption Method
One of the following methods:
requestSSL
BIRT iHub encrypts the login request and data using SSL. If the database server does not support SSL, the driver establishes an unencrypted channel.
SSL
BIRT iHub performs SSL certificate verification.
noEncryption
The channel between BIRT iHub and the metadata database passes unencrypted data.
Username
The database user name. The default user name is ihub.
Password
The database user name password. The default password of the ihub user is postgres.
Test Connection
Choose to verify that the BIRT iHub system can successfully connect to the metadata database.
The PostgreSQL data folder is the location of the certificate and keys used by the PostgreSQL server. If you change the certificate or keys, restart the PostgreSQL server. The SSL files for a default PostgreSQL database are in the following folder:
Test the SSL connection of the PostgreSQL using the PostgreSQL interactive terminal (psql) command. This command is located in \postgresql\bin folder of the iHub installation. The default location of this software is:
See the documentation at the following URL for more information about configuring and securing a PostgreSQL database:
http://www.postgresql.org/docs/
How to verify that a PostgreSQL server supports an SSL connection
The following example shows how to use the Windows command prompt to check if an SSL connection to a PostgreSQL database is possible. This example connects you to the default PostgreSQL server installed with iHub. Use the same computer as the PostgreSQL server. This server has a user name and password with the value postgres and a database table named ihub. If either the user name or password of your PostgreSQL server has changed, use the current user name and password.
1 In a command window, navigate to \postgresql\bin folder of the iHub installation. The default location is:
3 When prompted for a password, type the password for the postgres user. In this example, the password is postgres. Then press Enter. You should receive the following response.
psql (9.2.4)
WARNING: Console code page (437) differs from Windows code page (1252)
8-bit characters might not work correctly. See psql reference
4 Type \q and press Enter to quit the terminal. You can see in the connection information that an SSL connection is established.
Managing SSL files
The SSL certificates and keys used to secure BIRT iHub and the Visualization Platform are located in the \shared\config\credentials folder in the BIRT iHub installation folder. The default location is:
This location contains the iHub’s digital certificate in the Privacy Enhanced Mail (PEM) format and the Java KeyStore (JKS) file, which is a repository of security certificates. BIRT iHub is configured to use these certificates in the following files:
The acpmdconfig.xml file located in the iHub \etc\ folder. The default location is:
You can change the SSL key alias and keystore file. You can also update the keystore password, which the KeystorePass property specifies. By default, this password is:
birtihub
If you change the JKS keystore password, use the update_keystore_password utility to update the password in acserverconfig.xml. See Using the SSL keystore change utility, later in this chapter.
If you change these SSL files, you must restart the Actuate iHub 3.1 Windows service. If the machine on which you make a change is a node in a cluster, stop and start the cluster instead. For information on this task, see Stopping and starting iHub processes.
You can use the Java keytool utility to view and create SSL certificates and keys. This utility is located in the \bin folder of the BIRT iHub installation of the Java SE Development Kit (JDK). The default location of the JDK is:
How to use the Java keytool utility to view the contents of the JKS file
BIRT iHub generates sample SSL certificates that securely connect a web browser to BIRT iHub. To use SSL security in a production environment, you must replace these SSL certificates with certificates signed by a Certification Authority.
1 In a command window, navigate to the \credentials folder. The default location is:
0000: 66 8E E8 FC DF D8 6E 48 22 CD 61 E1 3E DB 58 90 f.....nH".a.>.X.
0010: CD CC 6D F9 ..m.
]
]
*******************************************
*******************************************
Updating the SSL keystore password in BIRT iHub
The shared configuration file, acserverconfig.xml, contains the properties that specify the JKS keystore and its password. These properties appear as attributes of the <System> element in acserverconfig.xml, as shown in the following example:
If you change the password for the JKS keystore, you can update the KeystorePass property with the new password by running the update_keystore_password utility. For example, if you change the KeystoreFile property to specify a different JKS keystore, you run the utility to update the KeystorePass property with the new JKS keystore password.
This utility performs the following tasks:
Creates a backup copy of the acserverconfig.xml file
Encrypts the password you pass to the utility when you run it
Updates the KeystorePass property in acserverconfig.xml with the new encrypted password
When you run the utility, you pass the new password to the utility when you execute it.
How to run the update_keystore_password utility
1 Create a new password for the keystore.
2 Stop iHub processes. If the machine on which you are updating acserverconfig.xml belongs to a cluster, stop the cluster instead. For information on stopping and starting a cluster, see Stopping and starting iHub processes.
3 Open a command prompt. Set an environment variable named AC_CONFIG_HOME. On Windows for example, execute the following command:
set AC_CONFIG_HOME environment <path of shared configuration directory>
Using the default BIRT iHub shared configuration directory, the command is:
set AC_CONFIG_HOME environment C:\Actuate3 \BIRTiHubVisualization\modules\BIRTiHub\iHub\shared\config
4 Set an environment variable named AC_SERVER_HOME. On Windows for example, execute the following command:
set AC_SERVER_HOME environment <path of BIRT iHub home directory>
Using the default BIRT iHub home directory, the command is:
set AC_SERVER_HOME environment C:\Actuate3 \BIRTiHubVisualization\modules\BIRTiHub\iHub
5 Navigate to the AC_SERVER_HOME\tools\bin folder. Execute the following command:
Updating Keystore password in ihub configuration file.....
Keystore password successfully updated in server configuration file.
Done.....
If you do not pass the new JKS keystore password in the command when executing the utility, the utility prompts you for the password, as shown in Listing 5‑2.
Listing 5‑2 Running update_keystore_password.bat without password
The keystore in a default BIRT iHub installation contains a self-signed certificate. If you want to use a certificate issued by a certificate authority (CA), you must replace the BIRT iHub default keystore with your own keystore, containing the CA-issued certificate.
To replace the keystore, BIRT iHub must be installed, and you must have the following items:
The private key file used to generate the certificate signing request (CSR)
The CA-issued site certificate
The CA-issued root certificate
Intermediate chain certificates, if any
A Java Development Kit (JDK), for the keytool application
The openssl application, which BIRT iHub contains
How to replace the default BIRT iHub keystore
1 Verify that all certificates are in the PEM format by viewing each certificate file in a text editor. The certificate should have the following characteristics, as shown in Listing 5‑3:
Certificate begins with -----BEGIN CERTIFICATE-----
Certificate ends with -----END CERTIFICATE-----
ASCII characters represent the content between -----BEGIN CERTIFICATE----- and -----END CERTIFICATE-----
Listing 5‑3 Viewing a certificate in PEM format
-----BEGIN CERTIFICATE-----
...E4MjBaMFUxCzAJBgNVBAgTA...
-----END CERTIFICATE-----
2 Merge the certificates by concatenating them in the following order. This is the order in which BIRT iHub expects the certificates. Maintain this order even if you do not have all of the following certificates. For example, if you do not have any intermediate certificates, merge the certificates in the order of site certificate followed by root certificate.
Site certificate
Intermediate certificate
Root certificate
Note that the way certificate authorities issue certificates varies with each vendor. For more information, consult the CA support.
3 Convert the merged certificate and the private key to PKCS#12 format by using the openssl application in BIRT iHub. For example, on a Windows machine, perform the following tasks:
1 Open a command prompt. Navigate to AC_SERVER_HOME\bin, where AC_SERVER_HOME represents the BIRT iHub home directory. For example:
cd C:\Actuate3\BIRTiHubVisualization\modules\BIRTiHub\iHub \bin
2 Set the OPENSSL_CONF environment variable:
set OPENSSL_CONF=C:\Actuate3\BIRTiHubVisualization\modules\BIRTiHub\iHub\bin\openssl.cfg
Enter a password when prompted by the openssl application. The value the -name option specifies, somealias, becomes the alias value for the key when the key is stored in the keystore.
4 Create a java keystore from the .p12 file you created in the previous step using the java keytool. Execute the following command:
Enter a password when prompted by the java keytool. The tool prompts you twice; first, for the new password for the keystore the -destkeystore option specifies, and second, for the password the .p12 file contains. The two passwords you specify must be the same.
6 Open the shared configuration file, acserverconfig.xml, using a text editor. In a default BIRT iHub installation on a Windows machine, the location of this file is:
In acserverconfig.xml, perform the following tasks:
1 Set the value of the KeyAlias property to the value of the -name option you specified in the command in step 3.3, for example, somealias.
2 Set the value of the KeystoreFile property to the location of the new .jks file you created in step 4, for example, mykeystore.jks.
3 Set the value of the KeystorePass property to the password you specified when you ran the java keytool in step 4, using the format !0!password!. For example, if the password you specified was oranges, then specify !0!oranges! as the value for KeystorePass.
Listing 5‑4 shows these properties in acserverconfig.xml.
Listing 5‑4 Setting the KeyAlias, KeystoreFile, and KeystorePass properties
8 To confirm that the new certificate is properly applied, connect to the HTTPS URL of Information Console, https://localhost:8701/iportal, with any browser to confirm that it received the new certificate.