The connection profile includes information about the database driver, a user ID, password, port, host, and other properties related to the type of data source. BIRT supports using a connection profile when creating a data source in a report design. When a connection profile changes, the BIRT report picks up those changes. This behavior makes migration from a test to a production environment straightforward.
You can use connection profiles for all data source types, except SQL Query Builder data sources. If you have to use connection profiles for this type of data source, you must define a unique connection profile in each report.
Creating a connection profile
There are two ways to create a connection profile in BIRT Designer Professional. You can create a connection profile in Data Explorer, when you create a data source, or in Data Source Explorer view. You use Data Source Explorer to modify, import and export connection profiles.
Connection profiles are stored in text files called connection profile stores. Connection profile stores can contain multiple connection definitions for various ODA data sources. The default connection profile store is ServerProfiles.dat, located in the .metadata folder in your workspace.
You can also define your own connection profile store, and choose an absolute or a relative file path to store it. It is a good practice to create and use your own profile store file, instead of the default store. Using the default store requires using absolute file paths for a profile location and involves additional procedures of exporting a profile.
Using the Data Source Explorer to create a connection profile limits the connection profile location definition to an absolute file path only, while Data Explorer allows a relative and absolute file path definition. When using a relative file path, the Resource folders in the designer and iHub are used as the base folders. At design time, the BIRT Resource folder points to either the project root or a folder on the file system set in BIRT Designer Preferences under Actuate BIRT—Resources. At run time, the BIRT Resource folder points to the Resource folder set for iHub.
Like other BIRT resource files, you must deploy the connection profile store to the iHub when you deploy the report that uses it. By default, BIRT Designer deploys relative path connection profiles to the iHub Resource folder.
The connection profile store file can be encrypted using BIRT secured encryption framework. The default extension for the connection profile is .acconnprofiles. This extension is tightly integrated with the default out‑of‑the‑box encryption.
How to create a connection profile using Data Explorer
1 In Data Explorer, right-click Data Sources, and choose New Data Source.
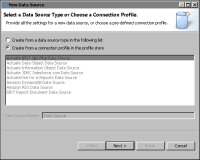
2 In New Data Source, choose Create from a connection profile in the profile store, as shown in Figure 45‑1.
Figure 45‑1 Create a new data source
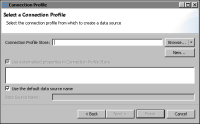
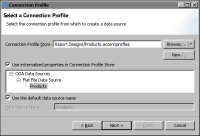
3 Choose Next. Connection Profile appears, as shown in Figure 45‑2.
Figure 45‑2 Connection Profile
4 In Connection Profile Store, perform one of the following steps:
To use an existing profile store, choose Browse.
1 In Browse, narrow down your selection by choosing Relative Path or Absolute Path for the connection profile store. Relative Path lists all the connection profile stores in the Resource folder. Absolute Path opens a browser window to the file system.
Selecting a connection profile store displays the connection profile store content in the text box below Use externalized properties in Connection Profile Store.
2 Select Use externalized properties in Connection Profile Store to maintain the link to the profile instance in the external profile store file. It is enabled by default. Disabling it removes the external reference link, and copies the properties from the selected profile to the data source local properties.
3 Deselect Use the default data source name, if you wish to specify a data source name different from the default.
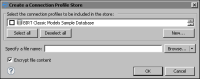
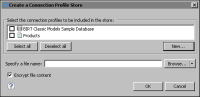
To create a new connection profile store, choose New. Create a Connection Profile Store appears, as shown in Figure 45‑3.
Figure 45‑3 Create a connection profile store
1 In Create a Connection Profile Store, select an existing profile from the list or choose New to create a new connection profile.
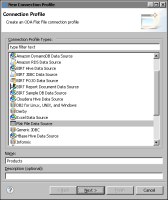
New Connection Profile appears, as shown in Figure 45‑4, and lists the data source types for which you can create connection profiles.
Figure 45‑4 New Connection Profile
2 Choose a data source type and specify a name for the new connection profile. In this example, as shown in Figure 45‑4, Flat File Data Source is selected.
3 Choose Next. A new window for defining the data source properties appears.
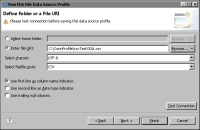
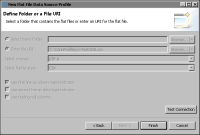
4 Specify the required information to connect to the data source. For a flat file data source, as shown in Figure 45‑5, you must enter:
flat file home folder, or file URI
flat file character set format
flat file style
file format details, such as Use first line as column name indicator, Use second line as data type indicator, and Use trailing null columns.
Figure 45‑5 Defining a folder for a flat file data source profile
The connection properties are the same as the properties displayed by the data source wizard.
5 Select Test Connection to verify the connectivity.
6 Choose Finish.
The new connection profile appears in the list of connection profiles, as shown in Figure 45‑6.
Figure 45‑6 Selecting a connection profile
7 In Create a Connection Profile Store, select the connection profile, Products.
8 Specify a file name for the store file.
9 Choose Browse to select a location for the profile store, or choose the arrow icon next to Browse, and choose Relative Path or Absolute Path. By default, profile store files are saved in a relative file path. Try to use a relative path unless your implementation requires an absolute path.
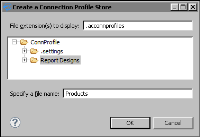
The relative path selection brings up a window like the one in Figure 45‑7. The default file extension is .acconnprofiles and the displayed location is the Resource folder in your workspace.
Figure 45‑7 Specifying a store file name
10 Select a folder in the suggested location and specify the file name, if you have not entered it in the previous step. Choose OK.
11 Deselect Encrypt file content if you wish not to encrypt. The option to encrypt is the default.
12 In Create a Connection Profile Store, choose OK.
The selected relative path appears in Connection Profile Store. In this example, Report Designs/Products.acconnprofiles, as shown in Figure 45‑8.
Figure 45‑8 Selecting the store path
13 Choose Next.
5 If you see a window such as the one shown in Figure 45‑9, choose Test Connection. If the connection is successful, choose Finish to save the connection profile.
Figure 45‑9 Testing the connection
How to create a connection profile from Data Source Explorer
1 Choose Window➛Show View➛Other.
2 In Show View, expand Data Management and select Data Source Explorer, then choose OK.
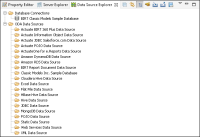
Data Source Explorer lists the data source types for which you can create connection profiles, and any previously defined connection profiles, as shown in Figure 45‑10.
Figure 45‑10 Data Source Explorer
Database Connections supports creating profiles to connect to databases using drivers shipped with BIRT Designer Professional. These database drivers provide access to the graphical SQL query builder. Creating a database connection profile is equivalent to creating a data source by selecting JDBC Database Connection for Query Builder in the data source wizard. ODA Data Sources supports creating profiles to connect to all the other types of data sources.
3 Right-click the data source type for which to create a connection profile. Choose New.
4 Specify a name for the connection profile. Use a name that describes the data source, so that you or other report developers can identify it when selecting the profile later.
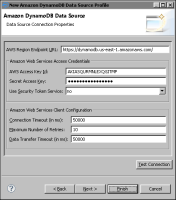
5 Specify the information to connect to the data source. The connection properties are the same as the properties displayed by the data source wizard. Figure 45‑11 shows an example of connection properties for Amazon DynamoDB.
Figure 45‑11 Connection properties for Amazon DynamoDB
6 Choose Test Connection to verify the connection to the data source.
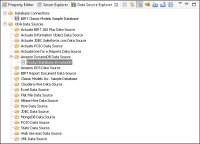
7 Choose Finish. The connection profile appears under the data source type in Data Source Explorer. Figure 45‑12 shows a connection profile, ProductsDatabase-DynamoDB, under Amazon DynamoDB Data Source.
Figure 45‑12 Data Source Explorer displaying a connection profile for Amazon DynamoDB