This section provides step-by-step instructions for building a BIRT data design file that contains customer and order data. The data object uses data from the sample database that is supplied with BIRT Designer Professional, Classic Models, Inc. This data object is used to build visualizations on a dashboard.
In this tutorial, you perform the following tasks:
BIRT Designer Professional organizes files by projects. You can create one project to organize all your reports or create multiple projects to organize your reports by categories. For each project that you create, BIRT Designer Professional creates a folder in your computer’s file system and adds default content such as a BIRTApplication.xml file and an HTML landing page. The contents of this project become the BIRT Application.
1 Choose File➛New➛Project. New Project, which appears in Figure 4‑1, displays the types of projects that you can create.
Figure 4‑1 New Project
2 If necessary, expand Actuate BIRT, select BIRT Project, then choose Next.
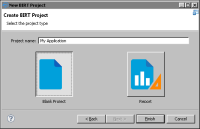
3 In New BIRT Project, select Blank Project. In Project name, type the following text, as shown in Figure 4‑2:
My Application
Figure 4‑2 New Blank Project
4 To create the project, choose Finish. You can now see the project in the Navigator view, as shown in Figure 4‑3.
Figure 4‑3 A project in the Navigator view
Task 2: Build a data object
You typically use one or more data objects in your BIRT designs and dashboards. The data object contains information to connect to a database or other type of data source. This information typically contains a driver class, data source name, and other connection information that is specific to the type of data source.
For this tutorial, you use the sample database, Classic Models, that is already configured for use with BIRT Report Designer. You do not need to specify the connection information for this sample database.
1 Choose File➛New➛Data Object. New Data Object, displays possible locations for your new data object.
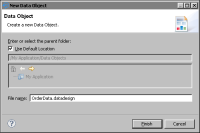
2 In File name, type the following text, as shown in Figure 4‑4:
OrderData.datadesign
Figure 4‑4 New data object design
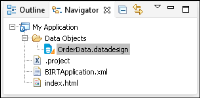
3 To add the data object to the project, choose Finish. You can now see the data object in the Navigator view, as shown in Figure 4‑5.
Figure 4‑5 A data object in the Navigator view
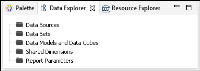
4 Select the OrderData.datadesign file in the Navigator view. Choose Data Explorer. If you use the default report design perspective, Data Explorer is to the left of the layout editor, next to Palette, as shown in Figure 4‑6. If Data Explorer is not open, choose Window➛Show View➛Data Explorer.
Figure 4‑6 Data Explorer
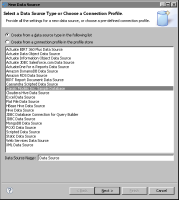
5 Right-click Data Sources, then choose New Data Source from the context menu. New Data Source displays the types of data sources you can create, as shown in Figure 4‑7.
Figure 4‑7 New Data Source
6 Select Classic Models Inc. Sample Database from the list of data sources. Use the default data source name, then choose Next. Connection information about the new data source appears.
7 Choose Finish. BIRT Designer Professional creates a new data source that connects to the sample database. It appears within Data Sources in Data Explorer, shown in Figure 4‑8.
Figure 4‑8 Data Sources in Data Explorer
8 Choose File➛Save to save your changes.
Task 3: Build a data set
Now, you are ready to build your data set. A data set identifies the data to retrieve from the data source. If your report connects to a JDBC data source, such as the sample database, you use a SQL SELECT statement to specify the data to retrieve.
1 In Data Explorer, right-click Data Sets, and choose New Data Set from the context menu.
2 In New Data Set, in Data Set Name, type the following text, as shown in Figure 4‑9:
Orders
Figure 4‑9 New Data Set
Use the default values for the other fields.
Data Source Selection shows the type and name of the data source that you created earlier.
Data Set Type indicates that the data set uses a SQL SELECT query.
3 Choose Next.
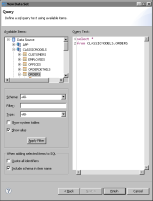
The Query page displays information to help you create a SQL query. Available Items lists all the schemas in the data source, including CLASSICMODELS, which you use for this tutorial. You can click the plus (+) sign next to CLASSICMODELS to display the data tables. The text area on the right side of this dialog shows the following required keywords of a SQL SELECT statement:
select
from
4 In the text area, type the following SQL SELECT statement to specify the data to retrieve:
select *
from CLASSICMODELS.ORDERS
The SELECT statement that you created, which is shown in Figure 4‑10, retrieves all of the columns of data in the ORDERS table.
Figure 4‑10 SQL SELECT statement in Edit Data Set
5 Choose Finish to save the data set. If you typed the query correctly, Edit Data Set appears. If you made a mistake, an error message appears before Edit Data Set opens. Edit Data Set displays the columns you specified in the query, and provides options for editing the data set.
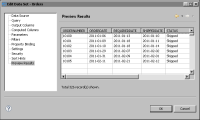
6 Choose Preview Results to make sure the query is valid and that it returns the correct data. Figure 4‑11 shows some of the data rows that the query returns.
Figure 4‑11 Data rows returned by a SQL SELECT statement
7 Choose OK. BIRT Designer Professional creates a new data set that connects to the sample database. It appears within Data Sets in Data Explorer, shown in Figure 4‑12.
Figure 4‑12 Data Sets in Data Explorer
8 Repeat the previous steps to make a second data set with the following values:
The Data Set name is:
Customers
The SQL SELECT statement:
select *
from CLASSICMODELS.CUSTOMERS
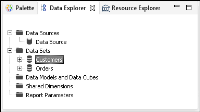
The new data set appears within Data Sets in Data Explorer, shown in Figure 4‑13. You can click the plus (+) sign next to the Customers data set to display the available data columns.
Figure 4‑13 Additional Data Set in Data Explorer
9 Choose File➛Save to save your changes.
Task 4: Build a data model
Now, you are ready to build your data model. A data model joins data sets and enables users to aggregate data for summarizing information. Once you have added the data model you will generate a data object store in the BIRT application that contains the data taken from the data source. This file is bigger than the data object design file because it contains the data from the data source.
Use the data object file to avoid making additional queries to a data source and to enable use of the BIRT application content without accessing the original data source. You can use the data object design file but each use will make a new query to the data source.
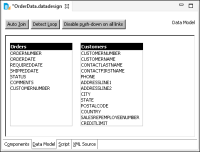
1 In Data Explorer, right-click Data Models and Data Cubes, and choose New Data Model from the context menu. Data Model appears showing the available data set tables and column names, as shown in Figure 4‑14.
Figure 4‑14 New Data Model
2 In OrdersData.datadesign, in Data Model, choose Auto Join to search the two data sets for possible column names to join the data.
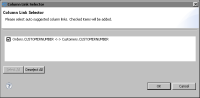
3 In Column Link Selector, select Orders.CUSTOMERNUMBER <‑> Customers.CUSTOMERNUMBER to join the orders data set and the customers data set using the column name CUSTOMERNUMBER, as shown in Figure 4‑15.
Figure 4‑15 New data set join using the selected columns
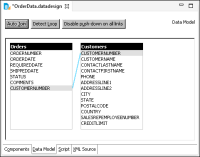
4 Choose OK to link the two data sets together. Figure 4‑16 shows the updated data model.
Figure 4‑16 Verifying the layout of the data model
5 Choose File➛Save to save your changes.
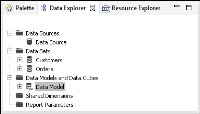
The new data model appears within Data Models and Data Cubes in Data Explorer, as shown in Figure 4‑17.
Figure 4‑17 Data Model in Data Explorer
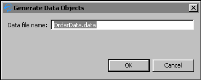
6 In the Navigator view, right-click OrderData.datadesign and choose Generate Data Objects from the context menu.
7 In Generate Data Objects, choose OK to accept the data file name and generate a data object, as shown in Figure 4‑18.
Figure 4‑18 Generating a data object
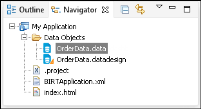
You can now see the new data object in the Navigator view, as shown in Figure 4‑19.