This tutorial provides instructions for building a report that lists products, their vendors, and quantities in stock. Rather than display all the products in stock, the report shows only products that need to be re-stocked. Because the number at which inventory is considered low can change with time, the report uses a report parameter that prompts the user to specify the minimum stock threshold when the user runs the report. The report also uses a report parameter that lets the user select a particular vendor or all vendors for the products that need re-stocking.
In this tutorial, you perform the following tasks:
1 In Navigator, right-click the My Reports project you created in the first tutorial, then choose New➛Report.
2 In New Report, type the following text as the file name:
Inventory.rptdesign
3 Choose Finish. The layout editor displays a blank report.
Task 2: Build a data source
Before you begin designing your report in the layout editor, create a data source to connect your report to the Classic Models, Inc. sample database.
1 Choose Data Explorer.
2 Right-click Data Sources, and choose New Data Source from the context menu.
3 Select Classic Models Inc. Sample Database from the list of data sources. Use the default data source name, then choose Next. Connection information about the new data source appears.
4 Choose Finish. BIRT creates a new data source that connects to the sample database. It appears within Data Sources in Data Explorer.
Task 3: Build a data set
In this procedure, you build a data set to retrieve data from the Products table in the Classic Models, Inc. database.
1 In Data Explorer, right-click Data Sets, and choose New Data Set.
2 In New Data Set, type the following text for Data Set Name:
Products
Use the default values for the other fields, then choose Next.
3 In Query, type the following query. Alternatively, drag the fields from the Products table, and drop them in the text area.
select productname,
productvendor,
quantityinstock
from Products
4 Choose Finish to save the data set. Edit Data Set displays the columns you specified in the query, and provides options for editing the data set.
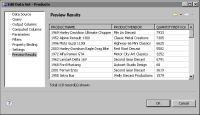
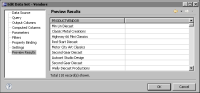
5 Choose Preview Results to confirm that the query is valid and that it returns the correct data. You should see the results that appear in Figure 13‑39.
Figure 13‑39 Data rows returned by the Products data set
6 Choose OK to save the data set.
Task 4: Lay out the data
In this procedure, you create a layout that displays the data in a simple row‑and‑column format.
1 Drag the Products data set from Data Explorer, and drop it in the layout editor.
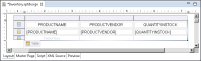
2 In Data Set Binding, choose Select All to select all the fields in the data set. BIRT Report Designer creates a table that contains all the data set fields and corresponding labels, as shown in Figure 13‑40.
Figure 13‑40 Layout editor displaying product data in a table
3 Edit and format the labels in the table’s header row (the first row).
1 Double-click PRODUCTNAME. Change the text to:
Product Name
2 Press Enter to accept the change.
3 Similarly, edit the PRODUCTVENDOR and QUANTITYINSTOCK labels so that they appear as follows:
Vendor
Quantity In Stock
4 Select the row that contains those labels.
5 In Property Editor, in General properties:
Choose B to format all the label text as bold text.
Choose the Left button to align the labels to the left.
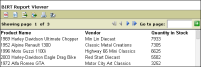
4 Preview the report. It should look like the one shown in Figure 13‑41.
Figure 13‑41 Report preview
Task 5: Create a report parameter that prompts for a minimum product quantity
In this procedure, you create a report parameter that prompts the user to specify a minimum quantity of stock. The report displays only rows where the quantity in stock is less than or equal to the user-specified value.
1 Choose Layout to resume editing the report.
2 In Data Explorer, right-click Report Parameters, then choose New Parameter.
3 Specify the following property values for the report parameter:
1 In Name, type the following text:
RP_quantityinstock
2 In Prompt text, type the following text:
Display products whose quantity in stock is less than or equal to this number
3 In Data type, select Integer.
4 In Display type, use the default, Text box.
5 In Default value, type the following amount:
1000
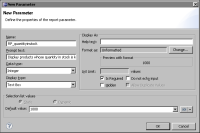
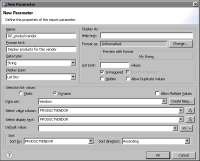
Figure 13‑42 shows the complete parameter definition.
Figure 13‑42 Properties for RP_quantityinstock report parameter
4 Choose OK to save the report parameter.
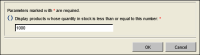
5 Preview the report. As shown in Figure 13‑43, Enter Parameters appears, displaying the prompt text and the default parameter value that you specified when you created the report parameter.
Figure 13‑43 Enter Parameters displaying the RP_quantityinstock parameter
Choose OK. The report output shows all products. The report does not display only products with quantities less than or equal to 1000 because you have not yet bound the report parameter to the data set.
Task 6: Create a report parameter that prompts for a vendor name
In this procedure, you create a report parameter that prompts the user to select a particular vendor or all vendors for the products for which the quantity in stock matches the user-specified value.
1 Choose Layout to resume editing the report.
2 In Data Explorer, right-click Report Parameters, then choose New Parameter.
3 Specify the following property values for the report parameter:
1 In Name, type the following text:
RP_productvendor
2 In Prompt text, type the following text:
Display products for this vendor
3 In Data type, select String.
4 In Display type, select List Box.
Selection list values displays options for providing a list of values to the user.
5 Under Selection list values, choose Dynamic.
This option creates a list of values dynamically. BIRT retrieves the values from the data source when the report runs. This technique ensures that the values displayed are always current.
Under Selection list values, Data Set displays Products, which is the only data set created for the report so far.
4 Create a new data set to retrieve the vendor names to display in the list box.
1 Choose Create New, next to the Data set field.
2 In New Data Set, in Data Set Name, type the following name:
Vendors
Choose Next.
3 In Query, type the following query:
select productvendor
from Products
4 Choose Finish to save the data set. Edit Data Set displays the columns specified in the query, and provides options for editing the data set.
5 Choose Preview Results to confirm that the query is valid and that it returns the correct data. Figure 13‑44 shows the rows returned by the query. Notice that some vendor names are listed multiple times.
Figure 13‑44 Data rows returned by the Vendors data set
6 Choose OK to save the data set.
5 Specify the values to display in the list box.
1 In New Parameter, in Data set, select Vendors, the data set you created in the previous step.
2 In Select value column, select PRODUCTVENDOR.
3 In Select display text, select PRODUCTVENDOR.
6 Specify how the values should be sorted.
1 Under Sort, in Sort by, select PRODUCTVENDOR.
2 In Sort direction, select Ascending.
7 Ensure that Allow Duplicate Values is not selected. Remember that the Vendors data set returned some vendor names multiple times. Deselecting the Allow Duplicate Values option displays each name once in the list box.
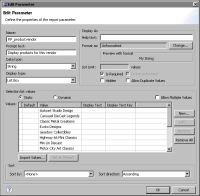
Figure 13‑45 shows the complete definition of the RP_productvendor report parameter.
Figure 13‑45 Complete definition of the RP_productvendor report parameter
8 Choose OK to save the report parameter.
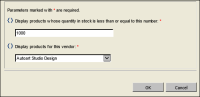
9 Preview the report. Enter Parameters appears, as shown in Figure 13‑46. The RP_productvendor parameter appears as a list box with the first value in the list selected by default.
Figure 13‑46 Enter Parameters displaying both report parameters
View the values in the list box. The values are sorted in ascending alphabetical order, and there are no duplicate values.
10 Choose OK. The report output still shows all products because you have not yet bound the report parameters to the Products data set.
Task 7: Edit the query
In this procedure, you edit the query in the Products data set so that it is dynamically updated at run time to use the values of the report parameters.
1 Choose Layout to resume editing the report.
2 In Data Explorer, right-click the Products data set, and choose Edit.
3 Edit the query to add a WHERE clause as follows:
select productname,
productvendor,
quantityinstock
from Products
where quantityinstock <= ?
and productvendor Like ?
The WHERE clause contains two parameter markers, ?, which indicate where you want BIRT to insert the report parameter values at run time. The Like operator is a SQL pattern-matching option. Using Like, you can replace the parameter marker with a value, such as A%, to return rows where the vendor name starts with A. In a later procedure, you see the flexibility of using the Like operator instead of the = operator.
Task 8: Create data set parameters and bind them to the report parameters
In this procedure, you define two data set parameters that correspond to the ? markers in the query. You then bind each data set parameter to the appropriate report parameter. At run time, the data set parameters get the values from the report parameters, and pass the values to the query.
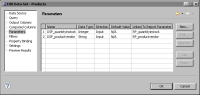
1 In Edit Data Set, choose Parameters. The Parameters page displays two placeholder data set parameters, which BIRT Report Designer created when you modified the query.
2 Define the first data set parameter.
1 Select the first parameter, then choose Edit.
2 In Edit Parameter, specify these values:
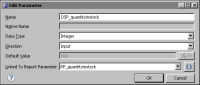
In Name, type the following text:
DSP_quantityinstock
In Data Type, select Integer.
In Direction, select Input.
In Linked to Report Parameter, select RP_quantityinstock. When Report Parameter Update Setting appears, choose No. This option binds the data set parameter to the RP_quantityinstock report parameter, without changing the properties defined for the report parameter.
Figure 13‑47 shows the complete data set parameter definition.
Figure 13‑47 Definition of the first data set parameter
3 Choose OK to save the data set parameter. The Parameters page displays the edited data set parameter.
3 Define the second data set parameter.
1 Select the second parameter, then choose Edit.
2 In Edit Parameter, specify these values:
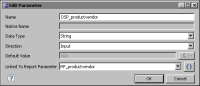
In Name, type the following text:
DSP_productvendor
In Data Type, select String.
In Direction, select Input.
In Linked to Report Parameter, select RP_productvendor. When Report Parameter Update Setting appears, choose No.
Figure 13‑48 shows the complete data set parameter definition.
Figure 13‑48 Definition of the second data set parameter
3 Choose OK to save the data set parameter.
The Parameters page, shown in Figure 13‑49, displays the edited data set parameters.
Figure 13‑49 Parameters page displaying the two data set parameters
4 Choose OK to save your changes to the Products data set.
Task 9: Test the report parameters
In this procedure, you test that the query is updated with the report parameter values.
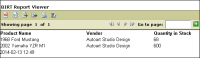
1 Choose Preview. In Enter Parameters, use the default values and choose OK. Figure 13‑50 shows the report output.
Figure 13‑50 Report displays rows that match the default report parameter values
2 Run the report using different parameter values. The report does not display any rows if none of the rows match the values you supply.
Task 10: Provide the option to select all vendors
The query and the design of the report parameters require the user to specify a minimum stock quantity and a specific vendor. The report displays only products meeting the specified minimum stock quantity and for the selected vendor. In this procedure, you provide the user with the option of selecting all vendors, so that the report displays all products—supplied by any vendor—that meet the specified minimum quantity. To provide this option, you modify the RP_productvendor report parameter to display an All Vendors value, and to send the appropriate value to the query.
1 Choose Layout to resume editing the report.
2 In Data Explorer, expand Report Parameters, right-click RP_productvendor, then choose Edit.
3 In Edit Parameter, under Selection list values, choose Static. This option supports creating user-defined values, whereas the Dynamic option does not.
The properties under Selection list values change to reflect the change from dynamic to static values.
4 Specify the values to display in the list box.
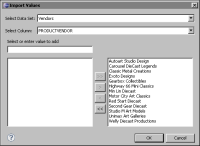
1 Choose Import Values. Import Values displays the first data set in the report, Products, and the values of the first field in the data set, PRODUCTNAME.
2 In Select Data Set, select Vendors.
3 In Select Column, select PRODUCTVENDOR. Import Values displays the values for the field.
5 Choose >> to import all values from the field.
Figure 13‑51 shows the selections you make in Import Values.
Figure 13‑51 Import Values showing the data set field values to import
6 Choose OK. Edit Parameter displays the imported values in the Values table, as shown in Figure 13‑52.
Figure 13‑52 Edit Parameter displaying the values that appear in the list box
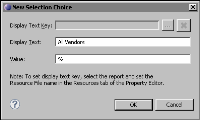
7 In Edit Parameter, add a new value to display in the list box.
1 Choose New next to the Values table.
2 In New Selection Choice:
In Display Text, type the following text:
All Vendors
In Value, type the following character:
%
Figure 13‑53 shows the definition of the new value.
Figure 13‑53 Definition of a new value
In SQL, % is a wildcard character that matches any sequence of characters. When the user selects All Vendors, the WHERE clause in the Products query is updated as follows:
WHERE ...
and productvendor Like %
This query returns all rows that have any productvendor value.
3 Choose OK to save the new value definition.
In Edit Parameter, the new value appears at the bottom of the Values table.
8 Designate the new value as the default value.
1 In the Selection values table, scroll to the bottom of the list.
2 Select the % value.
3 Choose Set as Default.
9 Specify how the values should be sorted when presented to the user.
1 Under Sort, in Sort by, select Value Column. This sort displays All Vendors at the top of the list in the list box because the value % appears before A.
2 In Sort direction, select Ascending.
10 Choose OK to save your changes to the report parameter.
11 Test the report parameter.
1 Choose Preview. Enter Parameters appears, as shown in Figure 13‑54. All Vendors is the first value in the list, and this value is selected by default.
Figure 13‑54 Enter Parameters displaying the updated vendor parameter
2 Provide values for the parameters.
For the first parameter, type the following number:
500
For the second parameter, use All Vendors.
Choose OK.
The generated report displays products, supplied by any vendor, where the quantity in stock is less than or equal to 500.
Task 11: Create a title that uses the report parameter values
Report parameters can be used for purposes other than filtering data. In this procedure, you add a report title that displays a report parameter value.
1 Choose Layout to resume editing the report.
2 Insert a text element at the top of the report.
3 In Edit Text Item, in the field with the value Auto, select HTML from the drop‑down list.
4 Type the following text:
Products with inventory less than <VALUE-OF>params["RP_quantityinstock"].value</VALUE-OF>
The <VALUE-OF> tag supports displaying a dynamic value. The expression params["RP_quantityinstock"].value refers to the value of the RP_quantityinstock report parameter.
5 Choose OK to save the edits to the text element.
6 Preview the report. Use the current parameter values.