In most cases, you add an element to a report in order to display the contents of the element. There are many good reasons, however, for hiding report elements conditionally. Using an element’s Visibility property, you can customize the information that a report displays. You can hide an element based on the output format or on a specific condition. You specify a condition by writing a Boolean expression that evaluates to either true or false.
The following examples describe cases for conditionally hiding an element. The examples also show the Boolean expressions to apply to the Visibility property.
Display a text message only for certain records. Assume you want the report to display a message when an account balance falls below a certain amount, such as $1,000.00. First, create a text element that displays something like “Your account balance is below the minimum balance required to waive the service fee.” Then, conditionally hide the text element by setting its Visibility property to the following expression:
row["accountbalance"] > 1000
When the expression returns true, the text element is hidden. Notice that you have to think the opposite when specifying the expression. You have to think about when you do not want the text to appear, rather than when you do. In this example, you want to display a message when the balance is less than $1,000.00. Therefore, you hide the text element when the balance is greater than $1,000.00.
Display a text message if a report returns no data. If the report uses parameters to prompt users to specify the data that they want to view, and it is possible for the report to return nothing, you can display a message, such as “No records found.” To accomplish this task, perform the following steps:
Create a column binding, named Row_Count, for example, that uses the aggregate function, COUNT, to get the number of data rows in a table. Remember, for each piece of computed data to use or display in a report, there must be a column binding.
Create a text or label element that displays the “No records found” message, then conditionally hide the element by setting its Visibility property to the following expression:
row["Row_Count"] != 0
The expression row["Row_Count"] refers to the Row_Count column binding that computes the number of rows. When Row_Count returns zero, the “No records found” message appears. Because an aggregate function processes all data rows in a table, you must place the text or label element in the header or footer row of the table. For information about using aggregate functions, see Aggregating data.
Display different pictures, depending on the values of a field. To add visual interest to a report, you want to display two stars next to an order total that equals or exceeds $10,000.00, one star for totals between $5,000.00 and $10,000.00, and nothing for totals less than $5,000.00. Create two pictures—one with two stars and the other with one star—and insert them next to the element that displays the order number. Use the following expression to hide the two-star picture conditionally. The expression hides the two-star picture when the order total is less than $10,000.00.
row["ordertotal"] <= 10000
Use the following expression to hide the one-star picture conditionally. The expression hides the one-star picture if the order total is less than $5,000.00 or more than $10,000.00.
Display different report sections, depending on the values of a field. For example, your staff are either full-time employees or contractors. You want to display different sets of information for these two groups. Create two report sections, one to show full-time employee information and another to show contractor information. Use the following expression to hide the section containing full-time employee information conditionally when the employee record is for a contractor:
row["classification"] == "fulltime"
Use the following expression to hide the section containing contractor information conditionally when the employee record is for a full-time employee:
row["classification"] == "contractor"
The Visibility property also provides you with the option to:
Hide an element, depending on the output format. For example, hide an element for HTML output and display it for the other output formats.
Specify different visibility conditions for different output formats. For example, hide an element in HTML if its value is x and hide an element in PDF if its value is y.
How to hide an element conditionally
1 Select the element to hide conditionally.
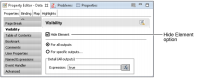
2 In Property Editor, under Properties, choose Visibility. The Hide Element option appears, as shown in Figure 8‑58.
Figure 8‑58 Hide Element option in Property Editor
3 Select Hide Element to specify that this element be hidden. If you want the element, such as an empty row, to always be hidden, this selection is all you need to do. To hide the element conditionally, specify the condition as well.
4 Select the report format to which to apply the hide condition.
To apply the hide condition for all report formats, select For all outputs.
To apply the hide condition for certain report formats, select For specific outputs. Also select this option to apply different conditions, depending on the report format.
5 Specify the hide condition by performing the following tasks:
1 Open the expression builder.
2 In the expression builder, create an expression that specifies the hide condition. Remember, think about when to hide the element, not when to display it. For example, to display the text message, Jumbo, when a loan amount exceeds $363,000.00, conditionally hide the text element using the following expression:
row["LoanAmount"] < 363000
This expression hides the text message when loan amounts are less than $363,000.00.
3 Choose OK.
6 Preview your report to test the conditional visibility.