The quickest way to change the size of a row or column is to drag the row or column boundary to the desired height or width. You can also resize a row or column by setting a specific row height or column width.
When setting a row height, preview the report to ensure that the results are what you want. The row height you specify is a fixed height. If the content cannot fit within the specified height, content is truncated.
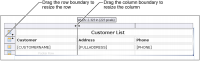
How to resize a column or row by dragging its boundary
1 Select the tab at the bottom left corner of the grid or table. Guide cells appear at the top and left sides of the grid or table.
2 In the guide cell area, select a row or column boundary, and drag it until the row or column is the desired size, as shown in Figure 8‑37.
Figure 8‑37 Resize rows or columns by dragging boundaries
How to specify a row height
1 Select the tab at the bottom left corner of the grid or table. Guide cells appear at the top and left sides of the grid or table.
2 Select the guide cell of the row to resize.
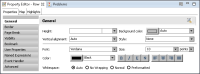
3 In Property Editor, under Properties, choose General. Property Editor displays the general properties of the row, as shown in Figure 8‑38.
4 Specify a value for Height. You can specify different units of measurements, including inches, centimeters, millimeters, and points.
How to specify a column width
1 Select the tab on the bottom left corner of the grid or table. Guide cells appear at the top and left sides of the grid or table.
2 Select the guide cell of the column to resize.
3 In Property Editor, under Properties, choose General.
4 Specify a value for Width. You can specify different units of measurements, including inches, centimeters, millimeters, and a percentage of the total grid or table width.