Creating a functional HTML button entails inserting the HTML button element in the desired location in the report, specifying the text to display on the button, then programming the button’s action. You can place an HTML button in the report page, a grid, table, list, and cross tab.
How to create an HTML button
1 Drag an HTML button element from the palette and drop it in the desired location in the report.
2 In HTML Button, specify the following values:
1 In Name, type a different name for the element if you do not want to use the default name. Each HTML button must have a unique name.
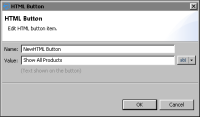
2 In Value, type the text to display on the button. Alternatively, select JavaScript Syntax or EasyScript Syntax to create an expression to display a dynamic or calculated value. Figure 32‑3 shows an example of text specified for Value.
Figure 32‑3 Definition of an HTML button
3 Choose OK. A message appears, providing information about writing code for the button. Choose OK.
The HTML button appears in the report.
3 While the button is selected, choose the Script tab.
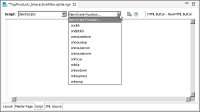
4 In the script editor, click New Event Function and select a button event from the drop-down list, shown in Figure 32‑4.
Figure 32‑4 Click New Event Function to display the list of button events
5 Write JavaScript code to program the button’s action for the selected event. The next section provides information about this task.
6 Run the report in the web viewer to test the button’s functionality. If you do not receive expected results, or if you receive an error, verify that the event handler script does not contain any problems.