On Users, the administrator chooses Add User to create a new user, as shown in Figure 2‑3. On Create New User—General, a side menu lists the following categories for which the administrator performs tasks to create a user, as shown in Figure 2‑4:
General
Configure general properties, such as user name, password, user e-mail address.
Assign User Groups
Assign one or more user groups to the user. Select applications that members of the user group can access.
Figure 2‑4 Viewing the side menu on Create New User
How to create a new user
This section demonstrates creating a user named Pam Castillo.
1 On Users, choose Add User.
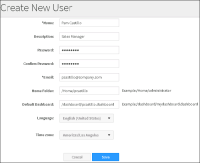
2 Set the following properties on Create New User—General, as shown in Figure 2‑5. A property name appearing with an asterisk (*) next to the name is a required property.
Name
Type the user name. The user name must not exceed 255 characters.
Description
Type a description for the user, such as job title.
Password
Type a password for the user. The password must be at least eight characters long, and must contain at least one lowercase letter, one uppercase letter, and one digit. Passwords can be up to 256 characters in length and can contain any characters except control characters or spaces. Passwords are case-sensitive. If you create a user using IDAPI, there is no restriction on what the password can be.
Confirm Password
Type the password again.
Email
Type the user’s e‑mail address.
Home Folder
Type a path for the user’s home folder, such as /home/username. The user’s home folder appears in Information Console.
Default Dashboard
Type the name of a dashboard. Alternatively, leave Default Dashboard blank.
To create a .dashboard file that is the default dashboard for all users, save any .dashboard file to the root folder of the volume, giving the file the following name:
default_dashboard.dashboard
If a user has a different dashboard URL set in the user’s My Profile, that dashboard is the default dashboard for that user.
Language
Select a language for which to display the user interface to the user. Alternatively, accept the default value, English (United States).
Time Zone
Select a time zone. Alternatively, accept the default value of America/Los Angeles.
Figure 2‑5 Configuring user properties on General
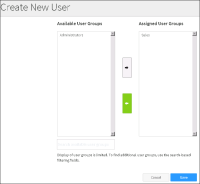
3 Choose Assign User Groups from the side menu.
4 On Create New User—Assign User Groups, assign Pam Castillo to the Sales user group by moving the Sales user group from the left‑hand list of user groups to the right‑hand list of user groups, as shown in Figure 2‑6. Use Search available user groups to isolate a particular user group or subset of user groups from which to choose, if necessary.
Figure 2‑6 Assigning a user group to a user
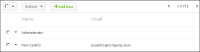
5 Choose Assign User Groups from the side menu. Choose Save. Confirm that you want to save the changes.
Pam Castillo appears in the list of users on Users, as shown in Figure 2‑7.