You export report data to extract some or all of the data from a report. For example, you can export customer sales data from a previous quarter, then use the numbers in a spreadsheet to create a forecast for an upcoming quarter. When you export data, you cannot export a table or chart element, but you can export the data displayed in both these elements. You can also export data from dashboard gadgets.
Actuate Viewers enable you to export data in the flat file formats described in this section. The viewers support the ability to export report data as a comma‑separated values (.csv) file, a pipe‑separated values (.psv) file, a tab‑separated values (.tsv) file, or a semicolon-separated values (.ssv) file. These files store data in a flat file format, which Excel can read. The difference between these formats is the character used as the data delimiter, which can be a comma, pipe, tab, or semicolon. You choose a format to export report data based on the requirements of the application to which you export the data, and the purpose for which you plan to use the exported data.
Once you choose a format, Excel displays the exported data in a spreadsheet. You can resize columns and format the data as you would do for any other spreadsheet.
How to export data in comma‑separated values (.csv) file format
1 From the main menu, choose Export Data.
2 On Export Data, Available ResultSets lists the report elements, such as tables, charts, cross tabs, charts and gadgets, and so on, that contain data. Select an element from which to export data.
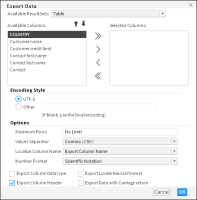
3 Available Columns lists the columns you can export from the specified table. You can export any of the data the report uses, including the data in aggregate rows and calculated columns. In Available Columns, select the columns to export one by one and choose the single right arrow after each selection, as shown in Figure 6‑4. To select all columns, choose the double right arrow.
Figure 6‑4 Exporting report data
To deselect a column, choose a column from Selected Columns, then choose the single left arrow. To deselect all the selected columns, choose the double left arrow.
4 In Encoding Style, select UTF-8, or specify a style in Other. If you do not specify a style, Actuate Viewer uses the local encoding style.
5 In Options, specify the following information:
In Maximum Rows, type the maximum number of data rows to export. To export all the data rows in the report, accept the default value of No Limit.
In Values Separator, choose the Comma (CSV) delimiter.
In Localize Column Name, select an option from the following:
Select Export Column Name to export the column name specified in the data source.
Select Export Column Display Name to export the column name specified in the report design.
Select Export Column Name and Display Name to export both.
In Number Format, do one of the following:
Choose Scientific Notation.
Choose Unformatted.
6 You can select the following additional options to export column data type, export the data in locale neutral format, export the column header, and export the data with carriage return.
Select Export Column Data Type to include the data type information in the flat file. In the following example, the second line identifies the type of data in the file:
FirstName, LastName, AccountID
STRING, STRING, INT
"Jane", "Doe", 1234 …
When you export report data that contains date‑and‑time values, by default, the values are formatted according to the current locale. For example, if you export the date 01/10/2009 in the original format, it can be interpreted as January 10, 2009 or October 1, 2009, depending on whether the locale is US or France. On Export Data, select Export Locale Neutral Format to export report data without considering locale information, so that the date is interpreted correctly in every locale.
When you select Export Column Header, viewers export the column header in addition to the data in the column. The spreadsheet displays each exported column below the corresponding column header.
When you select Export Data With Carriage Return, viewers export the data using a Carriage Return (CR) character for each line break.
Choose OK.
7 On File Download, the default name and the file extension of the spreadsheet file appear.
Choose Save.
8 On Save As, complete the following tasks:
1 In Save in, navigate to the folder in which you want to save the file.
2 In File name, change the name of the file. Choose Save. The comma‑separated values (.csv) file appears in the new location.
When you open the file, the output data appears as an editable Microsoft Excel worksheet. You can expand the columns to view all the data.
Use the same process to export data to pipe‑separated values (.psv) files, tab‑separated values (.tsv) files, and semicolon-separated values (.ssv) files.