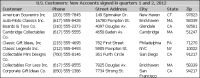
If you need to add more text or more space in the header area, you can add multiple column header rows. Figure 7‑19 shows a row with text added above the default column header row.
Figure 7‑19 A BIRT design displaying text in a row above the column header row
When you insert a column header row, to be able to display text that spans multiple columns, as shown in Figure 7‑19, you must merge the columns in that row. As Figure 7‑19 shows, you also can add a border to the new row.
How to add a new row
1 Select and right-click a column header. Choose Row.
2 To add a row above the selected column header, choose Insert Row Above. To add a row below the selected column header, choose Insert Row Below.
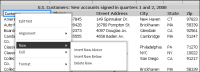
A new row appears in the position you specified. Figure 7‑20 shows a new row inserted above the default column header row. The row has the same number of columns and the same column widths as the row that follows.
Figure 7‑20 Inserting a new row above or below the column header row
How to merge column headers to type text that spans multiple columns
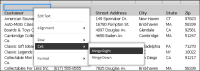
1 Select and right‑click the column header. Choose Cell➛Merge Right, as shown in Figure 7‑21. The first cell merges with the second cell to become a single, wider cell.
Figure 7‑21 Merging column headers
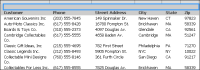
2 Repeat step 1 to merge all cells in the column. Figure 7‑22 shows the selection of a single cell, created by merging six cells.
Figure 7‑22 Result of merging all the column headers
3 To display text in this cell, double‑click in the cell, type the text, then press Enter.
4 To add borders:
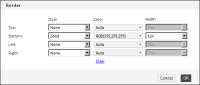
1 Select and right‑click the cell. Choose Format➛Border.
2 On Border, specify the type of border or borders to add. You can set the border style, color, and width. Figure 7‑23 shows the bottom border set to create a solid white border that is one pixel wide. Choose OK.