A filter condition is an If expression that must evaluate to True in order to include a data row. For example:
If the order total is greater than 10000
If the sales office is San Francisco
If the order date is between 4/1/2010 and 6/30/2010
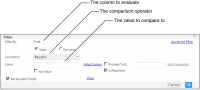
Figure 11‑1 shows an example of a condition defined in Filter. As the illustration shows, Filter helps you define the condition by breaking it down into the displayed parts.
Figure 11‑1 Filter displaying a filter condition
Specifying filtering options
You can filter data at the data set level and at the table level. Filtering at the data set level narrows the scope of data retrieved from the data set and can improve design‑time performance if the data set contains a large amount of data. Filtering at the table level narrows the scope of data displayed in a BIRT design and is the typical filtering option. If a BIRT design contains filters at both the data set and table levels, Report Studio executes the filter at the data set level first, then at the table level. Design the filters accordingly.
When creating a filter condition, users can specify whether or not the aggregate data in the BIRT design is recalculated to meet the filter condition. This feature is useful when comparing the filtered data values with the unfiltered totals, for example, when performing a percentage calculation of the unfiltered aggregate totals.
When you create a filter condition on a column containing Float or Double data type, the In, Not In, Equal to, and Not Equal To operators do not work as expected in Java-based applications. To make sure you obtain the results you expect, do one of the following:
When using the In or Not In operators in a filter condition specified on a computed column, make sure you round the values in the column to a specified number of digits. For example, the following expression rounds the value obtained by three decimal places:
Returns columns that are valid for more than one comparison value.
Country In USA, UK, France, Japan
Empty or blank values
Tests if a field contains a value or not.
E‑mail Is Null, Email Is Not Null
Excluding data
Excludes data that fulfills the condition.
Country Not In USA, UK, France, Japan
Order Amount Not Between 1000 and 5000
Product Code Not Like 'MS%'
Top or Bottom 'n' values
Tests if the column value is within the top or bottom 'n' values.
Use at the report table level or at the group level.
Use the Top/Bottom N dialog box to modify a group level filter.
Order Amount Top N 50
Median Price Bottom Percent 10
Comparing to a date value
Compares the date‑and‑time values in a column to a specific date.
The value supplied must be in one of the following formats, regardless of your locale:
3/26/2008
3/26/2008 2:30:00 PM
Use the calendar icon to select a date.
Order Date Equal To 3/26/2008
Shipped Date Equal To 3/26/2008 2:30:00 PM
Comparing to a string pattern
Tests if each string value in the column matches a string pattern.
Customer Like M%
Comparing to a value in another column
Tests values in one column against values in the specified column.
Price>MSRP
Defining a filter at the report table level
This section describes how to create a filter at the table level.
How to create a filter at the table level
1 Select and right‑click the column in the report for which you want to filter data.
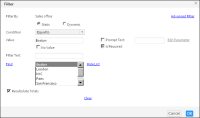
2 Choose Filter➛Filter. Filter appears, as shown in Figure 11‑2.
Figure 11‑2 Filter displaying the selected column
Filter By displays the column on which to apply the filter.
3 Select Static as the type of filter, if necessary.
4 In Condition, select the comparison test, or operator, to apply to the selected column. Depending on the operator you select, Filter displays one or two Value fields, or a completed filter condition.
5 If you select an operator that requires a comparison value, you can specify the value in one of the following ways:
In Value, type the value.
To select from a list of values, choose Select Values. A list of values appears. Select a value from the list. Figure 11‑3 shows the selection of Boston from the list of available sales office values.
Figure 11‑3 Specifying comparison values for a filter condition
If the list of values is long, type a value in Filter Text and choose Find. If found, Report Studio displays this value in the list. When you select the value, it appears in Value.
To specify null values, select No Value.
If you are filtering a detail table containing aggregate data, or a summary table, you can recalculate the aggregate data values for the retrieved data rows by accepting the default selection of Recalculate Totals. To calculate totals for all the data rows in the report table, deselect Recalculate Totals.
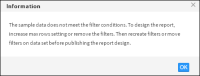
6 Choose OK. The filter takes effect. In cases where the sample data in the BIRT design does not meet the filter condition, the BIRT design does not display any data. Report Studio displays the message in Figure 11‑4. Always test a filter by running and viewing the generated BIRT design in Actuate Viewer.
Figure 11‑4 The message displayed when the sample data in the BIRT design does not meet the filter condition
How to select multiple values for a filter condition
The filter conditions IN and NOT IN require a list of values, for example IN ('Boston', 'New York', 'Philadelphia'). You can enter a list of values for a filter condition in the Filter or Advanced Filter dialogs using either of two methods, the method described in step 5 of How to create a filter at the table level or the method described below.
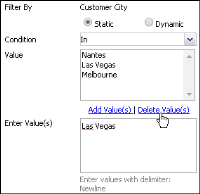
To add values to a filter condition, type the values in Enter Values, separated by a delimiter such as newline, or copy and paste the values. Then, choose Add Values, as shown in Figure 11‑5.
Figure 11‑5 Adding multiple values to a filter condition
To remove values from a filter condition, type the values in Enter Values, separated by a delimiter such as newline, or copy and paste the values. Then, choose Delete Values, as shown in Figure 11‑6.
Figure 11‑6 Deleting a value from a filter condition
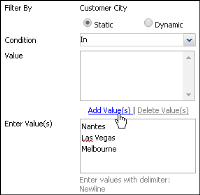
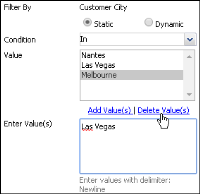
Make sure none of the values in Value is selected. Selected values are also deleted when you choose Delete Values. For example, in Figure 11‑7, when you choose Delete Values, Las Vegas and Melbourne are deleted, not just Las Vegas. If any of the values in Value is selected, Ctrl-click the value to deselect it.
Figure 11‑7 Deleting a selected value from a filter condition
The default delimiter is the newline character. To change the delimiter, you must change the value of the FilterValueDelimiter parameter in AC_SERVER_HOME \modules\BIRTiHub\iHub\web\iportal\WEB-INF\web.xml. Supported delimiters include comma (,), semicolon (;) and newline. For example, to change the delimiter to a comma (,) modify web.xml as follows:
<context-param>
<param-name>FilterValueDelimiter</param-name>
<param-value>,</param-value>
</context-param>
Defining a filter at the data set level
When you create a new BIRT design Report Studio provides the Table Builder wizard to help you select data fields and create a data set filter. Once these data fields appear in the BIRT design, you can no longer invoke Table Builder. Instead, you use Advanced Filter to create or modify a data set level filter condition. When you select Filter➛Slicer Filter from the context menu of the report table handle, the filter condition you specify using Advanced Filter is evaluated at the data set level.
How to create a data set filter
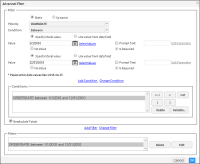
1 In Report Studio, in Available Data, choose Filter. Advanced Filter appears, as shown in Figure 11‑8.
2 To create a filter condition, complete the following steps:
1 In Filter By, select a column from the drop‑down list.
2 In Condition, select an operator. Depending on the operator you choose, one or two value fields appear, or a completed condition. The example in Figure 11‑8 shows the selection of the operator Between, and two corresponding value fields.
3 In the Value fields, do one of the following:
Type a value.
Choose Select Values, then select a value from the list of values that appears.
Use the calendar tool to select a date.
Select No Value to choose a Null value.
4 Choose Add Condition. Conditions displays the new condition, as shown in Figure 11‑8.
5 Choose Validate to verify the syntax of the new condition. In Information, choose OK.
6 Choose Add Filter. Filters displays the condition.
Figure 11‑8 Specifying a data set filter in Advanced Filter
Choose OK. Report Studio displays data fields that meet the filter condition in the BIRT design.
How to modify a data set filter
To modify a data set filter condition, complete the following steps:
1 In Available Data, select Filter. Advanced Filter appears.
2 In the Filters area, select the condition, then choose Edit.
3 Modify the condition by changing the values in Filter By, Condition, or Value.
To delete a filter, in the Filters area of Advanced Filter, select a filter and choose Delete. To delete a condition, in the Filters area of Advanced Filter, select a filter and choose Edit. Then, in the Conditions area, select a condition and choose Delete. Then, choose Change Filter. Choose OK. Verify that any remaining filter conditions display the expected results.