Mapping data from a database requires that you define many of the same properties as those that you define for mapping data from files. To map data from a database, first define the target database, provide a target table name, and choose a database data source. If necessary, to review the procedure for setting these properties, see “Defining a target database,” earlier in this chapter. Next, define the data set to retrieve from the source database using Table Declaration, as described in Defining a data set. Selecting a database in Datasource provides the option to define a query that retrieves a data set. “How to map data from an Oracle data source” provides more information about this process.
Defining a data set
To define a data set you must provide a query and set options for the query.
Query
Defines a SQL query from a relational database data source. You can type a query manually, and use Get columns to retrieve the columns from the data set.
Alternatively, you can use View database structure to select tables and columns. Use Datasource to select tables and their columns, and specify the column order.
Options
Enter the options required by the connection drivers. For example, when loading data from an Oracle database, it is recommended to include a parameter, such as PreFetchRows=10000.
The process of defining the target table structure is the same as the one discussed in “Defining table columns,” earlier in this section. While you edit the structure of a target data table, use Get columns to retrieve existing column information, then use Edit to make modifications. To create a new column, choose New, then provide information using Table Declaration, as shown in Figure 3‑22section.
How to map data from an Oracle data source
This procedure assumes you have already created an Oracle database connection.
1 Define the target database and table.
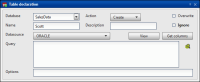
1 In Options, choose New from DB. Table Declaration appears, as shown in Figure 3‑34.
Figure 3‑34 Declaring a table from a database
2 In Table Declaration, choose the target database from the drop-down list, as shown in Figure 3‑35.
Figure 3‑35 Mapping data from an Oracle database
3 In Name, specify the name of the target table.
4 In Description, enter the table description.
5 In Action, choose Create.
6 Select Overwrite.
2 Define the data set.
1 In Datasource, choose the database data source.
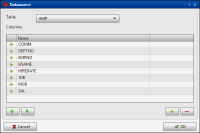
2 In Query, choose View database structure to build the query. Datasource appears.
In Datasource, choose a table from the table drop-down list. The column names appear, as shown in Figure 3‑36.
Use + and - to add or remove columns, and the up and down arrows if you need to change the column order.
In Datasource, choose OK. The column definitions appear, as shown in Figure 3‑36.
Figure 3‑36 Using the query builder
3 In Options, specify any options you wish to pass to the data driver.
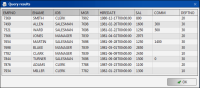
3 Choose View to validate the data connection and view the data. Query results appears, as shown in Figure 3‑38.
Figure 3‑37
Figure 3‑38 Viewing data from a database
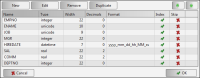
4 Choose Get columns to import the columns from the data set. The column definitions appear as shown in Figure 3‑39. The types are determined automatically, and all columns are indexed by default. Get columns overwrites the existing data set, and discards your existing changes.
Figure 3‑39 Getting the column definitions from the data set
5 Edit a column.
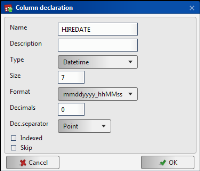
The example in Figure 3‑40 shows changing the format of the HIREDATE column, and setting the column as not indexed.
Figure 3‑40 Editing a Datetime column
1 Select the HIREDATE column and choose Edit.
2 In Type, select Date format.
3 In Format, select mm_dd_yyyy from the drop-down list.
4 Deselect Indexed. Choose OK.
6 In Project, choose Save. Choose Yes to save the project.
How to manage the loading process when exceptions occur
Users can decide not to stop the loading process when errors occur in the DATA tab. By default, the loading process stops whenever an error is encountered. However, thanks to a new ONERROR attribute in data table definition, it is now possible to choose whether you want the loading process to stop in the case of error or to continue loading. This allows the loading process to ignore any tables that present errors during the process, leaving them to be fixed and loaded later if desired. This can be particularly useful in the case of loading high volume tables needing overnight processing.
ON ERROR Attribute
In the DATA tab, clicking on the “minus” symbol (in the “On error” column) beside a table row, changes the “minus” symbol to an “arrow” symbol and deactivates the default “Fail on error” setting in the list of tables to be loaded.
Double clicking on the table opens its “Table declaration” window where you can see that the “Fail on error” check-box is now unchecked. Clicking the “arrow” symbol changes it back to “minus” and resets the “Fail on error” setting, checking the box once again. (See Figure 3‑41).
Figure 3‑41 Managing exceptions using the Data tab
_thumb.png)