Setting up iHub to join an existing cluster
This section assumes the administrator has already created a stand-alone iHub instance on one computer, as described in
“How to set up iHub to use the out-of-the-box (OOTB) PostgreSQL database,” earlier in this chapter. The stand-alone iHub instance is the machine that contains the shared configuration directory, which all nodes in the cluster access.
Before performing the cluster node installation, the administrator must also set up network sharing on the configuration folder and any required Encyclopedia volume folders, as described in
“Adding a node to a cluster,” in
Chapter 5, “Installing a BIRT iHub cluster.” It is the responsibility of the administrator performing the installation to make sure that all network sharing settings conform to the security policies in force for the environment.
This section refers to the machine containing the shared configuration directory as node1 and the cluster node accessing these shared resources as node2. Before performing a cluster node installation, the Administrator performs the following tasks:

On node1:

Turns off the private-network firewall

Obtains the machine host name and IP address

Tests the network accessibility of the machine

Sets the partition path for DefaultPartition in Configuration Console

Configures directory sharing and firewall settings in the network environment for the shared configuration and Encyclopedia volume folders

On node2:

Turns off the private-network firewall

Obtains the machine host name and IP address

Tests the network accessibility of the machine
The following section describes how to install and configure the iHub deployment bundle to join an existing cluster.
How to set up iHub to join an existing cluster
After extracting the contents of ActuateBIRTiHub.tar.gz and running the setup script as described in
“How to extract the contents of the iHub distribution package,” and
“How to run the setup script,” earlier in this chapter, perform the following tasks:
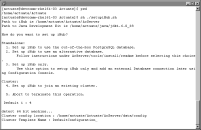
1 In the setupiHub menu, choose option 4, Set up iHub to join an existing cluster.
2 At the Cluster config location prompt, specify the configuration home location, as shown in
Figure 6‑33. For example, type:
/home/actuate/Actuate/AcServer/data/config
Press Enter.
Figure 6‑33 Specifying the cluster option, configuration home
location, and server template name
In an iHub cluster, the configuration home location, AC_CONFIG_HOME, is the shared directory that contains the acserverconfig.xml, acserverlicense.xml, and other related files.
For Cluster Template Name, specify a server template name from the available server templates listed in the shared acserverconfig.xml file, as shown in
Figure 6‑33. For example, type:
DefaultConfiguration
The default template name in the shared acserverconfig.xml in a cloud-based stand-alone iHub installation is DefaultConfiguration. Press Enter.
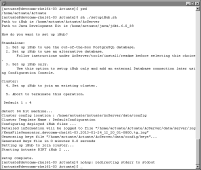
The script performs the following tasks, as shown in
Figure 6‑34:

Configures iHub deployment files

Writes setup and installation information to log files

Generates security key files

Sets up iHub to join the cluster

Starts BIRT iHub 2
Figure 6‑34 Completing the iHub cluster node setup
3 Log in to Configuration Console. In Simple view, scroll down to Account Settings. In New system password, type a new password. In Confirm system password, type the new password again. Then, choose Change password, as shown in
Figure 6‑35.
Figure 6‑35 Creating a new Configuration Console password
4 Scroll to the top of Simple view and choose Advanced view. In Advanced view, choose Servers. The new node appears in the list of servers.
For more information about configuring a cluster, see
Chapter 5, “Installing a BIRT iHub cluster,” earlier in this book, and Chapter 9, “Clustering,” in
Configuring BIRT iHub.


