How to add a resource group
1 From the Advanced view of Configuration Console, choose System Resource Groups.
2 On Resource groups, choose Add resource group.
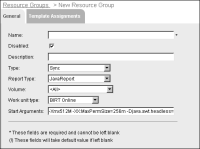
Resource Groups—New Resource Group—General appears, as shown in
Figure 8‑9.
Figure 8‑9 Adding a synchronous resource group
3 Supply the following parameter values:

Type a name for the resource group. Choose the name carefully because you cannot change it later.
Deselect the Disabled option, so that cluster nodes assigned to the resource group can run jobs that users send to the group. The default status of a new resource group is Disabled.
Type a description of the resource group.
Select the type of resource group Async, Sync, or View. You cannot change the type later.
To specify that all Encyclopedia volumes can use the Factories of the resource group, select All. Alternatively, select the name of the Encyclopedia volume that can use the Factory processes.
Select a work unit type.
Modify Start Arguments if necessary.
Type a minimum and maximum priority for jobs sent to an asynchronous resource group.
Choose OK.
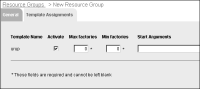
4 On Resource Groups, choose the resource group you just created.
On Properties, choose Template Assignments.
5 In Template Assignments, change the following settings, as shown in
Figure 8‑10:
Select Activate to make that server a member of the resource group so it can use the resource group’s Factory processes.
Select the maximum number of Factory processes to assign to the resource group.
For resource groups that support Java reports, type the minimum number of Factory processes.
Specify Start Arguments to optimize performance.
Figure 8‑10 Making server assignments to the new resource group
Choose OK.
6 Restart the cluster node or stand-alone server.