Tutorial 16: Writing an application that creates a user
In this tutorial, you build an application that logs in to a volume as Administrator and creates a user. The program demonstrates the following administration operations to create a user:
*Creates a user name and home folder
*Sets view preference, notification, e-mail, and job priority options
*Calls ActuateControl.CreateUser( )
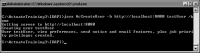
Figure 21‑13 shows the output to the command prompt window when the user creation operation succeeds.
Figure 21‑13 Message indicating that the user creation operation succeeded
To complete this tutorial, you need access to the following application classes and related files from Tutorial 15:
*Arguments.java
*ActuateController.java
*ActuateAPIEx.java
*ActuateAPILocatorEx.java
Task 1: How to write the application that creates a volume user
In this task, you create the AcCreateUser application. If you did not create Arguments.java, ActuateAPIEx.java, and ActuateAPILocatorEx.java in Tutorial 15: “Catching a SOAP message with Axis TCPMonitor,” you must also create these classes.
1 Navigate to or create the \ActuateTraining3\IDAPI\source directory. Create a new file called \ActuateTraining11\IDAPI\source\AcCreateUser.java and open the file for editing. Add import statements for com.actuate.schemas and java.rmi.RemoteException, and create an AcCreateUser class definition and main method, as shown in Listing 21‑4.
Listing 21‑4 AcCreateUser
import java.rmi.RemoteException;
import com.actuate.schemas.*;
 
public class AcCreateUser {
 
// set command line usage
public static final String usage =
"Usage:\n"+"
java AcCreateUser [options] userName homeFolder \n";
 
public static ActuateControl actuateControl;public static void createUser(String userName, String homeFolder) throws RemoteException {
 
// create a normal user with password same as userName
User user = actuateControl.newUser(userName, userName, homeFolder);
 
// Set user view preference to DHTML (defaults to DHTML in standard configuration)
// optionally - user.setViewPreference(ViewPreference.Default);
user.setViewPreference(UserViewPreference.DHTML);
 
// set notice options
user.setSendNoticeForSuccess(new Boolean(true));
user.setSendNoticeForFailure(new Boolean(true));
 
// set email options
user.setSendEmailForSuccess(new Boolean(true));
user.setSendEmailForFailure(new Boolean(true));
 
// create fake email address UserName@localhost
user.setEmailAddress(userName + "@" + "localhost");
 
// assign job priority
user.setMaxJobPriority(new Long(1000));
 
// create the user
actuateControl.createUser(user);
System.out.println("User " + userName
+ ", view preferences, send notice and email features,
plus job priority privileges created.");
}
public static void main(String[] args) {
String userName;
String homeFolder = "/home";
 
// set command line usage
Arguments.usage = usage;
 
// get command line arguments
Arguments arguments = new Arguments(args);
userName = arguments.getArgument();
homeFolder = arguments.getOptionalArgument(homeFolder) +
"/" + userName;
 
try {
actuateControl = new ActuateControl(arguments.getURL());
 
// Login
actuateControl.setUsername(arguments.getUsername());
actuateControl.setPassword(arguments.getPassword());
actuateControl.login();
 
// create user
createUser(userName,homeFolder);
 
}
catch (Exception e) {
e.printStackTrace();
}
}
}
1 To instantiate a User object and use ActuateControl.newUser( ) to set the userName, a password that is the same as the user name, and homeFolder attributes, type:
User user = actuateControl.newUser(userName, userName, homeFolder);
2 To set the viewer preference, type:
user.setViewPreference(UserViewPreference.DHTML);
3 To set the notification options, type:
user.setSendNoticeForSuccess(new Boolean(true));
user.setSendNoticeForFailure(new Boolean(true));
4 To set the e-mail notification options, type:
user.setSendEmailForSuccess(new Boolean(true));
user.setSendEmailForFailure(new Boolean(true));
5 To set the e-mail address, type:
user.setEmailAddress(userName + "@" + "localhost");
6 To assign the job priority, type:
user.setMaxJobPriority(new Long(1000));
7 To make the call to create the user using ActuateControl.CreateUser( ), type:
actuateControl.createUser(user);
8 To create an output message, type:
System.out.println("User " + userName + ", view preferences, send notice and email features, plus job priority privileges created.");
2 In the \ActuateTraining3\IDAPI\source directory, open the file called AcController.java, created in Tutorial 15: “Catching a SOAP message with Axis TCPMonitor,” for editing. If AcController.java does not exist, create a new file called AcController.java as instructed in Tutorial 15. Add a method to create a user as shown in Listing 21‑5.
Listing 21‑5 AcController with a createUser method
import java.io.File;
import java.io.FileOutputStream;
import java.io.PrintStream;
import java.net.MalformedURLException;
import java.rmi.RemoteException;
import java.util.Calendar;
import javax.xml.rpc.ServiceException;
import com.actuate.schemas.*;
 
public class AcController implements java.io.Serializable {
// control variables
public String authenticationId = null;
public String username = "Administrator";
private String password = "";
 
// server settings
public String actuateServerURL = "http://localhost:8000/";
 
// proxy operation
public ActuateSoapBindingStub proxy;
public ActuateAPIEx actuateAPI;
 
/**
* No-argument Constructor
*/
public AcController() throws MalformedURLException, ServiceException {
actuateAPI = new ActuateAPILocatorEx();
setActuateServerURL(actuateServerURL);
}
 
/**
* Constructor accepting serverURL as a parameter
*/
public AcController(String serverURL)
throws MalformedURLException, ServiceException {
actuateAPI = new ActuateAPILocatorEx();
setActuateServerURL(serverURL);
}
 
/**
* Create a new call object that can be used to send SOAP
* message to actuate server
* @return Call
* @throws ServiceException
*/
public org.apache.axis.client.Call createCall() throws ServiceException {
org.apache.axis.client.Call call =
(org.apache.axis.client.Call) actuateAPI.createCall();
call.setTargetEndpointAddress(this.actuateServerURL);
return call;
}
 
/**
* Login to actuate server with username and password
* Return true if login success
*/
public boolean login() {
boolean success = true;
com.actuate.schemas.Login request = new com.actuate.schemas.Login();
request.setPassword(password);
request.setUser(username);
try {
actuateAPI.setAuthId(null);
com.actuate.schemas.LoginResponse response = proxy.login(request);
authenticationId = response.getAuthId();
actuateAPI.setAuthId(authenticationId);
} catch (java.rmi.RemoteException e) {
// login failed
success = false;
}
return success;
}
 
/**
* Sets the ActuateServerURL
* @param serverURL The actuate server url to set
*/
public void setActuateServerURL(String serverURL)
throws MalformedURLException, ServiceException {
if ((proxy == null) || !serverURL.equals(actuateServerURL)) {
if (serverURL != null)
actuateServerURL = serverURL;
System.out.println("Setting server to " + actuateServerURL);
proxy = (ActuateSoapBindingStub)
actuateAPI.getActuateSoapPort(
new java.net.URL(actuateServerURL));
}
}
 
/**
* Sets the password.
* @param password The password to set
*/
public void setPassword(String password) {
if (password == null)
password = "";
this.password = password;
}
 
/**
* Sets the username.
* @param username The username to set
*/
public void setUsername(String username) {
if (username == null)
return;
this.username = username;
}
 
/**
* Returns the password.
* @return String
*/
public String getPassword() {
return password;
}
 
/**
* Returns the username.
* @return String
*/
public String getUsername() {
return username;
}
 
/**
* Send a single administrate message to create a user
* @param user
* @return AdministrateResponse
* @throws RemoteException
*/
public com.actuate.schemas.AdministrateResponse createUser(
com.actuate.schemas.User user)
throws RemoteException {
System.out.println("Creating user " + user.getName());
 
com.actuate.schemas.CreateUser createUser =
new com.actuate.schemas.CreateUser();
createUser.setUser(user);
createUser.setIgnoreDup(Boolean.TRUE);
 
com.actuate.schemas.AdminOperation adminOperation =
new com.actuate.schemas.AdminOperation();
adminOperation.setCreateUser(createUser);
 
return runAdminOperation(adminOperation);
}
}
3 Save and close all files.
Task 2: How to compile and run the CreateUser application
In this task, you compile and run the CreateUser application from the command prompt. The run command uses the following syntax:
java AcCreateUser [options] userName homeFolder
1 Open a command prompt window.
2 At the command prompt, type:
cd C:\ActuateTraining11\IDAPI
3 Add the axis client libraries, build path, and source path to the CLASSPATH environment variable. At the command prompt, type:
set CLASSPATH=C:\Actuate3\ServerIntTech3\Web Services\Examples\Axis Client\lib\*;C:\Program Files\Actuate11\ServerIntTech\Web Services\Examples\Axis Client\build;C:\Program Files\Actuate11\ServerIntTech\Web Services\Examples\Axis Client\source;
Press Enter.
4 To compile the Java application, type:
javac -d build source/AcCreateUser.java source/AcController.java
If you did not compile Arguments.java, ActuateAPIEx.java, and ActuateAPILocatorEx.java in Tutorial 15: Catching a SOAP message with Axis TCPMonitor, you must also compile these classes.
5 To run the Java application, type:
java AcCreateUser -h http://localhost:8000 testUser /Home
The Java application writes the following messages, shown in Figure 21‑14, to the command prompt when a volume login succeeds and the volume creates the user.
Figure 21‑14 Message indicating that login succeeds and a new user is created
Task 3: How to verify the creation of the user
In this task, you use the iHub administration tool to examine the results of the actions you completed in the earlier tasks of this tutorial.
1 Open BIRT iHub Visualization Console.
2 Log in as Administrator.
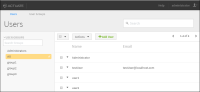
3 In Visualization Console, choose AdministratoriHub Administration. Users appears.
4 Verify that testUser exists in the list of Users, as shown in Figure 21‑15.
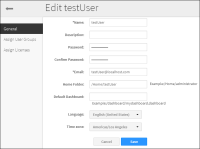
5 Choose testUser. Edit testUser appears.
Figure 21‑15 The list of users showing testUser
6 Verify that correct values appear in E-mail address and Home folder, as shown in Figure 21‑16.
Figure 21‑16 The general property values for testUser