When creating a dashboard, you have the option of choosing four different commentary types. It is recommended that one type be left as <Default>. This inserts the commentary type specified in the view as an element in the dashboard. For more information, see Creating a view.
1 In the Navigation Pane, choose Setup➛Dashboards➛Create.
2 In Setup Dashboard: <New>—Properties, complete the following tasks:
In Name, provide a name for the dashboard.
In Description, choose Edit. Provide a description. Then, choose OK.
In Categories, choose Edit. Select or create categories. Then, choose OK.
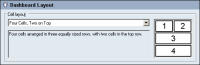
3 In Dashboard Layout, select an option from the list in Cell Layout. An example and description appear for each selected option, as shown in Figure 3‑1.
Figure 3‑1 Selecting a cell layout for a dashboard
4 In Cell contents, from each of the Cell contents lists, select an element to appear in each dashboard cell.
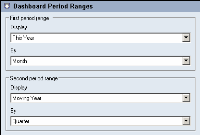
5 In Dashboard Period Ranges, specify period ranges for First period range and Second period range. For both period ranges, perform the following tasks:
1 In Display, select a period range.
To specify the range for charts and tables, select a period range value. For example, select This Year.
To show data for the selected period only, select Default.
To make charts and tables unavailable to the dashboard, select <None>.
2 In By, select a period type.
To specify the storage period type for charts and tables, select a storage period value. For example, select Month.
To specify the storage period type defined in the measure, select Default.
In Figure 3‑2, the First period range displays data for This Year by Month. The Second period range displays data for a Moving Year by Quarter.
Figure 3‑2 Defining period ranges for dashboard graphs and charts
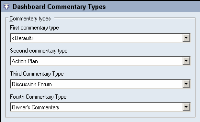
6 In Dashboard Commentary Types, select up to four commentary types. Each list contains all available commentary types.
1 In First commentary type, select a commentary type. Actuate recommends setting one commentary type to <Default>, as shown in Figure 3‑3. Each view defines a default commentary type that appears in a dashboard for the Owner’s Commentary type selection <default>.
Figure 3‑3 Defining a dashboard’s commentary types
2 In Second, Third, and Fourth Commentary Type, select a second, third, and fourth commentary type, if necessary.
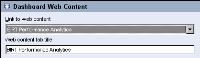
7 In Dashboard Web Content, to enable the web content tab, perform the following tasks:
1 In Link to web content, select a link to the web content to display.
2 In Web content tab title, type a name for the dashboard tab. The example in Figure 3‑4 shows a link to the BIRT Performance Analytics site.
Figure 3‑4 Specifying a link to web content
8 If necessary, choose Security. Then, assign access rights for the dashboard to groups and users.