Metrics Management supports the following methods for creating users:
Creating a single user
Duplicating a user
Using a template
Importing user credentials from an external user directory
Creating a single user
The tasks for creating a user include naming a user and configuring user authentication methods. Authentication methods include Active Directory and Active Directory Single-Sign On, Metrics Management, LDAP and LDAP Single-Sign On, Metrics Management Standard, and Windows authentication. The system specialist can configure the methods which are enabled for the database.
You cannot save the user if the distinguished name is already assigned. An error message indicates to which user the distinguished name is assigned.
The Active Directory method provides configuration information to the Active Directory Single Sign-on method when the single sign-on method is enabled at the database level. Similarly, the LDAP method provides configuration information to the LDAP Single Sign-on method.
Actuate recommends always configuring the Standard authentication method. The Standard authentication method defines a user’s native Metrics Management login name and password.
To enable Metrics Management authentication for a user, first ensure that the user resides in both Metrics Management and iHub. Then, enable Metrics Management authentication for the user in Metrics Management, and provide credentials for the user in iHub.
After configuring authentication, the system specialist can allow or deny a user access to the database. If a person leaves the organization, deny that user access to the database instead of deleting the user.
How to create a single user
1 In the Navigation Pane, choose Setup➛Users.
2 Choose Create.
3 In Setup User: <New>—Properties, complete the following tasks:
In Name, provide a name for the user.
In Description, choose Edit. Provide a description. Then, choose OK.
4 In Categories, choose Edit. Select or create categories. Then, choose OK.
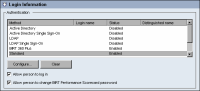
5 In Login Information, shown in Figure 2‑18, configure any of the following enabled authentication methods.
Figure 2‑18 Selecting the Standard authentication method
6 To configure the Active Directory authentication method, in Method, select Active Directory, and choose Configure.
1 In Configure User, choose Browse.
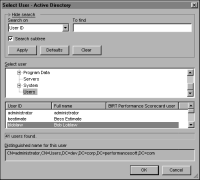
2 In Select User, browse to the directory server. Then, locate and select the user in the tree, as shown in Figure 2‑19. Choose OK.
Figure 2‑19 Selecting an Active Directory user
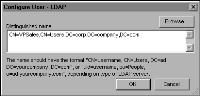
3 In Configure User, the user’s distinguished name appears, as shown in Figure 2‑20. Choose OK.
Figure 2‑20 Configuring Active Directory authentication
7 To configure the LDAP authentication method:
1 In Method, select LDAP, and choose Configure.
2 In Configure User, choose Browse.
3 In Select User, browse to the directory server. Then, locate and select the user in the tree. Choose OK. In Configure User, the user’s distinguished name appears, as shown in Figure 2‑21.
Figure 2‑21 Configuring LDAP authentication
4 Choose OK. You cannot save the user if the distinguished name is already assigned. An error message indicates to which user the distinguished name is assigned.
The LDAP method provides configuration information to the LDAP Single Sign-on method when the single sign-on method is enabled at the database level.
8 To configure the Standard authentication method:
1 In Method, select Standard method and choose Configure.
2 Provide a Metrics Management login name. The login name is not case-sensitive.
3 Select the Change Password check box. Provide a password under New password and enter it again under Confirm new password.
4 Choose OK.
9 To configure the Windows authentication method:
1 In Method, select Windows, and choose Configure.
2 In Configure User, select the appropriate domain from the Windows domain list.
3 From the Windows user list, select the user’s Windows login name from the available login names.
10 To make a user active, select Allow person to log in. To make a user inactive, deselect Allow person to log in.
11 To restrict this user from altering their password, deselect Allow person to change Metrics Management password. This option is only available with Standard authentication.
12 Choose Save.
Defining a user’s database access and type
Depending on license file settings, the system specialist defines read-write access for users, and specifies the user’s license type. The system specialist defines a user as a concurrent user, named user and data access only user.
If your organization purchased Named User licenses, the system specialist permits a user access to Metrics Management by defining him as a named user. A named user always has access to Metrics Management. If a user is not registered as a named user, when the user attempts to login an error message indicates that the number of concurrent user licenses is exceeded.
If your organization purchased a server license, the system specialist maintains the named user and data access only user lists for the database using Server Tools. For more information about configuring the user lists, see Configuring named users and Configuring data access only users.
How to define database access settings
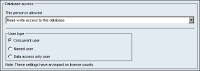
1 In Database access, to define read-write access, in This person is allowed, either select Read-write access to this database, or Read-only access to this database, as shown in Figure 2‑22.
Figure 2‑22 Defining database access settings
2 To restrict a user’s read-write database permission, select Read-only access to database. If your license permits, you can also change this setting to Read‑write access to database.
3 In User type, specify the user type to allow a user to access the database. Define the user as a concurrent, named, or data access only user.
4 Choose Save.
Duplicating a user
Instead of creating a user from a template, consider duplicating an existing user, and editing the copy to make changes to the new user. This process makes creating similar users faster and easier. You cannot have multiple users with the same login name. If you have entered a login name that is already in use, you receive an error message.
How to duplicate a user
1 In the Navigation Pane, choose Setup➛Users.
2 In Setup Users—Users, select a user name.
3 Choose Duplicate.
4 In Setup User: <Copy of User name>, type a user name in Name.
5 In Authentication, type a Metrics Management login name. Choose OK. Then, type a new login name, and choose Save.
6 Edit other user settings as desired.
7 Choose Save.
Using a template to create a user
Create a user template, either by defining user properties in a new user object, or by creating a template from an existing object. Then, create new users from the template.
How to create a user template
For more information about creating a user template, see Creating a template.
Metrics Management supports creating users from the Active Directory, Metrics Management, LDAP, or Windows authentication methods, if the method is configured for the database. Metrics Management creates users by importing the selected users’ names and authentication settings. To enable importing Metrics Management users from iHub, you must log in to Metrics Management using Metrics Management authentication.
Metrics Management supports using a template to define all users’ preferences, favorites, and privilege and security settings. Otherwise, define settings individually after creating users.
How to create users from an authentication method
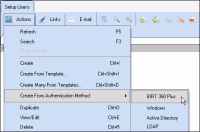
1 In the Navigation Pane, choose Setup➛Users.
2 In the main window, choose Actions➛Create From Authentication Method, and select the appropriate authentication method. In the example in Figure 2‑23, Metrics Management authentication is chosen.
Figure 2‑23 Creating users from the Metrics Management authentication method
3 In Import Users, in Available, select the appropriate directory to specify users that are available for import. Users appear in Available, as shown in Figure 2‑24.
Figure 2‑24 Selecting the User directory in Available
4 Select an available user. Choose Add to move the user to Selected. To move all available users to Selected, choose Add All.
Prospective Metrics Management user displays the values from which Metrics Management creates user names. If no name appears, Metrics Management names users based on user IDs.
5 To apply a user template to all new users, in Create users from this template, select a template.
6 To import users, choose OK. Imported users appear in Setup Users.