It is common for reports to present data that is organized into meaningful groups. For example, rather than displaying a basic list of sales orders, an orders report can group orders by customers. In addition to providing a more effective way to view data, grouped reports have other advantages over reports that are not grouped.
When grouping data, you can:
Add titles or other text at the beginning of each group.
Add averages, counts, subtotals, or other summary information at the beginning or end of each group.
Insert a page break before or after each group.
Generate a table of contents that displays the values of every group. The table of contents supports navigating to specific locations in the report.
Remove duplicate field values.
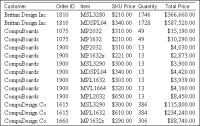
Compare the reports in Figure 12‑7 and Figure 12‑8. The report in Figure 12‑7 displays customer order information in a simple list. The data rows are sorted by customer name, then by order number. Notice the repeated customer name and order ID information.
Figure 12‑7 Report showing data in a simple list
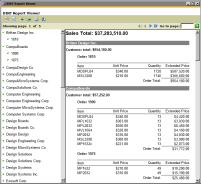
Figure 12‑8 Viewing a report that shows customers, orders, and items
The report in Figure 12‑8 shows data from the same data set. Unlike the first report, it groups the data rows by customers and order numbers, removing the repeated customer names and order numbers. The customer name and order totals appear at the beginning of each customer group. The order number appears at the beginning of each order group, and a subtotal appears at the end of each order. When the report is displayed in the BIRT report viewer or in PDF format, a table of contents appears to the left of the report.
The report in Figure 12‑8 uses the customer and order ID fields to create two groups. The customer group is the outer, or top, group. The orders group is within the customer group. There is no limit to the number of groups that a report can contain. For example, the sample report can contain two additional groups, one to organize customers by state, and another to organize states by region. Practically, however, a report that contains too many groups can make the report difficult to read.
How to group data
The instructions in this section assume that you already inserted data in a report.
1 In the layout editor, select the table element or list element that contains the data that you want to group.
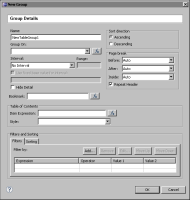
2 In Property Editor, choose the Groups tab, then choose Add. New Group, shown in Figure 12‑9, displays the properties you can set for the group.
Figure 12‑9 New Group
3 Specify the properties of the group.
In Name, type a name for the group. The name identifies the group and appears in the Edit Group context menu, so you can easily find a specific group for editing later.
In Group On, select the field on which you want to group. The drop‑down list displays all the fields associated with the table. You can group on a field in the table or a field that you have not used in the table. To group on a field that you have not used in the table, you must first create the column binding.
In Interval, you can select a grouping interval, then specify a range. You can also specify the initial value to use for calculating numeric intervals. For information about grouping by intervals, see Grouping data by intervals.
In Hide Detail, specify whether or not to display the detail rows. Select this option to display only summary data in the group’s header or footer rows.
In Table of Contents—Item Expression, specify the expression that returns the values to display in the auto-generated table of contents. By default, the group values appear in the report’s table of contents.
In Table of Contents—Style, select a style to apply to the values in the table of contents. For information about styles and how to create them, see Formatting report content.
In Sort Direction:
Select Ascending to sort the group values in ascending order.
Select Descending to sort the group values in descending order.
For Page Break, you can control where page breaks occur. To display each group of data on its own page, insert a page break before or after each group. You can also specify if the group header appears at the top of each page. For information about setting page breaks, see Designing a multipage report.
In Filters, you can specify a filter condition to select group values that meet a certain criteria. For information about filtering group values, see Filtering data.
In Sorting, you can specify that the group values be sorted by a field other than the field on which the data is grouped. For information about sorting group values, see Sorting data at the group level.
Choose OK to save the group.
The table includes two new rows, group header and group footer, as the example in Figure 12‑10 shows. BIRT Report Designer places a data element in the group header. This data element displays the values of the field (PRODUCTCODE, in this example) on which the group is based.
Figure 12‑10 Group header and group footer rows in a table
4 Preview the report. The data is organized in groups.
5 To create additional groups, repeat all the previous steps.