Managing JDBC drivers
Use the JDBC driver manager to install and manage drivers. You access the JDBC driver manager, shown in
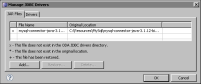
Figure 5‑2, from the data source editor. To indicate which drivers are available for use, the JDBC driver manager displays symbols next to the file names in the JAR files list.

A symbol x indicates that a file, previously available to BIRT, is no longer in the JDBC drivers directory. Reports that use this driver cannot access the underlying data source. To solve this problem, you must restore the driver in the JDBC drivers directory.
An asterisk (*) indicates that a file does not exist in the original location from which you installed the driver. Reports that use this driver can still access the underlying data source as long as the driver is in the JDBC drivers directory.
A plus sign (+) indicates that a file has been restored to the JDBC drivers directory.
In
Figure 5‑2, the JDBC driver manager indicates that the JAR file is no longer in the JDBC drivers directory.
Figure 5‑2 Managing JDBC drivers
Adding a JDBC driver
To install a JDBC driver, the JDBC driver manager prompts you to select the JAR file that contains the JDBC driver. The JAR file you select is copied to the following directory:
eclipse\plugins
\org.eclipse.birt.report.data.oda.jdbc_<version>\drivers
The driver or drivers contained in the JAR file located in this directory are available to all your report designs.
How to add a JDBC driver
This procedure assumes you are creating a new JDBC data source, and you need to install a new driver because the driver that the database requires is not available in the list of drivers.
1 In New JDBC Data Source Profile, shown in
Figure 5‑1, choose Manage Drivers.
2 In Manage JDBC Drivers, choose Add to install the JAR file that contains the driver.
3 Navigate to the directory that contains the JAR file. Select the JAR file and choose Open. Manage JDBC Drivers shows the new JAR file.
4 Choose Drivers to see the list of installed drivers, as shown in
Figure 5‑3.
Figure 5‑3 Viewing JDBC driver classes
5 Optionally, set the properties for a driver, using the following steps:
1 Select the new driver, then choose Edit.
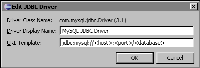
2 In Edit JDBC Driver, specify the following information:
In Driver Display Name, type a user-friendly name that describes the driver. This name appears in parenthesis next to the driver class name in Driver Class on New JDBC Data Source Profile.
In URL Template, type the URL format that the driver requires. This URL format appears in Driver URL on New JDBC Data Source Profile.
Figure 5‑4 shows an example of properties specified for a MySQL JDBC driver.
Figure 5‑4 Properties specified for a JDBC driver
3 Choose OK. Manage JDBC Drivers displays the new display name and URL template syntax suggestion.
6 In New JDBC Data Source Profile, specify the connection properties to connect to the JDBC data source. The Driver Class list displays the installed driver.
Deleting a JDBC driver
If you are upgrading a driver, delete the JAR file that contains the current driver before adding a new file. If the JAR file contains more than one driver, the driver manager deletes all drivers in the JAR file.
How to delete JDBC drivers in a JAR file
1 Right-click an existing JDBC data source, then choose Edit from the context menu. Edit Data Source appears.
2 Choose Manage Drivers to open the JDBC driver manager.
3 Select the JAR file that contains the driver, then choose Delete.
BIRT Designer removes the JAR file and any drivers that it contains from the JDBC drivers directory.
Restoring a JDBC driver
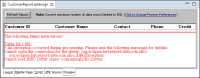
When you install a new version of BIRT Designer, the process replaces all the files in the eclipse directory and all the drivers installed in the JDBC drivers directory are lost. Reports that use a JDBC driver to access a data source display an error when you run them.
Figure 5‑5 shows an example of such an error. To solve this problem, use the JDBC driver manager to restore the drivers.
Figure 5‑5 Report displaying a Cannot load JDBC Driver class error
How to restore a JDBC driver
1 In Data Explorer, right-click the JDBC data source, then choose Edit from the context menu. Edit Data Source appears.
2 In Edit Data Source, choose Manage Drivers to open the JDBC driver manager.
The JDBC driver manager indicates that the driver used by the report no longer exists in the JDBC driver directory.
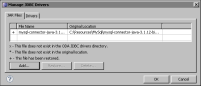
3 Select the JAR file to restore, then choose Restore. BIRT Designer restores the driver from the original location to the JDBC driver directory and replaces the x next to the file name with a plus sign (+), as shown in
Figure 5‑6.
Figure 5‑6 JDBC driver restored