Cells that define a campaign activity for a specific segment
Properties that define specific activities
Segments of data on which cells operate
Media appropriate to communicate with the segment
Resolution tables for history and response records
Strategies that identify campaign goals
To configure a campaign using BIRT Analytics, use Campaign Workflow to define workflows, stages, permissions, and a resolution level for a campaign.
Creating a campaign workflow
A workflow defines a role required to complete campaign tasks and activities. A workflow includes one or multiple stages and users. In a workflow stage, each user is assigned permissions required to complete tasks. For example, the role Campaign Manager can include two users, one with permission to initiate an activity such as generating messages to a group of customers. In the same workflow, another user may have permission to receive responses and initiate new messages.
How to create a workflow
1 Choose Workflow—Campaign workflow.
2 In Campaign Workflow, select Configuration, and choose Workflow.
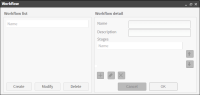
3 In Workflow, choose Create, as shown in Figure 7‑1.
Figure 7‑1 Creating a new workflow for a campaign
4 In Workflow detail—Name, type a name of a role that completes campaign tasks, such as Campaign Manager.
5 In Workflow detail—Description, describe the purpose or goal of this workflow. For example, name and describe the goal of Campaign Manager.
6 Create at least one stage in the workflow. You must create all stages in a workflow before executing a campaign.
7 In Workflow, choose OK.
Creating a stage
A workflow includes at least one stage. A stage supports defining users as task owners and assigning to each task owner the permissions required to perform tasks. Using multiple stages supports grouping sets of tasks and activities in a workflow. You must define all stages in a campaign workflow before executing the campaign. Executing a campaign locks the campaign workflow, preventing modifications.
Use stages to organize a workflow. For example, a typical workflow has two stages:
Stage1, Define/Validate
Stage2, Load/Response
Different users can have defined tasks in each stage. Organizing a workflow using a logical sequence of stages supports one role, such as Campaign Manager, which is responsible for completing tasks in multiple stages of a campaign.
For example, in a typical company, one group owns data collection tasks, another group owns data validation tasks, and another group owns data modeling and analysis tasks. A workflow uses stages to sequentially group tasks in a campaign. Stages support timely completion of tasks triggered by time and tasks triggered by events.
How to create a stage in a workflow
1 In Workflow detail, choose “create”.
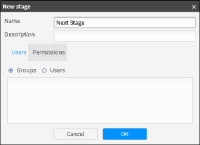
2 In New Stage—Name, type a name that identifies the stage in the workflow.
3 You have the possibility of sharing tasks with individual users or with user groups. In the “Users” tab, select either “Groups” or “Users” to display the list of available Groups or Users in the “New Stage” tab. Here we chose “Groups”. In New Stage, choose OK, as shown in Figure 7‑2.
Figure 7‑2 Creating a new stage
Note: Before being able to share your work with a User or a User Group, you must first create the Group and assign the Users, via the BA Admin tool. Whenever a new user is added to a User Group, he or she automatically inherits all existing permissions that have been given to that group.
About assigning permissions
A workflow requires at least one stage. For practical purposes, you must define users and permissions sufficient to complete tasks in each stage. To demonstrate assigning permissions and users in different workflow stages, consider the following procedure, for example.
How to assign permissions on stages in a workflow
To create three stages in a workflow called Campaign Manager:
1 Create stage1, called generate messages.
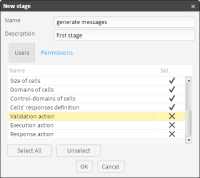
2 In stage1, assign users Admin and User1 all permissions except Execution, Response, and Validation actions. To assign all permissions for a stage to one user:
1 In New Stage, in Users, select a user, then choose Permissions.
2 In Permissions, select any permission name, then choose Select.
3 To remove a permission, in Selected for a permission name, double‑click the green check mark.
4 To assign a user all permissions except three, select all permissions, then double‑click each of those three, as shown in Figure 7‑3.
Figure 7‑3 Adding user permissions to a new stage
3 Create stage2, called Validate.
4 In stage2, assign a user only the Validation action permission.
5 Create stage3, called Execution and Response.
6 In stage3, assign Execution action and Response action permissions to Admin and User2.
The resolution level for a campaign identifies a database column in which records used to generate campaign activities are stored. For example, a campaign that contacts all customers typically uses customer ID records stored in the Customers table to generate activities. Defining a resolution level for a campaign links history and response records generated by the campaign to the records used to generate campaign activities.
How to define a resolution level for a campaign
1 In Campaign Workflow, select Configuration and choose Resolution level.
2 In List of levels, choose Create.
3 In Level detail, type a name that describes a column in which to store the history and response data for the campaign.
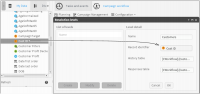
4 From My Data, drag a column on which to resolve the campaign and drop it in Record Identifier, as shown in Figure 7‑4. The column selected as Record Identifier must be discrete. In other words, each value must appear in only one column record.
Figure 7‑4 Creating a resolution level for a campaign
5 Choose OK. Column names for storing campaign history and response records appear in a new table named CWorkflow, as shown in Figure 7‑5.
Figure 7‑5 Creating a resolution table for a campaign
6 In Resolution levels, choose OK.
Defining a media condition
A media condition associates a media type and a selection or segment of records. Defining specific media conditions supports assigning a specific media condition to a campaign cell. For example, associating the email media type and a selection of valid email address records enables a cell to send email messages to valid recipients.
How to define a media condition
1 In Campaign Workflow, select Configuration➛Media.
2 In Media list, choose Create.
3 Define the following media details, as shown in Figure 7‑6:
In Name, type characters that establish a media name for selection in a campaign cell.
In Description, describe this media type and purpose.
Select a listed media type to associate with this media name.
Figure 7‑6 Defining media details
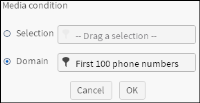
4 In Media condition, define a media condition using one of the following options:
Choose Selection. Drag a selection from Data Tree and drop it in Selection.
Choose Domain. Drag a segment from Data Tree and drop it in Domain.
For example, a media condition can limit a specific phone to call only the first one hundred phone records. Create a segment containing records 1 through 100 in [Customers].[Telephone]. Drag the First 100 Phone Numbers segment and drop it in Domain, as shown in Figure 7‑7.
Figure 7‑7 Defining a media condition
Choose OK.
Defining an action goal
You can associate an action with each campaign cell that describes a goal for the cell. In Campaign Workflow, action is a descriptive term only. Campaign Workflow includes the following actions:
Marketing
Informative
Collect
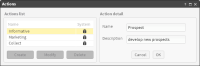
For example, assign the Informative action to a cell that has a goal of sending advertising messages. Alternatively, define a new action goal, such as Prospect.
How to define an action goal
1 In Campaign Workflow, select Configuration➛Actions.
2 In Actions list, choose Create.
3 Define the following action details, as shown in Figure 7‑8.
In Name, specify an action name for selection in a campaign cell.